
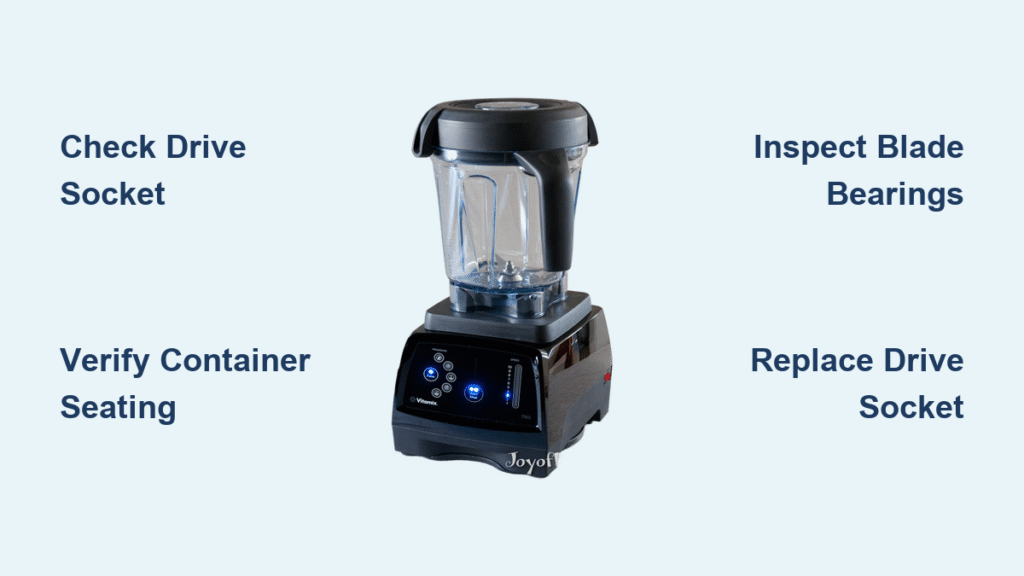
Your Vitamix powers on, the motor hums, blades whirl—but nothing happens. Ingredients sit untouched while the machine spins uselessly above them. This frustrating scenario turns your powerful blender into an expensive paperweight, leaving you with chunky smoothies and half-processed soups despite the machine appearing to work normally.
When your Vitamix spins without blending, you’re experiencing a mechanical disconnect between motor power and actual blending action. This guide walks you through systematic troubleshooting to identify and fix the root cause, whether it’s a simple assembly issue or component failure. You’ll learn to diagnose problems quickly, perform safe checks at home, and determine when professional help is needed—all without risking further damage to your appliance.
Recognize True Spinning-Not-Blending Symptoms
Stationary Ingredients Despite Motor Operation
You hear the motor running at normal speed, but your ingredients remain completely still in the container. This critical symptom indicates the blade assembly isn’t properly engaging with the motor drive system. Unlike normal blending where ingredients immediately begin moving toward the blades, here they stay perfectly positioned as if untouched. This complete lack of ingredient movement while the motor runs confirms a mechanical failure in the power transfer system.
Empty Container Rotation Versus Loaded Failure
Your Vitamix blade assembly spins freely when the container is empty, creating that familiar whirring sound, but fails to create the vortex needed for blending once you add ingredients. This specific failure pattern suggests a problem with the drive socket or coupling mechanism that can handle light loads (empty container) but fails under normal blending resistance. The container might even appear to spin normally when empty, tricking you into thinking the unit is functioning correctly.
Inconsistent Blending With Unprocessed Sections
When ingredients blend unevenly—some areas becoming smooth while others remain completely chunky—it indicates partial engagement between components. You might notice certain sections of your mixture getting processed while other pockets stay untouched, creating a frustrating “dead zone” effect. This inconsistent performance suggests wear in drive components that allows just enough power transfer for minimal blending but not complete processing.
Diagnose Common Root Causes
Drive Socket Wear and Separation
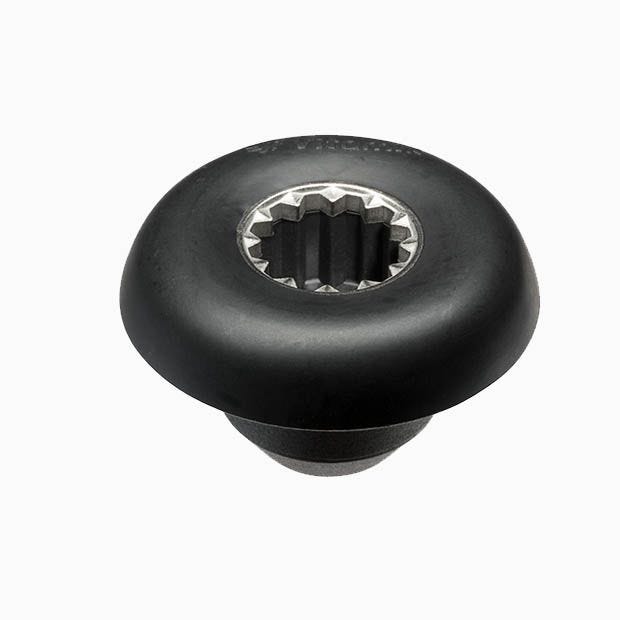
The drive socket serves as the critical connection point between your Vitamix motor and the blade assembly. Made of durable rubber, this component gradually wears down with regular use, eventually developing cracks or complete separation. When this happens, the motor spins freely but cannot transfer power to the blades. You might notice small rubber fragments accumulating around the base or hear a distinctive “slipping” sound when attempting to blend.
How to Check for Drive Socket Failure:
– Unplug your Vitamix completely before inspection
– Remove the container and examine the black rubber drive socket on the motor base
– Look for visible cracks, missing sections, or complete separation from the mounting point
– Check for rubber debris collected around the motor base area
Improper Container Placement Issues
Even slight misalignment between the container and motor base prevents proper engagement of the drive system. Your Vitamix requires precise seating to function correctly—without the distinctive “click” that confirms proper alignment, the drive socket cannot connect securely with the blade assembly. This common issue often occurs when users rush the setup process or don’t rotate the container fully into position.
Container Seating Verification Process:
– Ensure the container sits perfectly flush against the motor base without gaps
– Listen carefully for the audible “click” as you rotate the container clockwise
– Check for any wobbling or rocking motion when the container is in place
– Confirm the container handle aligns properly with the front of the unit
Blade Assembly Bearing Degradation
Inside your Vitamix container, the blade assembly contains sealed bearings that facilitate smooth rotation. Over time, these bearings can fail due to liquid seepage, age, or excessive strain from overloading. When bearings wear out, the blade assembly spins freely without generating the necessary torque to move ingredients, creating the spinning-but-not-blending problem.
Warning Signs of Bearing Failure:
– Unusual grinding, squealing, or scraping sounds during operation
– Visible wobble or wiggling of the blade assembly while spinning
– Liquid leakage around the base of the blade assembly
– Excessive heat buildup in the container bottom during use
Perform Quick Diagnostic Tests
Empty Container Spin Assessment
Remove all ingredients and run your Vitamix for 10 seconds on medium speed. Observe the blade behavior carefully—smooth, consistent rotation indicates motor health, while irregular spinning patterns or wobbling suggest blade assembly problems. If the container spins normally when empty but fails with ingredients, this confirms a drive system issue rather than motor failure.
Manual Resistance Check
With the unit unplugged, manually rotate the blade assembly using the container handle. A properly functioning assembly turns smoothly with consistent resistance throughout the rotation. Excessive play, grinding sensations, or uneven resistance during this test indicates potential bearing failure or drive component damage.
Drive Socket Stability Verification
Gently pull upward on the drive socket—properly secured sockets resist moderate pulling force without dislodging. If the socket lifts easily or feels loose on the motor shaft, immediate replacement is necessary. A secure socket remains firmly in place with no noticeable movement when tested this way.
Implement Targeted Repair Solutions
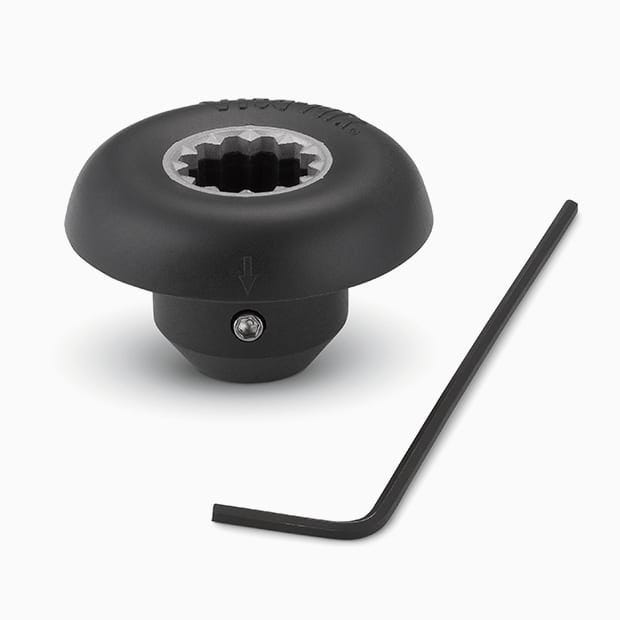
Replace Worn Drive Socket (15-Minute Fix)
Required Tools:
– Phillips head screwdriver
– Model-specific replacement drive socket
– Needle-nose pliers (optional for stubborn sockets)
Step-by-Step Replacement Process:
1. Unplug your Vitamix and remove the container
2. Carefully invert the motor base to access the drive socket screws
3. Remove the three retaining screws around the socket perimeter
4. Gently pull the old socket straight up and off the motor shaft
5. Align the new socket with the motor shaft flat spot for proper orientation
6. Press firmly until the socket seats completely on the shaft
7. Replace and evenly tighten the retaining screws
8. Test with an empty container before attempting to blend ingredients
Correct Container Seating Problems
Inspect the container base for damage, debris, or dried residue that might interfere with proper seating. Clean the contact points thoroughly with warm, soapy water, ensuring no obstructions prevent full engagement. Pay special attention to the locking mechanism area where residue commonly accumulates.
Proper Container Alignment Technique:
– Position the container on the base without twisting initially
– Ensure the container handle faces directly forward before rotation
– Listen for the definitive “click” as you rotate clockwise into place
– Run your finger around the container base to confirm no gaps exist
Blade Assembly Replacement Considerations
When bearing failure occurs, complete blade assembly replacement becomes necessary. This repair requires model-specific parts and moderate mechanical skill. Before proceeding, verify warranty coverage as Vitamix often covers this repair for units under 7-10 years old. Check part availability for your exact model and review return policies before purchasing replacement components.
Prevent Future Spinning-Not-Blending Failures
Master Proper Assembly Technique
Always seat containers firmly before operation. The distinctive click confirms proper engagement—never force rotation beyond this natural stopping point. Taking an extra five seconds to ensure perfect alignment prevents most container seating issues that lead to spinning-but-not-blending problems.
Establish Regular Maintenance Routine
- Weekly: Wipe the drive socket area with a damp cloth to remove debris
- Monthly: Inspect the drive socket for early signs of wear or cracking
- Quarterly: Deep clean container base and locking mechanism with mild detergent
Practice Smart Load Management
Avoid overfilling containers beyond the maximum fill lines indicated on your specific model. Excessive loads strain drive components, accelerating wear on sockets and bearings. When processing tough ingredients, use the tamper properly and blend in smaller batches to reduce mechanical stress.
Determine When to Seek Professional Help
Evaluate Warranty Coverage Options
Contact Vitamix customer service with your model and serial number readily available. Many spinning-but-not-blending issues fall under warranty coverage, especially for units under 7-10 years old. Provide a clear description of the symptoms and diagnostic steps you’ve already performed to expedite the process.
Identify Service Center Indicators
Seek professional service when you notice multiple components showing wear simultaneously, the motor makes unusual sounds beyond normal operation, electrical issues accompany mechanical problems, or DIY replacement parts don’t resolve the issue after proper installation.
Consider Cost-Benefit Analysis
Professional repair typically costs $75-$150, while new Vitamix units range from $300-$600. Factor in your appliance’s age, remaining warranty coverage, and sentimental value when deciding between repair and replacement. For units under five years old, repair is usually the most cost-effective solution.
Model-Specific Failure Patterns
Legacy Models (Pre-2015)
Older Vitamix models feature different drive socket designs requiring specific replacement parts. Check your exact model number before ordering components, as compatibility varies significantly across generations. These older units may experience more frequent drive socket failures due to different material specifications.
Ascent Series Models
Newer Ascent series blenders incorporate improved drive socket designs with enhanced durability. Warranty coverage typically extends to 10 years for mechanical failures on these models, providing greater peace of mind. The digital interfaces on these units may also provide diagnostic codes for certain mechanical issues.
Explorian Series Units
Budget-friendly Explorian series models may experience drive socket issues sooner due to different material specifications. Fortunately, replacement parts remain readily available and affordable for these popular entry-level models. Regular maintenance becomes even more critical for extending the lifespan of these units.
Final Resolution Steps
Your Vitamix spinning without blending typically stems from drive socket failure, improper container seating, or blade assembly bearing problems. Begin with simple visual inspections and seating verification before moving to component replacement. Most users successfully resolve this issue within 30 minutes using the drive socket replacement process outlined above.
Keep your model number handy when ordering replacement parts, and don’t hesitate to contact Vitamix support—they often provide free replacement components for units under warranty. Implement regular maintenance to prevent future failures: clean the drive socket weekly, verify container seating before each use, and avoid overloading your blender. With proper care, your Vitamix should continue delivering powerful blending performance for many years to come.


