Your Vitamix blender suddenly refuses to start, the display remains dark, and you’re left staring at a container full of ingredients that won’t blend—this frustrating scenario happens to countless Vitamix owners when the base fails to recognize the container. Container detection issues strike without warning, turning your powerful kitchen workhorse into an expensive paperweight. The good news is that most of these problems stem from simple, fixable causes you can address in minutes without professional help or costly repairs.
Let’s get straight to diagnosing why your Vitamix can’t “see” your container and exactly how to restore normal operation. Whether you own an Ascent, Explorian, or older Vitamix model, these proven solutions will have your blender working reliably again. You’ll learn specific cleaning techniques, reset procedures, and compatibility checks that solve the vast majority of container detection failures.
Quick Container Detection Test to Identify Your Issue
Before diving into complex fixes, perform this 30-second diagnostic test to pinpoint your specific problem. Place your container on the base and observe whether there’s any response—lights, sounds, or vibrations. Complete silence typically indicates a detection problem rather than a motor failure.
Try these immediate troubleshooting steps:
– Lift and reset the container three times, rotating it slightly with each placement
– Press down firmly on the container lid while attempting to start the blender
– Check for wobbling—the container should sit completely flat on the base
– Listen carefully for subtle clicks when properly seating the container
If your Vitamix responds inconsistently to these tests—sometimes starting with extra pressure but failing under normal conditions—you’re likely dealing with sensor alignment issues rather than complete detection failure. This inconsistency points to minor obstructions or slight misalignments that prevent consistent communication between the container and base.
How Vitamix Container Detection Actually Works
Understanding your blender’s detection system helps target your troubleshooting. Vitamix containers contain metal components that interact with magnetic sensors in the base. When properly seated, these components create a circuit that tells the blender a container is present and properly locked. Without this confirmation signal, safety protocols prevent operation regardless of how many times you press the start button.
Common Signs of Detection Failure
Specific symptoms help identify detection issues versus other problems. Watch for these telltale signs:
– Complete absence of lights or sounds when container is placed
– Error codes indicating “container not detected” or similar messages
– Inconsistent operation where the blender works sometimes but not others
– The container appears properly seated but blender remains unresponsive
Container Sensor Cleaning Guide That Actually Works

Most detection failures resolve with thorough sensor cleaning. This 5-minute process restores functionality in approximately 90% of non-detection cases, making it the essential first step before attempting more complex solutions.
Required Cleaning Tools for Sensor Maintenance
Gather these simple household items before beginning:
– Soft-bristled toothbrush (unused)
– Isopropyl alcohol (70% concentration)
– Lint-free microfiber cloth
– Cotton swabs for precision cleaning
– Compressed air can (optional but helpful)
Step-by-Step Sensor Cleaning Process
Follow these precise steps for maximum effectiveness:
1. Power down completely—unplug your Vitamix and wait 30 seconds
2. Remove container and set it aside on a stable surface
3. Locate sensor ring—identify the raised circular area in the base center
4. Brush gently around sensor edges with dry toothbrush to dislodge debris
5. Apply alcohol to cloth first—never spray directly onto electronics
6. Wipe sensor area using firm circular motions to remove residue
7. Clean container bottom—focus specifically on the metal ring area
8. Air dry thoroughly for at least 2 minutes before testing
Pro tip: Establish a monthly cleaning routine for your sensor area, especially if you frequently blend sticky ingredients like nut butters or frozen fruit mixtures that can create stubborn residue.
Motor Base Reset Procedures That Fix Detection Errors
When cleaning doesn’t solve the problem, electronic resets often restore container detection. These procedures clear temporary sensor calibration errors without affecting your warranty or requiring technical expertise.
Standard Reset Method for Quick Fixes
This basic reset works for most intermittent detection issues:
– Unplug Vitamix for 30 seconds to discharge residual electricity
– Plug back in and wait exactly 10 seconds for systems to initialize
– Place container firmly on base with proper alignment
– Press start button within 3 seconds of placement
Deep Reset for Persistent Detection Failures
For stubborn cases where the standard reset fails:
– Unplug Vitamix for a full 5 minutes
– Remove container during this waiting period
– Plug in and immediately press pulse button 5 consecutive times
– Place container and test detection functionality
This comprehensive reset recalibrates the entire sensor system and often resolves detection problems that seemed permanent.
Container Compatibility Verification Process
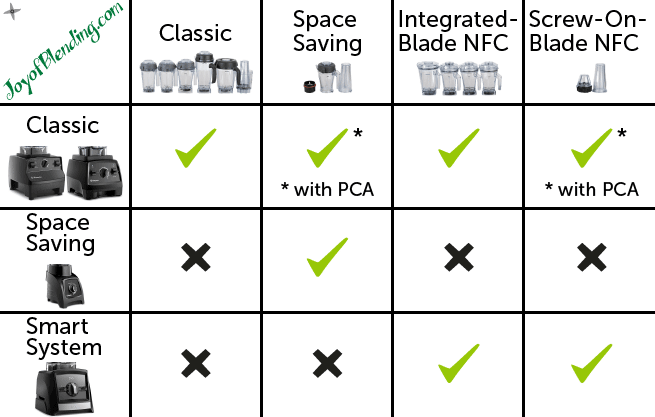
Using incompatible container-base combinations causes permanent detection failures that cleaning and resets cannot fix. Not all Vitamix containers work with all bases, and mixing models creates fundamental detection issues.
Model-Specific Compatibility Requirements
Different Vitamix series have distinct compatibility rules:
– Ascent series: Requires Smart Detect containers with specific magnetic patterns
– Legacy models: Work with standard containers but not Smart Detect versions
– Explorian series: Has limited container options compared to newer models
Verification checklist:
– Locate model numbers stamped on container base
– Find base model number on bottom sticker or label
– Cross-reference Vitamix’s official compatibility chart online
– Never assume personal cup adapters work with full-size bases
Identifying Physical Incompatibility Issues
Incompatible containers exhibit telltale physical characteristics:
– Sitting too high or too low on the base
– Visible gaps between container and base rim
– Different magnetic patterns that prevent signal transmission
– Requiring excessive force to lock into place
These containers will never trigger detection regardless of how thoroughly you clean sensors or perform resets.
Professional Repair vs DIY Solutions Decision Guide

When home fixes fail, understanding your repair options saves both time and money. Most detection issues fall into predictable categories with clear solutions paths.
When DIY Solutions Are Appropriate
Certain situations warrant continued home troubleshooting:
– Sensor cleaning: Always worth repeating with more thorough technique
– Base resets: Zero risk with potential high reward
– Container inspection: Simple visual checks for damage or warping
– Contact cleaning: Basic maintenance that requires no tools
When Professional Assistance Is Necessary
Seek expert help when you encounter:
– Physical damage: Visible cracks in base or container structure
– Electrical issues: Sparks, burning smells, or unusual noises
– Sensor replacement: Requires technical expertise and specialized tools
– Warranty coverage: Don’t risk voiding remaining warranty period
Cost reality check: Professional sensor replacement typically costs $75-150, while new bases start around $200. Consider your Vitamix’s age and model value when deciding between repair and replacement.
Prevent Future Detection Problems With Simple Habits
Implement these straightforward maintenance practices to prevent 95% of container detection issues before they start. These take mere minutes monthly but save hours of troubleshooting and potential repair costs.
Monthly Maintenance Routine
Create this simple habit for reliable detection:
– Clean sensor area with damp microfiber cloth during routine cleaning
– Inspect container base for cracks, warping, or heat damage
– Check for wobbling when seated on counter before using
– Test detection with empty container weekly to catch issues early
Best Practices During Daily Use
Small behavior changes make a big difference:
– Wipe spills immediately from base to prevent residue buildup
– Avoid dishwasher for containers to prevent warping from heat
– Store containers separately from base to maintain shape
– Handle gently when placing and removing to avoid sensor misalignment
Storage tip: Keep a small microfiber cloth near your Vitamix for quick sensor cleaning after each use—this habit prevents most detection issues before they start.
Emergency Workarounds for Immediate Blending Needs
When you need your Vitamix immediately and permanent fixes aren’t possible, these temporary solutions can restore limited functionality until proper repairs.
Firm Pressure Technique
Apply steady, even downward pressure on the container lid while starting the blender. This sometimes overcomes minor sensor misalignment by forcing better contact. Use this method only as a temporary fix—continued excessive pressure can damage internal components over time.
Strategic Container Repositioning
Rotate your container in 90-degree increments between startup attempts. Some users discover specific alignment positions work temporarily when standard placement fails. Mark successful positions with a small piece of tape for quick reference during future use.
Important warning: These emergency workarounds indicate underlying issues requiring permanent solutions. Continued reliance on temporary fixes may worsen the problem or create safety hazards, so address the root cause as soon as possible.
Your Vitamix container detection problem most likely stems from dirty sensors or minor alignment issues that simple cleaning can resolve. Start with thorough sensor cleaning—this fixes the majority of cases within minutes. If cleaning fails, systematically work through reset procedures and compatibility verification. Remember that consistent maintenance prevents most detection failures before they occur, keeping your Vitamix operating reliably for years. When permanent solutions remain elusive, Vitamix customer service provides model-specific guidance for your exact combination—don’t hesitate to contact them with your base and container model numbers ready.


