
You’re feeding fresh celery through your Omega juicer when suddenly the pulp chute goes silent. The motor strains, produce keeps entering the hopper, but nothing exits the other side. This frustrating scenario—where your omega juicer pulp not coming out—is one of the most common issues Omega owners face. The culprit is almost always the celery end cap, that small but critical component designed to increase extraction but prone to causing blockages when misused. Understanding why this happens and knowing exactly how to fix it will save you from potential motor damage and restore your juicer’s optimal performance.
The good news is that most pulp backup situations are entirely preventable and easily resolved with simple adjustments. Whether you own an Omega 8006, 8004, or similar horizontal masticating model, this guide walks you through immediate troubleshooting steps, proper adjustment techniques, and long-term prevention strategies that keep your juicer running smoothly for years to come.
Why Your Omega Juicer Pulp Has Stopped
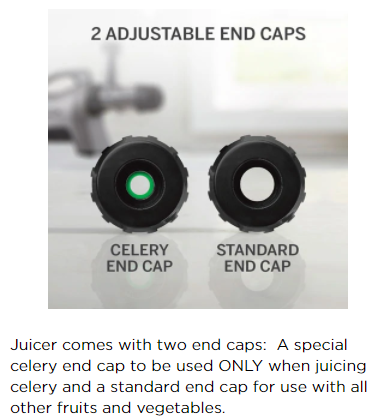
The celery end cap on your Omega juicer serves a specific purpose that can backfire when misused. This component creates a tighter seal at the juicing chamber exit, which increases compression and extraction pressure on whatever you’re processing. The design allows the machine to wring more juice from celery and fibrous vegetables, resulting in drier pulp and higher yield overall. However, when this seal is too tight or used with the wrong produce, the pulp loses almost all its moisture before exiting and becomes compacted inside the chamber.
Dry, compacted pulp creates a blockage that interrupts the continuous flow through your juicer. You might notice the motor straining harder than normal, a change in the operating sound, or simply a complete absence of pulp exiting the chute. This problem escalates quickly during extended juicing sessions with fibrous produce like celery, leafy greens, or wheatgrass, where the continuous pressure builds without adequate release points.
Critical mistake to avoid: Never assume tighter settings always mean better extraction. More pressure should mean more juice, right? Actually, your juicer needs a balance—enough pressure to extract effectively, but enough space for the pulp to actually exit the chamber. When that balance shifts too far toward pressure, the system grinds to a halt with pulp jammed inside.
What to Do When You First Notice Reduced Pulp Flow
When you see pulp output decreasing but haven’t yet reached a complete blockage:
– Immediately slow your feeding rate to give the system time to clear
– Listen carefully for changes in motor sound that indicate developing resistance
– Check the pulp texture—if it’s becoming unusually dry or compacted, adjust now
– Loosen the celery end cap by 1/8 to 1/4 turn clockwise while the machine runs
These micro-adjustments during operation prevent most complete blockages before they occur. Waiting until pulp has completely stopped flowing puts unnecessary strain on your motor and auger system.
Quick Fix for Immediate Relief

When pulp stops coming out and your motor sounds like it’s struggling, immediate action prevents potential damage. The first step is straightforward: stop juicing immediately and turn off the machine. Continuing to run a jammed juicer overheats the motor and can cause permanent damage to the auger or drive system.
Once the machine is off, locate the celery end cap at the base of the juicing chamber. Rotate it counterclockwise to loosen the setting—this reduces back pressure and creates a larger exit opening. You should feel and hear the pressure release almost immediately. In many cases, this simple adjustment is all it takes to dislodge the backup and restore normal flow. The compacted pulp will suddenly expel from the chute, often in a burst once the pressure releases.
Complete Blockage Removal Process
If loosening doesn’t restore flow within 10 seconds:
1. Turn off and unplug your Omega juicer completely
2. Remove the celery end cap entirely by rotating counterclockwise
3. Use the included scrub brush to gently clear pulp from the chamber exit
4. Inspect the juicing screen for compacted material that may need removal
5. Run a small amount of water through the system to flush remaining debris
6. Reinstall the end cap at a noticeably looser setting than before
Pro tip: Keep a second end cap cleaned and ready for immediate replacement during long juicing sessions. This eliminates downtime waiting for parts to dry when clearing blockages.
Master Your Celery End Cap Settings
The celery end cap adjustment is both an art and a science that improves with practice. Different produce types require different pressure settings, and finding those sweet spots maximizes your juice yield while preventing backup issues. Leafy greens and soft fruits work best with looser settings that allow quick material passage without clogging. Harder vegetables like carrots and celery can handle tighter settings for maximum extraction, but only up to a point.
Start with a medium-tight setting as your baseline for most juicing tasks. From there, you can tighten slightly when processing celery or other fibrous vegetables, always watching and listening for signs of developing backup. The ideal setting produces relatively dry pulp while maintaining steady, uninterrupted flow from the pulp chute. If you notice the motor working harder or pulp output decreasing, loosen the cap incrementally until flow normalizes.
Produce-Specific Adjustment Guide
| Produce Type | Recommended Setting | Visual Pulp Indicator |
|---|---|---|
| Leafy greens | Loosest setting | Moist but not dripping |
| Celery/cucumber | Medium-tight | Slightly damp to touch |
| Carrots/beets | Tighter setting | Dry but not powdered |
| Wheatgrass | Tightest setting | Very dry, crumbly texture |
When switching between produce types during a single juicing session, adjust the end cap between changes rather than searching for one universal setting. Begin with loose settings for leafy greens, tighten for celery, then adjust again for carrots or apples. This proactive approach prevents the majority of backup issues before they develop.
Essential Cleaning Procedures
The celery end cap requires consistent cleaning to function properly, yet many owners overlook this critical maintenance step. After each juicing session, remove the end cap and wash all components with warm water and liquid dish soap. The included scrub brush is specifically designed to clean the small openings and adjustment threads that collect pulp residue. Pay extra attention to the central exit opening and the threading around the cap’s circumference, as these areas are most prone to buildup.
For stubborn dried pulp, soak the end cap components in warm, soapy water for several minutes before scrubbing. This softens accumulated residue and makes removal much easier. A soft toothbrush works well for accessing the adjustment threads and detailed areas that the main brush might miss. After scrubbing, rinse all components thoroughly with clean water and allow them to air dry completely before reassembly.
Critical warning: Never reinstall damp components. Residual moisture in the adjustment mechanism leads to bacterial growth and can affect how the cap fits when reinstalled. Taking the extra minute to ensure everything is dry pays dividends in consistent performance.
Prevent Backup During Extended Juicing Sessions
Prevention starts before you even begin juicing. Process produce in an order that minimizes risk—begin with softer, higher-moisture items like tomatoes or citrus, then progress to firmer vegetables that tolerate higher pressure. This approach lets the juicer operate at lower pressures initially while the mechanism warms up and settles into efficient operation. Jumping straight into large quantities of celery on the tightest setting is a recipe for immediate backup.
Take micro-breaks during extended juicing sessions. Pause every 30 to 60 seconds, or after processing roughly 8 to 10 ounces of produce, to let the system clear accumulated material. These brief interruptions prevent gradual compaction within the chamber and give you a chance to verify that pulp is flowing freely. The habit takes minimal time but prevents most backup scenarios during heavy production runs.
Time-saving shortcut: Cut produce into uniform pieces that match your feed tube diameter. This creates consistent pressure within the chamber and prevents overloading that leads to blockages. Never force produce down the tube—that’s a sure path to pulp backup.
Recognize Warning Signs Before Complete Blockage
Experienced juicer operators develop a sense for when backup is developing, allowing correction before complete blockage occurs. The motor sound provides your best early warning system—a normally smooth hum becoming strained or irregular indicates the auger is encountering resistance from compacted pulp. Trust your ears; if something sounds different, something is different inside the chamber.
Pulp volume and appearance offer additional clues. A visible reduction in pulp exiting the chute, even though your feeding rate hasn’t changed, signals developing backup. Similarly, pulp that appears unusually dry, compacted, or fibrous suggests the end cap setting may be too tight for current conditions. Wet, sloppy pulp indicates the opposite problem—a setting so loose that extraction suffers. Both conditions warrant adjustment to find the optimal middle ground.
Temperature Check Technique
Place your hand on the juicer housing during operation—excessive heat (beyond normal warmth) indicates increased friction from developing blockage. If the housing becomes noticeably warm to the touch within the first few minutes of operation, reduce the end cap pressure immediately. This simple tactile check prevents 90% of motor-damaging backup situations before they become critical.
Long-Term Maintenance for Reliable Performance

Beyond session-by-session cleaning, periodic deep inspection ensures the celery end cap continues functioning properly over years of use. Examine the adjustment threads for wear, damage, or accumulated debris that could impede smooth rotation. If the cap becomes difficult to tighten or loosen, or fails to hold a consistent setting during operation, replacement is necessary before the problem worsens.
Inspect the juicing screen and auger alongside end cap maintenance, as problems in these components can contribute to or mimic end cap-related backup issues. A damaged screen may allow larger pulp particles to accumulate in problematic areas, while a worn auger fails to compress material effectively, leading to unexpected symptoms that mirror backup.
When replacement becomes necessary, order parts from the manufacturer or authorized distributors to ensure compatibility with your specific Omega model. End cap designs vary between juicer variants, and using incorrect or aftermarket parts affects performance and may void warranty coverage. Keep a note of your model’s part numbers to streamline future maintenance needs.
Keep Your Omega Juicer Running Optimally
The celery end cap is a powerful feature that enhances juicing efficiency when used correctly but demands attention and periodic adjustment to prevent problems. Understanding that tighter settings increase extraction at the cost of increased backup risk empowers you to make informed decisions about pressure throughout each session. Regular cleaning and proper maintenance of the end cap and related components ensures consistent performance over the life of your machine.
The golden rule: Never leave the end cap on the tightest setting when pulp flow has stopped or significantly reduced. This single principle, consistently applied, prevents the majority of pulp backup issues Omega juicer owners encounter. Combined with proper produce preparation, periodic adjustment during extended sessions, and regular maintenance, you can enjoy reliable performance and maximum juice yield from your Omega juicer for years of continued use. Your omega juicer pulp not coming out problem becomes a thing of the past when you master these simple techniques.


