

Your meat grinder suddenly stops in the middle of processing a batch of venison, leaving you with half-ground meat and a frustrating problem. When your electric meat grinder won’t power on or struggles during operation, the motor has likely failed—but replacing the entire appliance costs significantly more than fixing the motor itself. This complete meat grinder motor repair guide shows you exactly how to diagnose motor problems, select the right replacement, and complete the repair with confidence. Whether you’re maintaining a basic home unit or a more powerful grinder, understanding this process saves money and extends your kitchen equipment’s lifespan without requiring professional help.
Spot These Critical Motor Failure Warning Signs
Before disassembling your meat grinder, confirm the motor is actually the problem rather than other components. Most motors fail gradually, giving you early warning signs that allow timely intervention before complete breakdown occurs.
Overheating and Burning Smells Indicate Imminent Failure: If your motor becomes excessively hot during normal operation or emits a distinct burning odor—especially during extended grinding sessions—the internal windings are likely deteriorating. This symptom typically worsens progressively over weeks or months. Ignoring these warnings almost guarantees complete motor failure, so address overheating immediately to prevent total burnout.
Unusual Noises Signal Bearing or Armature Damage: Listen for grinding, clicking, or irregular humming sounds that weren’t present when your grinder was new. A properly functioning motor runs with a consistent, smooth hum. Any abnormal noise pattern suggests failing bearings or damaged armature components. Investigate these sounds promptly before they lead to complete seizure and more extensive damage.
Power Loss Reveals Winding Weakness: When your grinder struggles with cuts it previously handled easily, the motor is losing torque. Notice if it stalls on smaller pieces or takes longer to process the same amount of meat. This gradual power reduction indicates weakening windings or worn internal components. Address this issue before the motor fails completely during an important grinding session.
Match Replacement Motors to Your Grinder’s Specifications

Selecting the correct replacement motor requires understanding how power ratings, speed configurations, and physical dimensions affect grinding performance. Replacement motors come in standardized options designed specifically for meat grinder applications.
Power and Speed Configuration Guide
Replacement motors are manufactured in five standard power-speed combinations:
- 80W at 9,000 RPM: Suitable only for very light-duty applications and minimal grinding volumes
- 250W at 10,000 RPM: Handles moderate household use effectively
- 350W at 12,000 RPM: The most popular mid-range option for typical home grinding
- 450W at 13,000 RPM: Provides extra power for tougher cuts and frozen meat
- 500W at 14,000 RPM: Maximum power for heavy commercial-style home use
The 350W-12,000 RPM configuration represents the ideal balance for most home users, delivering sufficient torque for medium-density cuts while maintaining reasonable energy consumption. Choose higher-wattage options only if you regularly process large volumes, tendons, or frozen meat—these draw more current and generate more heat, potentially requiring enhanced ventilation.
Verify Physical Compatibility Before Purchase
Check these critical dimensions before ordering your replacement motor:
- Gear compatibility: Must match your grinder’s 9/10-inch gear system
- Weight: Approximately 50 grams (1.76 ounces)
- Dimensions: Standard size of 1.18 x 0.79 x 0.39 inches
- Mounting pattern: Must align precisely with your grinder’s existing holes
A mismatched motor won’t mount properly regardless of electrical compatibility. Measure your existing motor’s dimensions and verify your grinder’s gear size before purchasing a replacement. Most standard replacement motors like the 5430 series are designed specifically for common home meat grinder models.
Select the Best Motor Material for Longevity
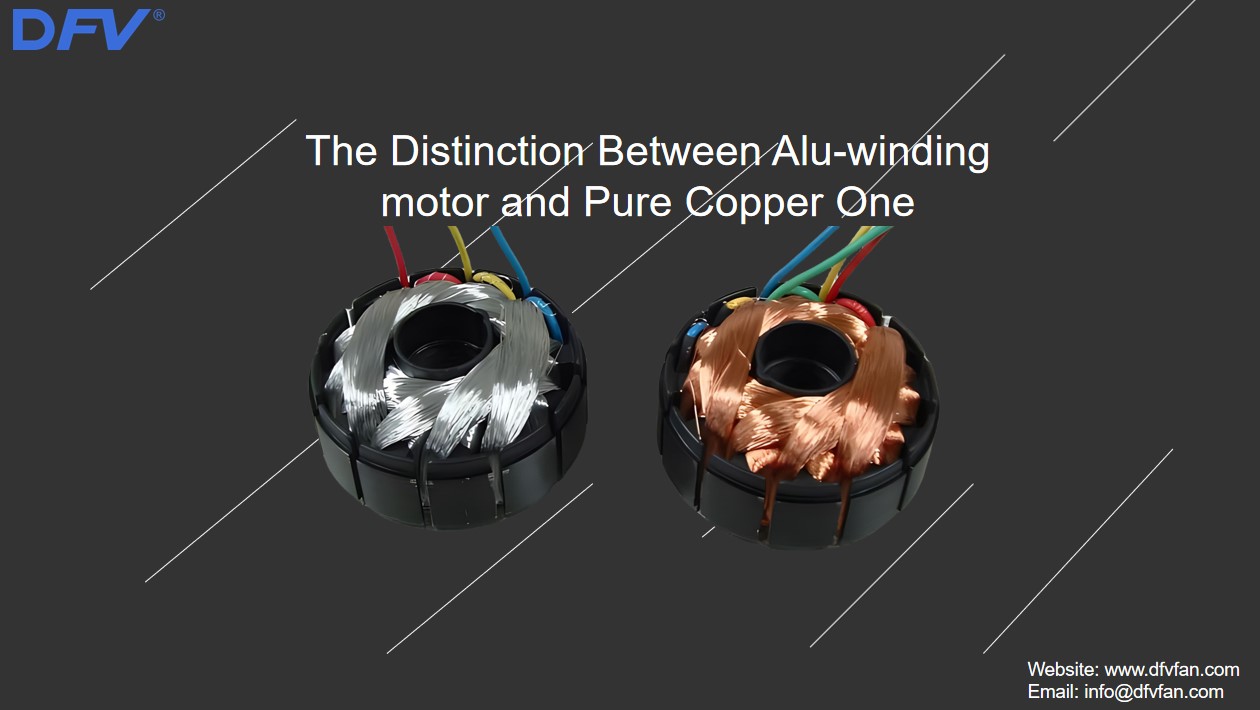
Your choice between copper and aluminum wound motors significantly impacts your meat grinder motor repair’s long-term success. This decision affects performance, durability, and overall value.
Why Copper Windings Outperform Aluminum
Pure copper windings offer approximately 40% better thermal conductivity compared to aluminum alternatives. This critical advantage allows for more efficient heat dissipation during extended grinding operations. The superior thermal management of copper windings reduces burnout risk under heavy loads and extends operational lifespan considerably.
While aluminum-wound motors may cost slightly less initially, their shorter lifespan and reduced performance under stress make copper the more economical choice over time. When investing in meat grinder motor repair, pure copper construction provides the best return on your repair investment through enhanced durability and consistent performance.
Determine the Right Power Level for Your Needs
For typical home meat grinding applications, the 350W-12,000 RPM configuration offers the ideal balance of power and manageability. This specification handles medium-density cuts effectively while maintaining reasonable energy consumption.
Consider your typical grinding patterns:
– If you primarily process lean cuts in moderate quantities, the mid-range option provides everything you need
– Those regularly grinding larger volumes, tougher cuts, or frozen meat should consider the 450W or 500W configurations
– Avoid overpowered motors unless necessary—they generate more heat and may require intermittent operation during extended sessions
Execute Your Meat Grinder Motor Repair Correctly
With the right replacement motor in hand, follow these precise steps to complete your repair successfully. Proper installation ensures reliable performance and prevents premature failure.
Disconnect and Remove the Failed Motor
Begin by removing external components obstructing motor access—typically the hopper, feeding tray, and grinding mechanism. Organize these parts logically for easier reassembly. Before disconnecting anything, photograph the motor’s connections and mounting configuration as reference images for reassembly.
Carefully disconnect electrical connections while noting which wire attaches to each terminal. Most motors have straightforward two-wire connections, but documentation prevents confusion. Remove mounting fasteners (screws, bolts, or clips), supporting the motor as you remove the final fastener to prevent damage.
Install and Test the Replacement Motor
Position the new motor in the mounting location, ensuring precise alignment with the gear interface and mounting holes. The motor should seat flush without forcing—misalignment indicates an incompatible replacement. Secure the motor with original fasteners, tightening evenly to ensure stable mounting without cracking the housing.
Connect electrical wires according to your documentation, ensuring secure connections with no exposed bare wire. Before reassembling the grinding mechanism, perform a brief functional test: activate the motor for just 2-3 seconds. It should start smoothly with no unusual noises and consistent speed. If problems occur, disconnect power immediately and verify connections and mounting.
Prevent Future Motor Failures Through Proper Care
After completing your meat grinder motor repair, adopt these practices to maximize your investment and prevent premature failure.
Operate Within Your Motor’s Capacity
Match your grinding approach to your motor’s power rating—never force it to process materials exceeding its capacity. If you regularly need to grind large quantities or tough materials, consider upgrading to a higher-wattage motor rather than overloading your current unit.
Implement rest periods during extended grinding sessions. A simple guideline is to run for 15-20 minutes, then allow at least 10 minutes for cooling. This intermittent operation significantly extends motor life compared to continuous use by preventing thermal overload.
Maintain Proper Cleaning and Inspection Routine
Clean your grinder thoroughly after each use to prevent material buildup that stresses the motor. Dried meat residue on moving parts increases friction and resistance, forcing the motor to work harder. Regular cleaning keeps operating effort minimal and reduces motor strain.
Perform monthly inspections of motor mounting and connections. Vibration during operation can loosen fasteners over time, and loose mounting creates additional stress that accelerates wear. A quick monthly check catches developing problems before they cause failure.
Troubleshoot Common Post-Repair Issues
Even carefully executed meat grinder motor repair sometimes reveals unexpected issues. Understanding common problems helps you achieve the desired outcome without frustration.
Motor Runs But Gear Doesn’t Move: Verify proper gear engagement between the motor and grinder drive gears. The motor may need slight repositioning to achieve full engagement. Remove the grinding mechanism and check alignment before assuming motor failure.
Excessive Vibration or Noise: Check that all mounting fasteners are tight and the motor sits flush against its mounting surface. Also inspect the grinding mechanism assembly to ensure all components are in correct positions—misalignment often causes vibration.
Intermittent Operation: Inspect all electrical connections for looseness. Verify that spade terminals are fully seated and that no corrosion or debris interferes with electrical contact. Loose connections mimic motor failure symptoms.
Decide Whether Repair or Replacement Makes Sense
Replacement motors typically cost $46-50, representing 20-40% of a new meat grinder’s price. This makes motor replacement economical when the grinder body, hopper, and cutting mechanism remain in good condition.
Consider these factors before proceeding with meat grinder motor repair:
– Age of the unit (older models may have other failing components)
– Condition of non-motor parts (worn gears or damaged housing)
– Availability of replacement parts for your specific model
When motor failure results from burnt windings, seized bearings, or damaged armature, internal repair usually exceeds practical thresholds. Standardized replacement motors facilitate direct swap procedures, making replacement the preferred approach for most home users. By selecting the appropriate replacement motor, following proper installation procedures, and adopting sensible operating practices, you extend your grinder’s useful life significantly while saving money compared to complete replacement. Regular maintenance and attention to warning signs help you catch developing problems early, ensuring reliable performance for years of continued service.


