
Nothing ruins a butchering session faster than a meat grinder that jams, overheats, or produces uneven results. When your grinder fails during critical food preparation moments, you’re left with partially processed meat and a frustrating cleanup job. Proper meat grinder maintenance isn’t just about preserving your investment—it’s essential for food safety, consistent performance, and extending your equipment’s lifespan. Whether you’re a home cook grinding weekly burger meat or a serious homesteader processing game harvests, this guide delivers actionable maintenance protocols that keep your grinder operating at peak efficiency. Discover how just 15 minutes of proper care after each use can prevent costly repairs and ensure your KitchenAid, STX, Cuisinart, or Weston grinder delivers restaurant-quality results for years to come.
Gather Essential Cleaning Supplies Before Disassembly
Having the right tools ready transforms meat grinder maintenance from a chore into an efficient process. Start with a dedicated cleaning kit featuring stiff nylon brushes designed to reach deep into grinding plates and screw channels without scratching stainless steel surfaces. Food-grade mineral oil (available in pharmacies) serves as your primary lubricant—it’s odorless, tasteless, and safe for incidental food contact. Avoid petroleum-based products that can contaminate future meat batches.
Your maintenance station needs non-abrasive sponges, microfiber drying cloths, and a small container for soaking parts. Line your workspace with newspaper to catch grease drips and keep small components organized. For stubborn buildup, prepare a baking soda solution (1 tablespoon per quart of warm water) that safely breaks down proteins without damaging metal components. Never use bleach or harsh chemicals that can corrode aluminum parts common in many grinders.
Correct Disassembly Prevents Costly Mistakes
Improper disassembly causes more damage than regular use—many owners force components or lose small parts during this critical phase. Always unplug electric models completely before starting, and secure manual grinders with non-slip mats to prevent dangerous movement. Begin by removing the hopper, then carefully extract the feeding screw by pulling straight outward—some resistance is normal as the screw seals against the housing.
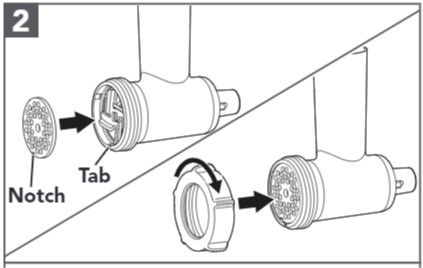
Pay special attention to blade and plate orientation: the blade’s cutting edge must face the direction of rotation. Take photos with your smartphone before removing each component to document proper alignment—this simple step prevents common reassembly errors. Keep all washers, spacers, and retention rings organized in the order they come off, using a labeled tray or egg carton to prevent mix-ups. Never force stuck components; apply food-safe penetrating oil and allow 10-15 minutes for it to work before trying again.
Deep Cleaning Protocol for Food Safety
Residual meat particles harbor bacteria that multiply rapidly in hidden crevices, making thorough cleaning non-negotiable for food safety. Begin immediately after grinding while fats remain warm and pliable—this 5-minute window makes cleaning dramatically easier. Flush the mechanism by running warm soapy water through the grinder (in reverse if possible) to remove the majority of accumulated material before it hardens.
For stubborn buildup, soak metal components in the baking soda solution for 15-30 minutes, then use specialized brushes to scrub plate holes and screw channels. Never submerge electrical components—wipe motor housings with a damp cloth only. Pay special attention to the blade mounting surface where tiny meat fibers hide, causing cross-contamination in future batches. Aluminum parts require extra care as they scratch easily and corrode when exposed to harsh chemicals.
Proper Lubrication Extends Grinder Lifespan
Incorrect lubrication causes more grinder failures than any other maintenance mistake. Apply food-grade mineral oil sparingly to the feeding screw shaft and blade mounting surface using a clean cloth—excess oil attracts debris and contaminates meat. Wipe away any visible oil after application, leaving only a thin protective film. For electric models with visible gears, consult your manual for specific lubrication points; some require food-grade grease instead of oil.
Lubricate immediately after cleaning and drying while metal surfaces are clean, allowing maximum adhesion. Reapply monthly for frequently used grinders, and always before extended storage periods. Never use cooking oils like olive or vegetable oil—they turn rancid, become sticky, and attract dirt that accelerates wear. Proper lubrication reduces friction by up to 90%, dramatically extending the life of moving components.
Blade and Plate Inspection Checklist

Dull blades and worn plates produce stringy, uneven results while forcing your grinder to work harder. Inspect blades before each use for visible nicks, chips, or bent edges—hold them up to light to see if the edge reflects evenly (a dull blade shows shadows). Plates wear differently, with holes gradually becoming rounded; compare against new plates if available or examine under magnification for visible rounding.
Replace plates after processing 50-100 pounds of meat, though bone-in cuts accelerate wear dramatically. The golden rule: when your grinder requires significantly more force to process the same amount of meat, it’s time for new blades or plates. Always verify correct installation—blades must face the rotation direction, and plates must seat fully with retention rings hand-tightened (never use pliers that could damage threads).
Storage Techniques That Prevent Rust and Damage
Improper storage causes more long-term damage than regular use. After cleaning and drying, lightly reassemble your grinder with all parts lubricated to prevent dust accumulation on bare metal. Store in a climate-controlled environment between 50-70°F with humidity below 50%—kitchen cabinets typically work better than garages or sheds.
For seasonal storage, wrap metal components in food-grade paper (not plastic, which traps moisture) and include silica gel packets to absorb humidity. Apply a light coat of mineral oil to all metal surfaces before storage, reapplying monthly during extended storage. Store blades and plates separately in protective sleeves to prevent edge damage and accidental cuts. Never store near cleaning chemicals that can off-gas and corrode metal components.
Troubleshoot Common Performance Issues Immediately
Grinder problems escalate quickly when ignored—address these issues before they cause permanent damage:
Why Your Grinder Suddenly Loses Power
- Check power sources first: test the outlet with another device
- Inspect cords for damage and allow 30 minutes for thermal reset if overheated
- Disassemble to check for internal jams—never force operation when jammed
Fixing Uneven Grinding Results
- Verify blade orientation (must face rotation direction)
- Ensure meat is cold but not frozen (ideal temperature: 32-36°F)
- Feed meat steadily without overloading the hopper
Eliminating Excessive Noise and Vibration
- Stop immediately—grinding sounds indicate component interference
- Check for damaged blades or plates with missing segments
- Inspect for foreign objects in the mechanism before restarting
Monthly Maintenance Habits That Save Hundreds
Invest just 20 minutes monthly to prevent costly repairs and extend your grinder’s life significantly. Test all functions to catch developing problems early. Inspect power cords for fraying and check electrical components for damage. Assess blade and plate condition more thoroughly than routine checks. For electric models, verify carbon brush length (replace when worn below 1/2 inch).
Before heavy use seasons like hunting season, perform comprehensive maintenance including full disassembly, inspection, and lubrication. Replace any components showing wear before they fail during critical use. Quality grinders represent $50-$500 investments—regular maintenance costs pennies compared to replacement or professional repairs. Many manufacturers offer extended warranties for properly maintained equipment, adding financial incentive to diligent care.
Consistent meat grinder maintenance transforms frustration into reliability. By implementing these protocols after each use, you’ll prevent 90% of common grinder failures while ensuring food safety and peak performance. Remember the golden rule: clean immediately while components are warm, lubricate properly with food-grade products, and store correctly to prevent corrosion. These small time investments compound into thousands of pounds of perfectly ground meat and years of trouble-free service. Your future self will thank you when your grinder still performs flawlessly while others have been discarded—make maintenance non-negotiable, and enjoy restaurant-quality results for decades.


