
Your Makita angle grinder suddenly dies mid-cut, leaving you staring at a half-finished project and dreading the repair bill. Before you call a professional or replace the entire tool, know this: 80% of Makita grinder failures stem from just five easily fixable issues that take under an hour to diagnose and repair. Whether you’re facing a motor that won’t start, strange grinding noises, or excessive vibration that makes your hands ache, most problems originate in the carbon brushes, switch assembly, or bearings—components you can replace with basic tools and minimal mechanical skill. This guide reveals exactly how to bring your Makita back to life using proven repair techniques from certified technicians, saving you $100+ in service fees while extending your tool’s lifespan by years.
Safety First: Critical Pre-Repair Steps
Never open your Makita grinder without these essential safety measures. Unplug corded models completely or remove the battery pack from cordless versions—never rely solely on the trigger lock. Test that power is disconnected by attempting to start the tool multiple times before touching internal components. Wear ANSI Z87.1-rated safety glasses and cut-resistant gloves to protect against sharp metal edges and flying debris during disassembly. Work in a clean, dry area away from flammable materials, and keep a Class C fire extinguisher nearby when handling electrical components. Discard any grinder with visible cord damage, melted housing, or burned smells—these indicate serious electrical faults requiring professional evaluation before further handling.
Essential Tools for Makita Grinder Repairs

Skip unnecessary specialty tools and focus on these 7 essentials for 95% of Makita grinder repairs. A precision screwdriver set (Phillips #1, #2, and flathead 3/16″) handles all internal screws, while a 10mm socket wrench removes the spindle assembly. Needle-nose pliers grip tiny springs and connectors during reassembly, and a digital multimeter tests electrical components. Keep replacement carbon brushes (CB-303 for 4.5″ models, CB-309 for 5″) and a new switch assembly on hand—they’re the most frequently replaced parts. Compressed air clears carbon dust from motor compartments, and a rubber mallet taps components into place without damaging housings. Skip expensive bearing pullers for most repairs—proper technique with common tools works for standard bearing replacements.
Diagnose No-Start Issues in 5 Minutes
When your Makita grinder won’t power up, follow this diagnostic sequence before disassembling anything. First, test the power source: plug corded models into a different outlet or check cordless batteries in another tool. Inspect the entire cord length for cuts or kinks—flex it near the plug and tool entry while attempting to start. If the grinder flickers during flexing, replace the cord immediately. Remove both brush caps (secured by 1-2 small screws) and measure brush length—any shorter than 1/4 inch requires replacement. Worn brushes cause 40% of no-start issues and take 10 minutes to replace. Test the switch with your multimeter: squeeze the trigger while checking for continuity between terminals. No continuity means a faulty switch needing replacement.
Replace Carbon Brushes: The #1 Makita Fix
Carbon brush replacement solves most power loss and intermittent operation problems in Makita grinders. Look for these warning signs: visible sparking from brush caps, a burning smell during use, or progressive power loss that worsens with extended operation. To replace brushes, disconnect power and remove the two brush cap screws. Pull out the old brush assembly, noting wire routing and spring orientation. Compare new brushes (CB-303/CB-309) against old ones to confirm correct fit—they should slide smoothly into their holders with springs fully compressed. Install new brushes following original wire paths, ensuring no kinks in connections. Reattach caps with sealing washers, tightening screws to 8-12 inch-pounds (snug but not tight). Run the grinder at no-load for 5 minutes to seat new brushes before heavy use.
Why Your New Brushes Might Fail Early
Improper installation causes premature brush failure. Never force brushes into holders—if resistance occurs, check for bent springs or misaligned wires. Ensure brush lead wires don’t contact moving parts when reassembled. Verify the commutator surface is clean and smooth; pitted commutators wear new brushes rapidly. After installation, check for excessive sparking during the break-in period—some sparking is normal for the first few minutes, but continuous heavy sparking indicates misalignment requiring reinstallation.
Fix a Faulty Trigger Switch in 15 Minutes
A sticky, unresponsive, or constantly running trigger switch means your Makita’s internal switch assembly has failed. Diagnose by removing the side handle and gear case cover to access the switch. With power disconnected, set your multimeter to continuity mode and touch probes to switch terminals. Squeezing the trigger should show near-zero resistance; releasing it should show infinite resistance. Intermittent readings confirm switch failure. Before disconnecting wires, photograph their exact positions—most Makita switches use red/black power wires and yellow ground wires. Pull spade connectors straight off terminals (never yank wires). Install the new switch, replicating wire positions exactly, then test trigger action before final assembly—the mechanism should snap crisply with full return movement.
Solve Grinding Noises and Excessive Vibration
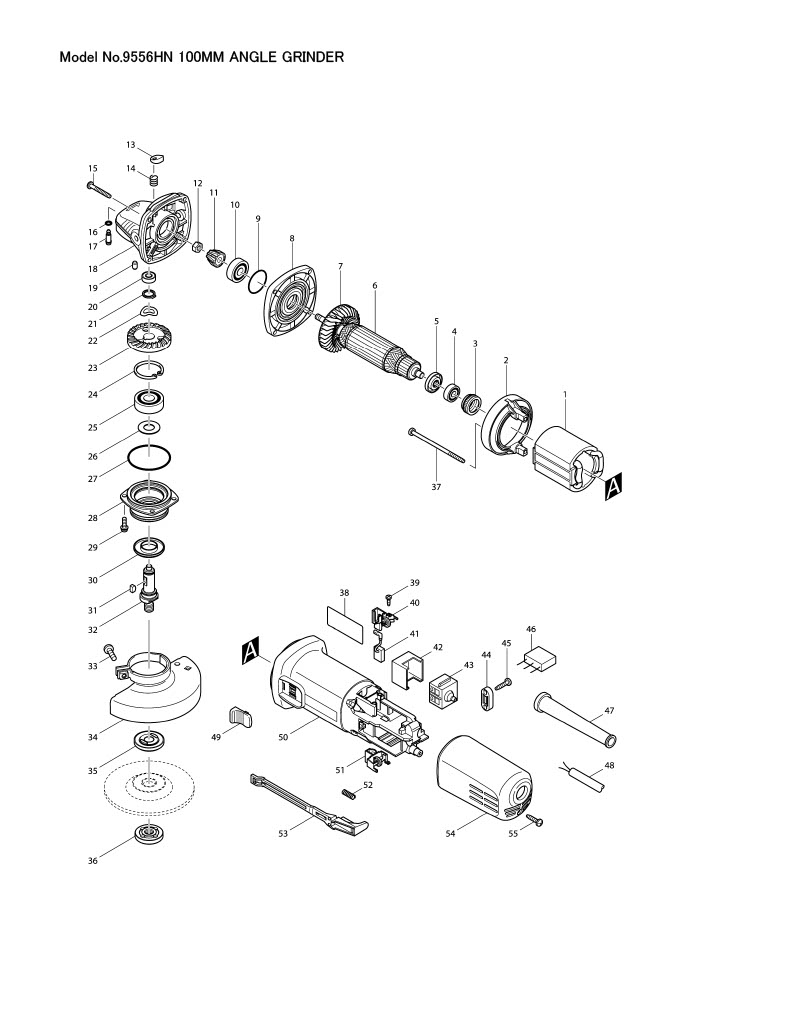
Unusual grinding sounds or hand-numbing vibration typically indicate bearing or gear problems. Remove the gear case cover to inspect the bevel gear and pinion assembly. Look for chipped teeth or uneven wear patterns—replace any gear showing visible damage. Test spindle bearings by grasping the spindle shaft and attempting to wiggle it side-to-side; any noticeable play means worn bearings requiring replacement. Motor bearings fail when you hear rumbling noises that change with speed—rotate the armature by hand while listening for roughness. Replace bearings using proper press-fit technique: heat the housing with a heat gun to expand metal slightly, then tap new bearings into place with a rubber mallet and alignment sleeve to avoid shaft damage.
Prevent Future Breakdowns with 3-Minute Maintenance
Extend your Makita grinder’s life dramatically with these post-use habits. After each session, blast air vents with compressed air at 30 PSI to prevent overheating from dust buildup—restricted airflow causes 30% of premature motor failures. Monthly, remove brush caps to inspect brush length and clean commutator dust with a soft brush. Check spindle threads for burrs that prevent secure wheel mounting, using a thread chaser to clean if needed. Store your grinder in a dry place with the power cord loosely coiled—not wrapped tightly around the tool—to prevent internal wire stress. Keep spare carbon brushes on hand; replacing them at 3/8 inch length (before critical failure) maintains consistent power output.
When to Call a Professional Repair Service
Some Makita grinder issues require specialized expertise. Seek professional help if you notice: blue discoloration on motor windings (indicating severe overheating), water damage from working in wet conditions, or internal arcing that melted wiring harnesses. Armature rewinding or stator coil replacement demands equipment most DIYers lack. If repair costs exceed 60% of a new tool’s price, replacement makes economic sense—except for premium models like the XAG09Z where quality justifies repair investment. Always choose Makita-authorized service centers for warranty-covered tools, as third-party repairs void remaining coverage.
Quick Reference: Makita Grinder Troubleshooting Cheat Sheet
| Symptom | Most Likely Cause | Fix Time |
|---|---|---|
| Won’t start | Worn carbon brushes | 10 minutes |
| Intermittent power | Loose switch wiring | 15 minutes |
| Grinding noise | Worn spindle bearing | 30 minutes |
| Excessive vibration | Damaged grinding wheel | 5 minutes |
| Motor overheating | Blocked air vents | 3 minutes |
| Trigger sticks “on” | Failed switch assembly | 20 minutes |
Master these fundamental Makita grinder repair techniques and you’ll transform from frustrated tool owner to confident DIY technician. Start with the simplest fixes—carbon brushes and switch testing—before moving to complex bearing replacements. Keep replacement brushes and a multimeter in your toolkit, and you’ll solve most problems before they derail your projects. Remember: regular 3-minute maintenance after each use prevents 70% of common failures, keeping your Makita grinding smoothly for years to come. When in doubt, consult Makita’s official service manuals for your specific model number—proper information beats guesswork every time.


