
You just unboxed your Oster blender, but those speed settings and attachments feel overwhelming. Don’t worry—within 10 minutes, you’ll confidently blend restaurant-quality smoothies, crush ice without motor strain, and even make nut butter. This guide cuts through the confusion with precise steps for your specific model, whether you own the Pro 1200, Classic Series, or MyBlend personal blender.
Most failed blends happen before you press “start”—improper ingredient loading or skipped safety checks cause 70% of common issues. By following this exact sequence, you’ll prevent leaks, motor burnout, and uneven textures. You’ll discover why liquids must always go first, how to safely blend hot soups, and the weekly maintenance trick that doubles your blender’s lifespan.
Essential Pre-Use Safety Checks to Prevent Damage
Skipping these 60-second safety steps risks electrical hazards or permanent damage to your Oster blender. Always verify assembly before plugging in—improperly seated jars cause 90% of “won’t start” errors. Start by ensuring your hands and counter are completely dry, then position the blender at least 2 inches from counter edges to prevent tipping during high-speed operation.
Critical electrical safety protocol:
– Confirm voltage matches your outlet (check label on motor base)
– Keep power cord away from sinks and hot surfaces
– Never drape cord over counter edges where feet can trip it
– Place base on non-slip surface (rubber mat recommended)
Assembly verification checklist:
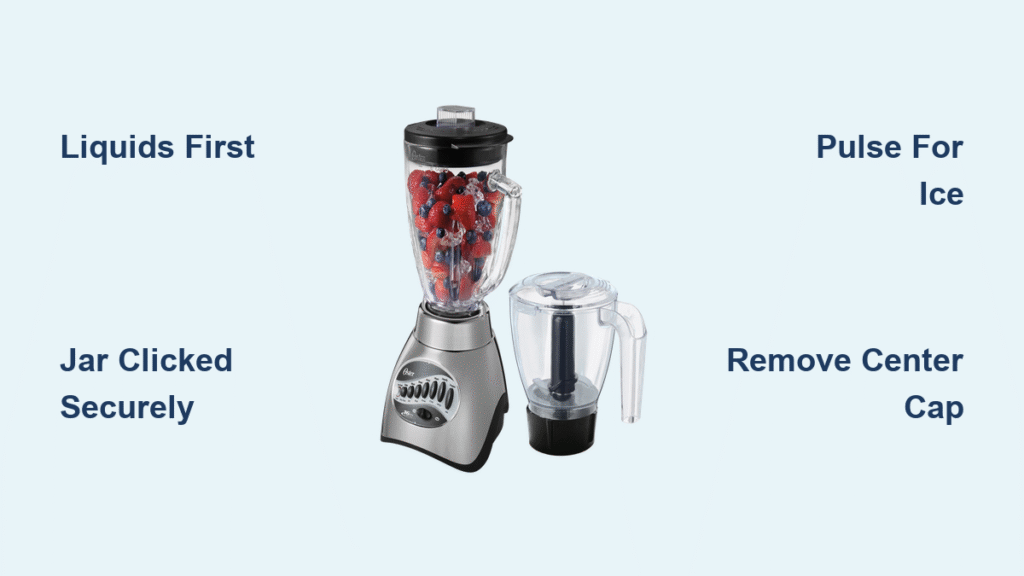
1. Press jar firmly onto base until it clicks (listen for the lock)
2. Spin blade assembly clockwise until it stops (no wobbling)
3. Snap lid until it locks—center cap must be fully inserted
4. Test stability: Gently shake assembled unit (no movement between parts)
Decoding Your Oster Model’s Control Panel Features

Your Oster’s capabilities depend entirely on its model—using the wrong settings for your specific unit causes poor results. The Pro 1200’s dual-direction blades reverse automatically to prevent jams, while Classic Series models require manual scraping. Identify your model by checking the wattage label: Pro models (1200W) have 7 speeds plus pulse, Classics (1000W) offer 3 speeds, and MyBlend uses one-touch operation.
Speed setting cheat sheet for all models:
– Speed 1 (Low): Start all blends here for 5 seconds (creates vortex)
– Speed 2 (Medium): Pureeing cooked vegetables or soft fruits like bananas
– Speed 3 (High): Crushing ice or frozen ingredients (max 5 cubes/batch)
– Pulse: Chopping herbs or breaking initial ice chunks (5-7 bursts)
Model-specific power-ups:
– Pro 1200: Press “Green Smoothie” for auto 45-second cycle
– Classic Series: Twist dial slowly between speeds to avoid jerking
– MyBlend: Screw bottle directly onto base—no jar needed
Perfect Ingredient Loading Sequence for Lump-Free Blends
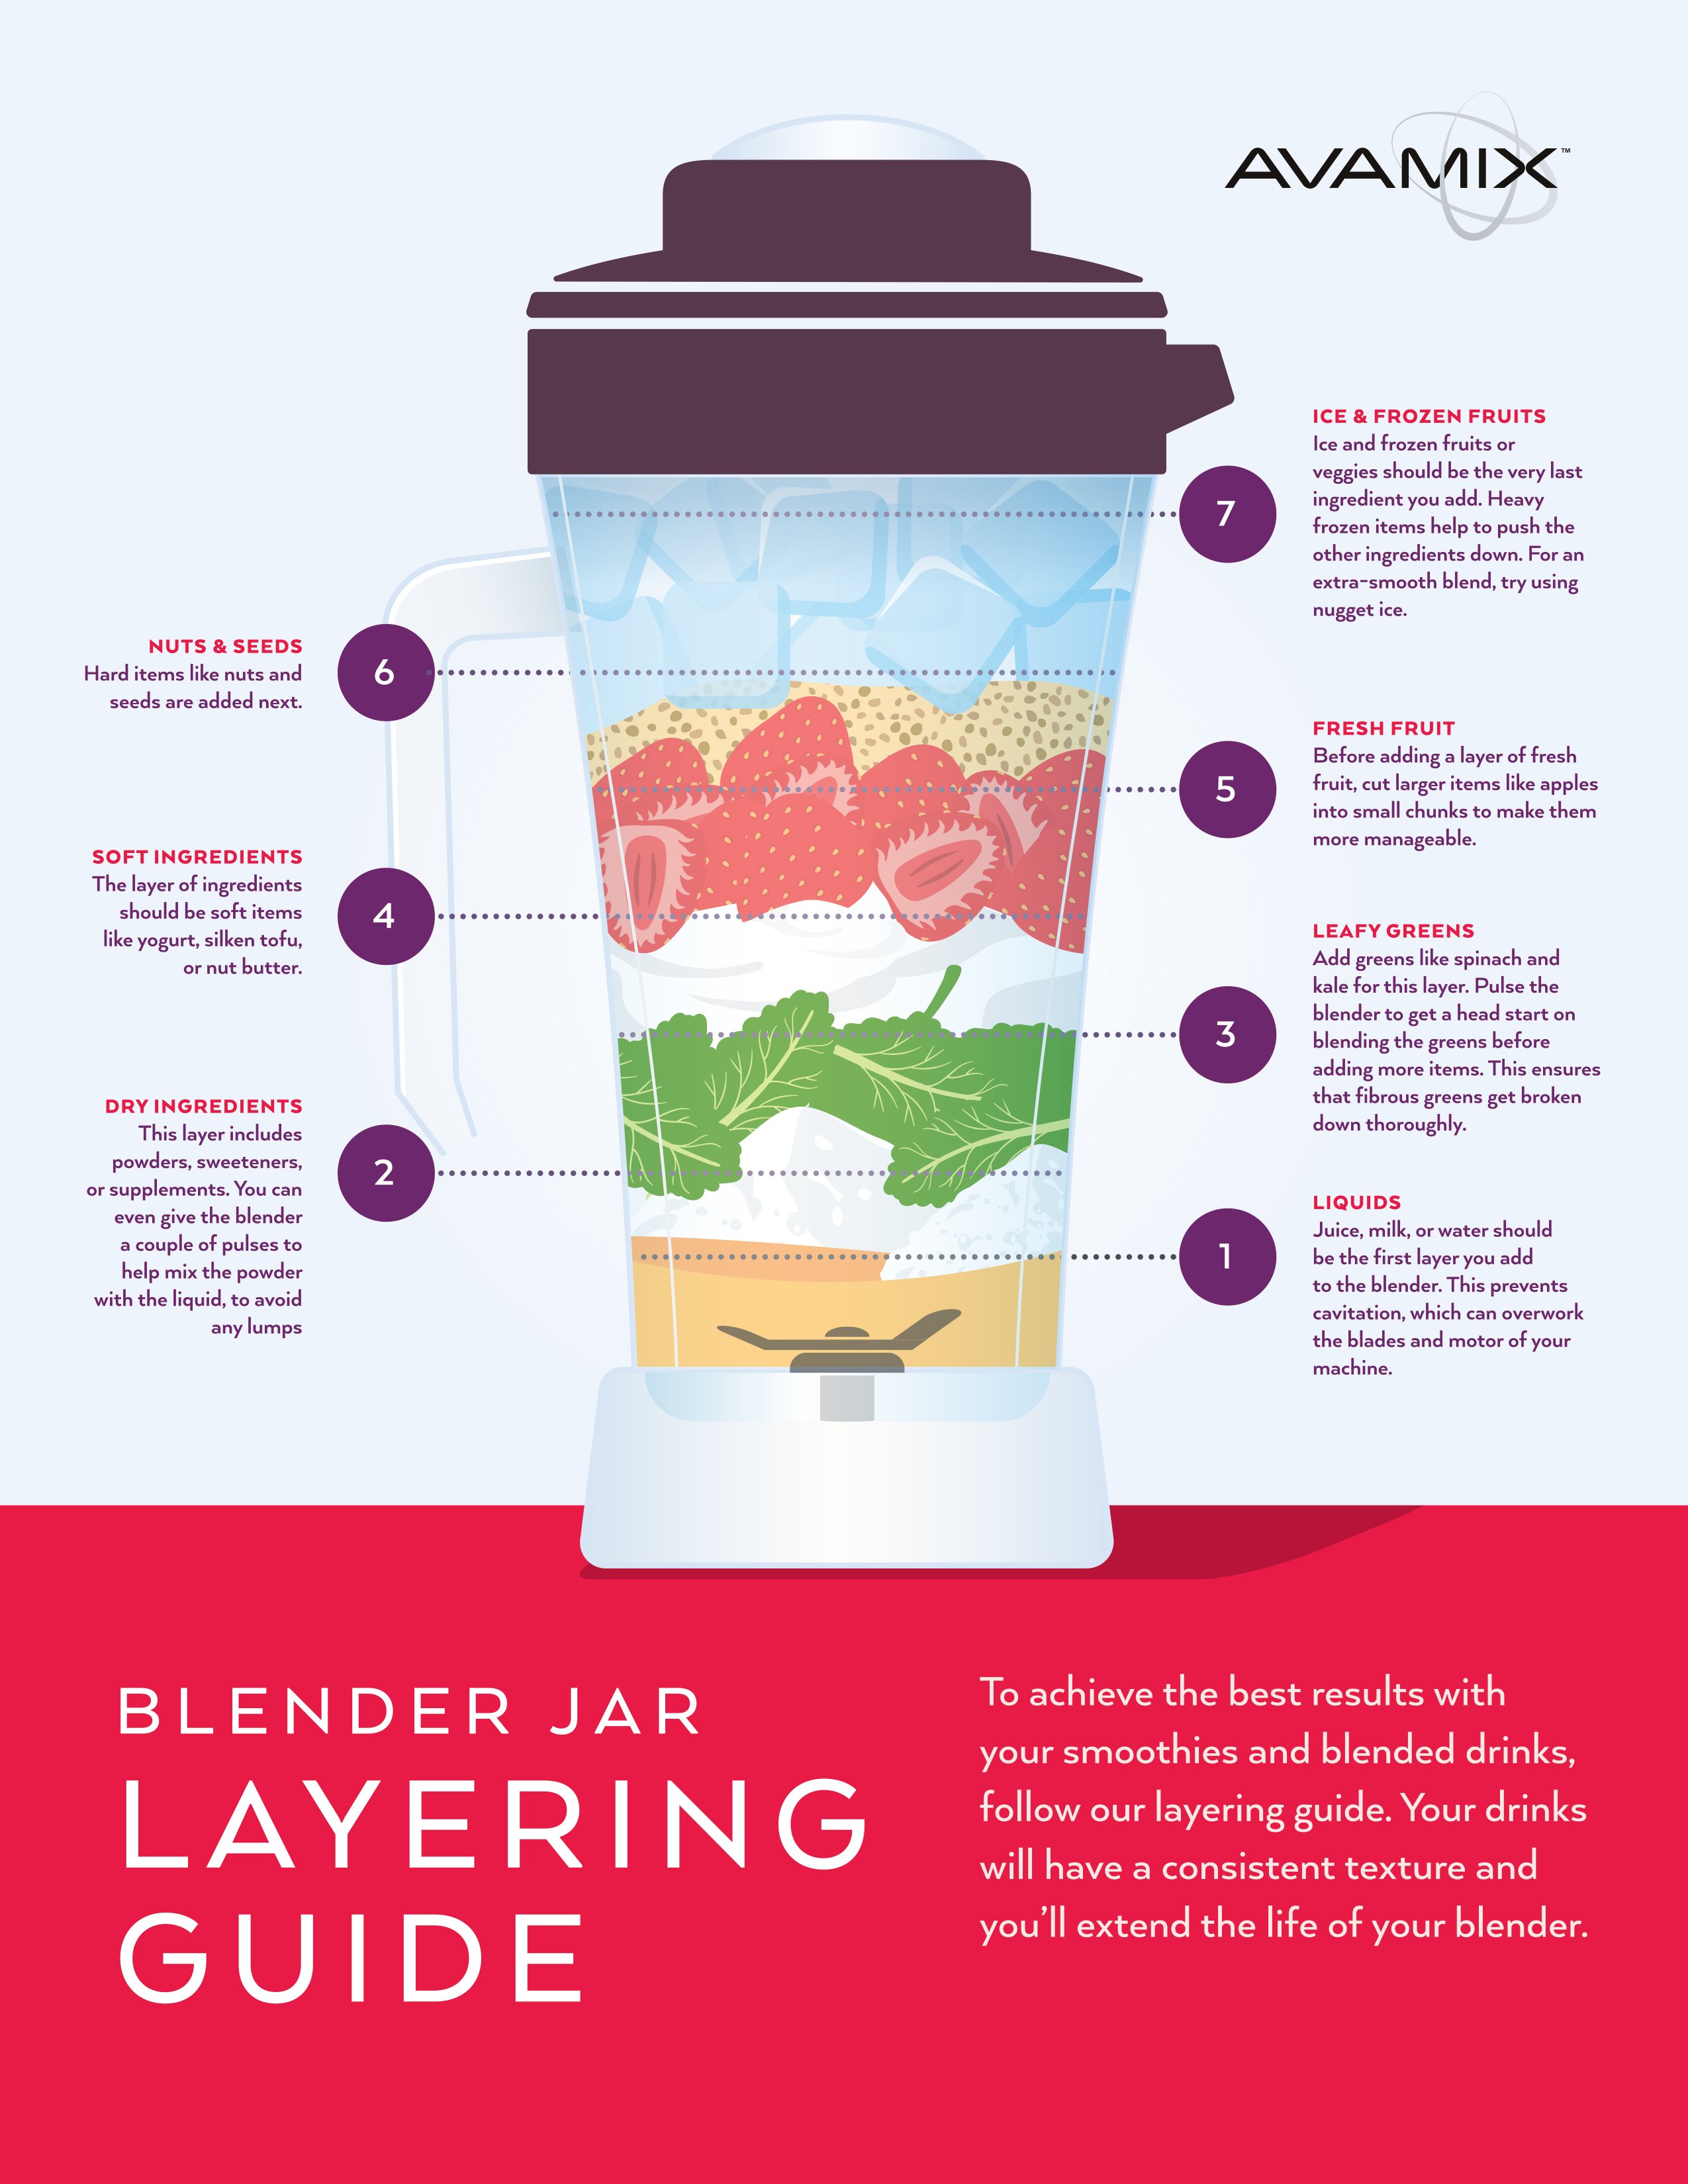
The order you add ingredients determines whether you get silky smooth results or chunky disasters. Liquids must always go first—this creates the vortex that pulls solids toward blades. Never exceed the max-fill line; overfilling causes leaks and strains the motor. For frozen blends, use the 1:1 liquid-to-frozen ratio rule (e.g., 1 cup almond milk + 1 cup frozen berries).
Exact loading sequence for smoothies:
1. Base liquid (1-1.5 cups): Almond milk, juice, or coconut water
2. Powders (1 scoop): Protein or greens (prevents clumping)
3. Soft ingredients: Banana slices or spinach (pack loosely)
4. Frozen items: Ice or frozen fruit (add last to maintain vortex)
Pro technique: Insert tamper through lid’s center cap during thick blends, gently pushing ingredients downward without stopping the motor. Stop immediately if resistance increases—overloading causes motor burnout.
Ice Crushing Without Motor Burnout
Your Oster handles ice, but improper technique dulls blades and overheats motors. Never add more than 5 standard ice cubes per batch—exceeding this strains the 1200W motor. Pulse 5 times first to break cubes into smaller pieces, then switch to high speed for only 15-20 seconds. Listen for the pitch change: when ice reaches snow-like consistency, the motor sound drops—stop immediately to prevent overheating.
Critical safety steps for ice:
– Use only cubed ice (crushed ice jams blades)
– Add 2 tbsp liquid to create lubrication
– Rest motor 30 seconds between batches
– Never blend dry ice (always include liquid)
Hot Soup Blending Without Pressure Explosions
Glass jars withstand temperatures up to 180°F, but steam pressure can blow lids off if you skip these steps. Fill jar only halfway—hot liquids expand during blending. Remove the center cap completely to vent steam, then hold the lid firmly with a towel while starting on Speed 1. Gradually increase to Speed 2 in 10-second bursts, never exceeding 45 seconds total per batch.
Never blend:
– Boiling liquids (wait 5 minutes to cool)
– Carbonated drinks (pressure shatters glass)
– Overfilled jars (max 3 cups for hot liquids)
Nut Butter in 4 Minutes: The Roast-Then-Blend Method
Transform raw nuts into creamy butter using your Oster’s sustained power. Roast nuts first at 350°F for 8 minutes—this releases oils for smoother texture. Add 2 cups roasted nuts plus 1 tbsp coconut oil to the jar. Blend on high for 30 seconds, scrape down sides, then repeat in 30-second cycles with 20-second motor rests between.
Texture transformation timeline:
– 0-1 minute: Chopped nuts → coarse meal
– 1-2 minutes: Dry powder → clumpy paste
– 2-4 minutes: Thick paste → smooth butter
Stop blending when it coats the jar sides—overprocessing separates oils. Store in airtight container for 3 weeks.
Daily Cleaning That Takes 30 Seconds
Cleaning immediately prevents permanent stains and motor damage. Never soak the base—water destroys electrical components. After use, rinse jar and blades under warm water, then fill halfway with warm soapy water. Blend on high for 30 seconds, rinse thoroughly, and air-dry upside down. For stuck residue, add 1 tbsp baking soda to the soapy water before blending.
Weekly deep clean essentials:
– Remove blade assembly (use towel—edges are razor-sharp)
– Soak gasket in vinegar solution to kill odors
– Wipe base with damp microfiber cloth (never submerge)
– Check for hairline cracks in jar—replace if found
Troubleshooting: Why Your Blender Won’t Start
95% of “dead” blenders stem from assembly errors, not motor failure. First check these:
1. Is the jar fully clicked onto the base? (Lift and reseat firmly)
2. Is the lid locked with center cap inserted? (Most models won’t start without this)
3. Did you plug into a working outlet? (Test with another device)
Stop immediately if you notice:
– Burning smell (unplug for 30 minutes to cool)
– Excessive vibration (reduce ingredient volume)
– Leaking from base (replace gasket—$5 part)
Persistent issues require contacting Oster support at 1-800-334-0759—most repairs are covered under the 1-year warranty.
Model-Specific Power User Techniques
Pro 1200 secret: The “Food Chop” preset runs 10-second pulses automatically—perfect for salsas. Never use this setting for liquids—it creates splatter. Classic Series pro tip: Start on Speed 1 for 10 seconds before increasing to prevent ingredient “clumping” around blades. MyBlend hack: Screw sports lid directly onto bottle for on-the-go smoothies—no transfer needed.
Universal efficiency boosters:
– Cut ingredients to 1-inch cubes for even blending
– Thaw frozen fruit 5 minutes before use
– Peel citrus completely (pith makes blends bitter)
– Always rest motor 2 minutes after 60 seconds of continuous use
Extend Your Blender’s Lifespan by 5+ Years
Most Oster blenders die from preventable neglect, not motor failure. Critical longevity habits:
– Store with lid off to prevent rubber gasket odors
– Replace sealing gaskets annually ($4 online)
– Carry by the base—not the jar—when moving
– Never use metal utensils near blades (causes nicks)
Your investment pays off when you master these techniques. Start with simple smoothies using the exact loading sequence, then progress to nut butters and hot soups. Within a week, you’ll blend faster and cleaner than 90% of Oster owners—proving that the best kitchen tool is the one you actually use correctly. For model-specific manuals, visit Oster’s support page and enter your serial number.


