
That shiny Ninja 1500 watt blender sitting on your counter can transform frozen fruit into silky smoothies, crush ice into snow, and create restaurant-quality purees—if you know exactly how to harness its power. Most users struggle with inconsistent results or trigger the dreaded blinking red light because they miss critical setup steps. This guide cuts through the confusion with precise instructions for perfect blending every time, whether you’re making a single-serve smoothie or processing large batches.
Follow this step-by-step approach to unlock your blender’s full potential. You’ll discover the exact assembly sequence that prevents leaks, master the three-speed system for ideal textures, and troubleshoot common issues that stop most users cold. Within one week of applying these techniques, you’ll move from following basic recipes to creating signature blends with professional results.
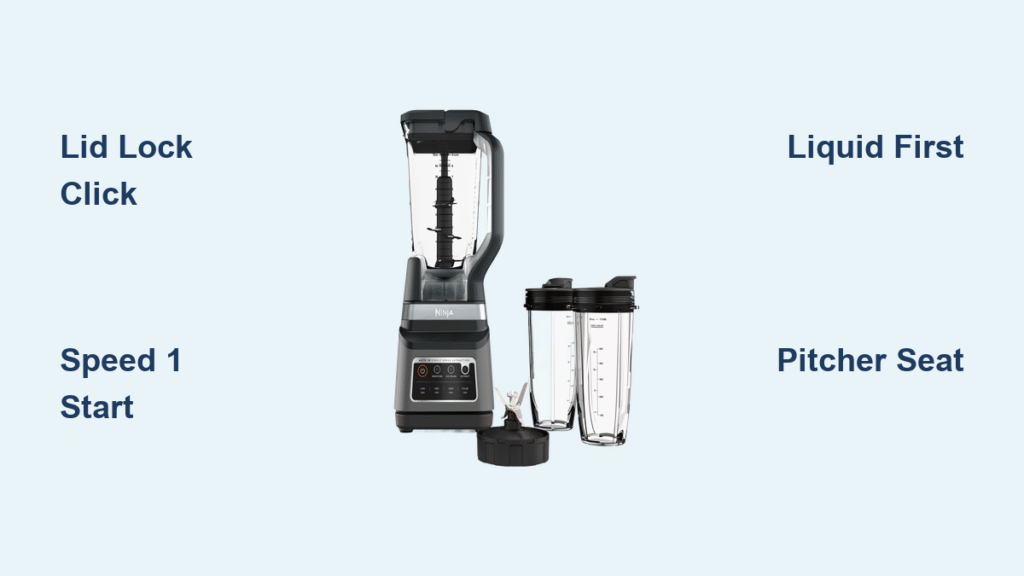
First-Time Assembly in 5 Minutes

Identify Your Components Correctly
Your Ninja 1500 watt system arrives with specific parts that must click together precisely. Place the heavy motor base with its 1500-watt motor on a stable surface away from counter edges. The large pitcher locks onto this base, while the tower blade assembly slides down the center shaft. Single-serve users also get 18-ounce and 24-ounce cups with dedicated blade attachments—these follow the same assembly principle but scale for individual servings.
Lock the Pitcher Without Leaks
Position your pitcher on the motor base until it seats firmly and rotates slightly when properly aligned. You’ll know it’s correct when the pitcher sits flush against the base with no wobbling. Critical safety note: The pitcher must be rotated into its proper position—attempting to blend without proper seating triggers the safety system and causes the red light to blink.
Install Blade Assembly Safely
Handle the stacked blade tower with extreme caution—these blades remain razor-sharp even after months of use. Hold the plastic center shaft and slide the entire assembly down until it bottoms out. The blades should sit level without shifting when touched. Never attempt to clean blades while attached to the motor base.
Decode Control Panel Settings Like a Pro

Three-Speed Power System Explained
Your Ninja blender offers three distinct power levels engineered for specific tasks:
- Speed 1 (Low): Gentle mixing for liquids and soft ingredients like yogurt or ripe bananas
- Speed 2 (Medium): Your go-to speed for most smoothies, sauces, and general food processing
- Speed 3 (High): Maximum power specifically for ice crushing and frozen ingredients
Pulse Function for Precision Textures
The Pulse button delivers full power only while pressed—ideal for chunkier textures like salsa or when you need precise control. Think of it as surgical blending for recipes where “slightly chunky” matters. Use short bursts of 2-3 seconds for consistent results.
Single-Serve Mode Auto-Adjustment
When you attach the single-serve cup, the system automatically detects the smaller container and adjusts power delivery. This prevents over-processing smaller volumes and ensures your personal smoothie doesn’t become watery soup. The blender operates as long as you maintain gentle pressure on the cup.
Perfect Blend Every Time: Step-by-Step Execution
Loading Order That Prevents Motor Strain
Never dump everything in at once. Follow this exact sequence for consistent results:
- Liquids first – Minimum 1 cup to cover blades completely
- Soft ingredients – Yogurt, fresh fruit, soft vegetables
- Hard ingredients – Frozen fruit, ice cubes, hard vegetables
- Powders last – Protein powder, spices, supplements
Lock the Lid Properly to Avoid Blinking Light
Press the lid down until you hear an audible click. The white arrow on the lid must align precisely with the arrow on the pitcher handle—even slight misalignment triggers the safety system. Check for trapped food debris around the lid seal that might prevent full engagement.
Execute Your First Blend Without Splatters
Start every blend at Speed 1 for 5-10 seconds to create a vortex that pulls ingredients down toward the blades. Gradually increase to Speed 2 or 3 as needed. For most smoothies, Speed 2 for 30-45 seconds creates perfect consistency without overheating the motor.
Single-Serve Smoothie Method in Under 60 Seconds
Cup Assembly Process for Leak-Free Blending
Fill your single-serve cup following the same loading order as the large pitcher. Screw the blade assembly on hand-tight—over-tightening makes removal difficult. Pro tip: Add liquid to the max fill line, then add solids up to the same line to prevent overflow.
Blend and Go Technique for Busy Mornings
Invert the cup onto the single-serve platform and press down gently. The blender operates as long as you maintain pressure. After 20-30 seconds of blending, remove the blade assembly and replace with the to-go lid. You’re ready to leave in under a minute with a perfectly blended smoothie.
Fix Blinking Red Light Fast Without Calling Support

Three Quick Checks That Solve 95% of Issues
When your Ninja blender flashes red and refuses to start, run through these diagnostics immediately:
Lid Security: Push the lid down firmly until it clicks. Check for trapped food debris preventing full engagement.
Arrow Alignment: The white arrow on the lid must point directly at the arrow on the handle. Even a quarter-inch misalignment triggers the safety system.
Pitcher Position: Remove and re-seat the pitcher. It should sit flat and rotate slightly when properly positioned.
Diagnose Persistent Red Light Problems
- Solid red light means motor overheating—wait 15 minutes to cool
- Flashing power button indicates electrical issues—check your outlet
- Grinding sounds require immediate shut-off and blade inspection
Clean Like a Pro in 2 Minutes After Every Use
Immediate Rinse Protocol to Prevent Stains
Rinse blades under hot water immediately after use—never let food dry on. For stubborn residue, soak the blade assembly in hot soapy water for 5 minutes. Safety reminder: Clean blades by holding the plastic center shaft only, never the blades themselves.
Quick Wash Method for Daily Maintenance
Fill the pitcher halfway with hot water and a drop of dish soap. Run on Speed 2 for 30 seconds. Rinse thoroughly—this cleaning method works for 90% of cleaning needs and prevents residue buildup.
Master Advanced Techniques for Professional Results
Ice Crushing Perfection Without Damaging Blades
Use Speed 3 for ice only. Fill pitcher no more than halfway with standard ice cubes. Add 1/2 cup liquid to create a vortex. Pulse 5-6 times initially, then run continuously for 10-15 seconds for snow-like consistency. Never use large ice chunks that strain the 1500-watt motor.
Nut Butter Method That Actually Works
Start with 2 cups roasted nuts. Process on Speed 2, scraping down every 30 seconds. After 2-3 minutes, the nuts release their oils and transform into creamy butter. Add a tablespoon of oil if mixture seems dry. Pro tip: Allow nuts to thaw 5-10 minutes for easier blending.
Hot Soup Processing Direct from the Stovetop
The 1500-watt motor handles hot ingredients directly from the pot. Fill pitcher no more than halfway with cooked ingredients plus liquid. Start at Speed 1 and increase gradually to prevent splashing. Process 30-45 seconds for silky smooth soup without cooling time.
Troubleshooting Quick Fixes That Save Your Recipe
Blender Won’t Start Emergency Checklist
Check power connection first. Verify all three safety interlocks—lid locked, arrows aligned, pitcher seated correctly. These elements prevent 90% of start-up issues. Ensure the power cord is fully extended and not pinched.
Poor Blending Results Correction Protocol
Increase liquid content gradually in 1/4 cup increments. Cut ingredients into 1-2 inch pieces for optimal processing. Process in smaller batches if the mixture seems too thick—never exceed the max fill line.
Excessive Noise Elimination Steps
Ensure your blender sits on a level surface. Check for foreign objects like spoons that might have fallen in. Reduce batch size—overloading creates strain and noise. Verify blade assembly is properly seated without wobbling.
Performance Optimization Secrets for Consistent Results
Ingredient Temperature Rules That Matter
- Frozen fruit: Thaw 5-10 minutes for easier blending
- Hot liquids: Never exceed 2 cups in the large pitcher
- Ice: Use standard cubes—large chunks strain the motor
Liquid Ratios That Guarantee Smooth Blending
- Smoothies: Maintain 1:1 ratio liquid to solid ingredients
- Purees: Minimum 1 cup liquid to start the vortex
- Frozen desserts: Use 1/4 cup liquid per cup of frozen ingredients
Batch Processing Protocol for Large Quantities
Process large quantities in 4-cup maximum batches. Allow 2-minute cooling periods between batches to prevent motor overheating. Combine final batches in the pitcher and give one final blend for consistency.
Key Takeaway: Your Ninja 1500 watt blender rewards proper technique with restaurant-quality results. Master the loading order, respect the safety systems, and maintain consistent cleaning habits. Within a week, you’ll move from following recipes to creating your own signature blends with confidence—whether you’re crushing ice for cocktails or making silky smooth nut milks. The difference between mediocre and professional results comes down to these precise techniques that leverage the full power of your 1500-watt machine.


