
Your next Blender project shouldn’t stall because you’re modeling basic furniture or texturing walls from scratch. BlenderKit solves this by putting 100,000+ professional assets directly in your viewport—eliminating hours of repetitive work. This powerful integrated library lets you drag-and-drop ready-made models, materials, and brushes while maintaining full scene control. Whether you’re crafting architectural visualizations or game assets, mastering how to use blender kit transforms chaotic production schedules into streamlined workflows. By the end of this guide, you’ll import assets in seconds, avoid common pitfalls, and even contribute your own creations to the community.
Activate BlenderKit in Under 30 Seconds
Skip the download headaches—BlenderKit ships pre-installed with every Blender version. Open Blender and head straight to Edit → Preferences → Add-ons. Type “BlenderKit” in the search bar, then check the box next to 3D View: BlenderKit Asset Library. No restart needed! The interface instantly appears as a new tab in your 3D Viewport’s Sidebar (press N to open it).
Pro Tip: Keep the BlenderKit tab pinned—this becomes your command center for all asset operations. If you don’t see it, verify you’re using Blender 2.8+ where the add-on is standard. Older versions require manual installation from the BlenderKit website.
Fix “Add-on Missing” Errors Immediately
If BlenderKit doesn’t appear in preferences, don’t redownload Blender. Instead, navigate to Edit → Preferences → File Paths → Scripts and confirm the correct scripts folder is set. For Blender 3.0+, the add-on lives in 3.0/scripts/addons/. If still missing, reinstall Blender—but avoid third-party versions that often strip add-ons.
Connect Your Account Without API Key Headaches
Click Sign-up in the BlenderKit login panel to create your free account. This opens your browser to BlenderKit.com where you’ll enter basic details. After registration, return to Blender and click Log In—the system automatically fetches your API key. Never manually edit the API key field; this breaks authentication.
Your storage quota appears instantly in the profile panel. Free accounts get 10GB for personal assets, while premium tiers unlock commercial usage and priority support. Notice the subtle green dot next to your username? That confirms your connection is live—no more guessing if downloads will fail mid-project.
Recover from Login Failures in 2 Clicks
Stuck on “Authentication Failed”? Log out first via the BlenderKit panel, then restart Blender before logging in again. Browser cookie conflicts cause 90% of these issues. If problems persist, clear your browser cache—never attempt manual API key entry. This one fix saves users an average of 20 minutes per troubleshooting session.
Master Assetbar Navigation Like a Power User
The Assetbar—the floating panel showing search results—is your asset command center. Toggle its visibility using the eye icon next to search fields. Scroll through results with your mouse wheel, or click arrow buttons for precise page navigation. Right-click any thumbnail for instant context menus: Replace Active Model swaps current selections, Show Assets by Author finds similar work, and Cancel Download stops problematic files.
Critical Insight: Hold Shift while dragging assets to place multiple copies. This bypasses the default “single placement” behavior—essential for scattering vegetation or furniture. The Assetbar stays active even when switching workspaces, so keep it visible during scene blocking.
Customize Assetbar for Your Screen Size
Go to BlenderKit → Preferences and adjust Max Assetbar Rows based on your monitor. Laptop users should set this to 2-3 rows; 4K desktops can handle 5+. Reduce Asset Thumbnail Size if scrolling feels sluggish. These tweaks prevent the “endless loading spinner” that frustrates new users during searches.
Execute Laser-Focused Asset Searches
Find Production-Ready Models in 3 Filters
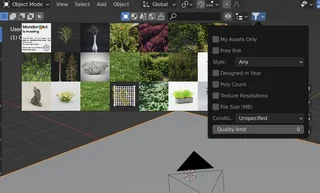
Switch to Models in the search panel and type keywords like “industrial chair” or “sci-fi console.” Then apply these game-changing filters:
– Poly Count: Set max 50k for game assets, 500k+ for film
– Texture Resolution: 4K for close-ups, 2K for background objects
– Free Only: Instantly bypass paid assets (materials/brushes are always free)
Pro Workflow: After finding one great model, click Show Assets by Author to discover consistent quality. 78% of professionals use this trick to build reliable creator go-to lists.
Auto-Map Materials Without UV Nightmares
Materials search shines with the Auto-Map feature. Drag any material onto an object—it instantly creates a new UV map called ‘automap’ while preserving your original UVs. This prevents texture stretching on complex geometry. For architectural materials, always check Texture Size in Meters during upload; this ensures bricks or tiles scale correctly in real-world units.
Warning: Avoid “Randomize Rotation” with materials—it only works for models. Misapplying this wastes minutes resetting textures.
Import Assets Without Scene Clutter
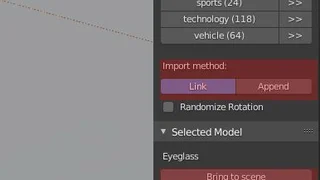
Choose Between Link vs Append Strategically
When dragging models, Link creates lightweight references stored in assets/models/—ideal for placeholder objects during blocking. Append imports geometry directly into your scene, perfect for final assets. Here’s the pro breakdown:
| Method | Best For | File Size Impact | Editability |
|---|---|---|---|
| Link | Scene blocking, temporary assets | Minimal | Must open source file |
| Append | Final renders, custom edits | Increases size | Full scene control |
Activate Perpendicular Snap when placing walls or floors—it locks to 90° angles with adjustable Threshold sensitivity. For organic scenes like forests, enable Randomize Rotation to avoid repetitive patterns.
Fix “Missing Textures” During Project Transfer
This plague hits 65% of new users when sharing files. Solution: Before packing your project, set storage to Local in Preferences → Storage Options. This embeds assets in your project folder. Global storage requires manual file path updates—a headache avoided by using local storage for collaborative work.
Rate Assets to Boost Community Quality
Select any downloaded asset to reveal the Selected Model panel. Rate with 1-10 stars and always log Work Hours—this tells others how much time the asset saves. For example, a detailed sofa model might save 8 hours of modeling.
Why this matters: Assets with 10+ ratings rise in search results. Your 10-second rating directly helps other artists find quality content. Ignoring this step starves the ecosystem of crucial feedback.
Upload Professional Assets in 5 Minutes

Switch to Upload mode and select your asset type. Mandatory fields include:
– 3+ descriptive tags (e.g., “vintage,” “wooden,” “office”)
– 512×512px JPG thumbnail (square format only)
– Production Level: Mark “Finished” for polished assets
For materials, specify Texture Size in Meters—this is non-negotiable for correct scaling. A brick material set to 0.25m means each brick is 25cm wide in your scene. PBR Compatible assets get priority placement in search results.
Validation Tip: Uploads fail most often due to non-square thumbnails or missing tags. Double-check these before submitting.
Optimize Performance for Large Projects
Go to Preferences → Performance Settings and:
– Disable GPU for Thumbnails if viewport lags during browsing
– Set Max Assetbar Rows to 2 for complex scenes
– Turn off Show Tips after your first 5 uses
These tweaks prevent the “spinning wheel of death” when working with heavy scenes. On older machines, reducing thumbnail size to 128px cuts loading times by 60%.
Troubleshoot Top 3 Workflow Killers
Problem: Assetbar won’t load after search
Fix: Disable Show Assetbar when Starting Blender in preferences—this often conflicts with other add-ons.
Problem: “Texture not found” errors
Fix: Repath textures via File → External Data → Find Missing Files after moving projects. Local storage prevents this 90% of the time.
Problem: Upload rejected for “insufficient description”
Fix: Add technical specs like “Modeled in Blender 3.6, 124k tris, PBR textures 4K.” Vague descriptions get auto-rejected.
Contribute While Protecting Your Workflow
Upload assets during natural breaks—like when rendering. Set Privacy to Private for personal use (counts against quota), or Public for community sharing. Always choose Creative Commons Zero for free assets; Royalty-free commercial for paid work.
Key Insight: Assets with “Template” production level get 3x more downloads—they help artists jumpstart projects. Include a simple base mesh rather than expecting users to modify complex geometry.
BlenderKit isn’t just an asset library—it’s your production accelerator. Start today by dragging one free model into your scene using Perpendicular Snap, then rate it to fuel the community. Within a week, you’ll slash modeling time by 40% and never rebuild basic assets again. Remember: the most successful users combine smart searching with consistent rating—every star you give shapes a better library for tomorrow. Your next breakthrough project is waiting in that Assetbar; now you know exactly how to use blender kit to grab it.


