
Nothing ruins your morning routine like struggling with your electric juicer while you’re trying to make a fresh, healthy breakfast beverage. Learning how to use an electric juicer properly transforms this frustration into a smooth, efficient process that delivers nutrient-packed juice in minutes. These powerful kitchen appliances extract liquid from fruits and vegetables while separating the fibrous pulp, giving you pure, vitamin-rich beverages without the effort of manual pressing. Whether you’re using a centrifugal model with its high-speed spinning basket or a slow masticating cold-press juicer, mastering the proper technique makes all the difference in juice quality and appliance longevity.
Electric juicers come in three main varieties, each requiring slightly different operation techniques but sharing core principles. Centrifugal juicers work at high speeds (3,000-16,000 RPM) to extract juice quickly, masticating models operate slowly (40-160 RPM) to preserve more nutrients, and specialized citrus juicers automate the extraction of orange, lemon, and lime juice. This guide walks you through every step of the juicing process regardless of your model type, ensuring you get maximum yield with minimal mess and complete safety. By the time you finish reading, you’ll know exactly how to use an electric juicer to create delicious, fresh juices that support your health goals.
Prepare Produce for Maximum Juice Extraction
Wash and Cut Ingredients Properly
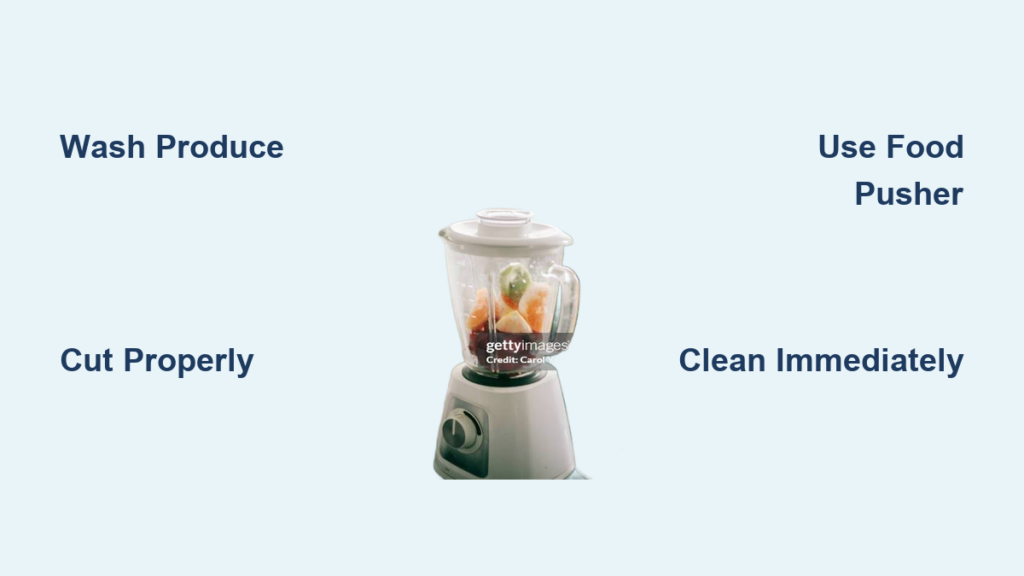
Before touching your juicer, thoroughly wash all fruits and vegetables under running water to remove dirt, pesticides, and contaminants. For produce with inedible skins like melons or pineapples, remove the skin completely before juicing. Most other fruits and vegetables can be processed with their skins intact since many nutrients concentrate just beneath the surface.
Cut produce into pieces that fit comfortably through your juicer’s feed chute—typically 1-2 inch cubes. Centrifugal juicers with wider chutes handle larger pieces, while masticating models require smaller cuts to prevent jamming. Firm, fresh produce yields more juice than overripe items, so select vibrant, blemish-free fruits and vegetables for optimal results.
Select Complementary Ingredients
Choose produce combinations that balance flavors and maximize nutritional benefits. Pair sweet fruits like apples with vegetables such as carrots or beets to create palatable blends that deliver vegetable benefits without overwhelming bitterness. Adding a small slice of lemon or lime enhances flavor and prevents oxidation, which causes juice to brown and lose nutrients. Ginger adds complexity to many juice combinations without dominating other flavors.
Assemble Your Electric Juicer Correctly
Position Base and Attach Components
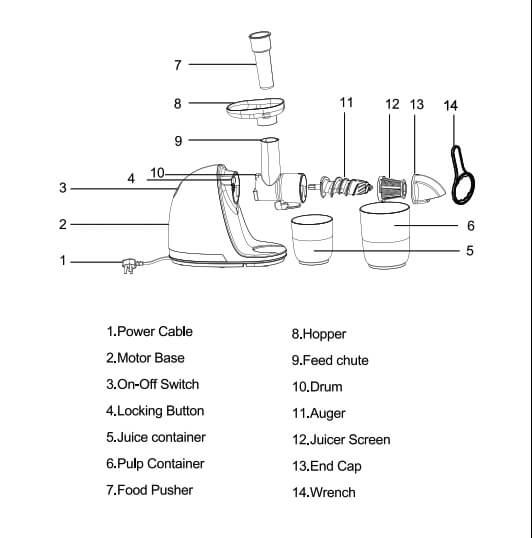
Always unplug your juicer before assembly to prevent accidental activation. Place the base unit on a stable, level surface with enough space for both feeding ingredients and collecting juice. Attach the collection pitcher beneath the juice spout, ensuring it sits securely and won’t tip during operation. Position the pulp container beneath the pulp outlet if your model includes this feature.
Install the filter basket according to your manufacturer’s instructions, handling it carefully to avoid bending the delicate mesh that separates juice from pulp. Attach the lid and verify all safety locking mechanisms engage fully—most modern juicers won’t operate if components aren’t properly assembled. Double-check that no parts are loose or misaligned before plugging in your appliance.
Set Up Collection Containers for Efficient Juicing
Choose Appropriate Containers
Select a juice collection container slightly larger than the expected volume to prevent messy overflow. Glass or food-grade plastic containers work best as they won’t react with natural acids in fruits and vegetables. Position the container directly beneath the juice spout with adequate clearance for smooth flow without splashing.
If your juicer features a drip-stop mechanism, ensure it’s properly engaged to prevent dripping between uses. Having a second container available helps when making multiple batches or separating different juice types. For optimal nutrition, use chilled containers to keep your juice cold during extraction, as temperature affects both flavor and nutrient preservation.
Operate Your Juicer for Optimal Results
Feed Produce at the Right Pace
Plug in your juicer and switch it on before adding any ingredients to verify proper operation. Select the appropriate speed setting—high for hard produce like carrots, low for soft fruits and leafy greens. Maintain a steady feeding pace that allows complete processing of each piece before adding more; never force ingredients into the feed chute.
Always use the food pusher provided with your juicer to guide ingredients downward, keeping fingers safely above the opening. Never insert fingers, utensils, or other objects into the feed chute while operating—serious injuries can occur from the rotating mechanisms. If ingredients jam, immediately switch off and unplug before clearing the obstruction.
Adjust Pulp Settings and Complete Extraction
Monitor juice flow into your collection container and pulp accumulation in the pulp container. If your juicer features adjustable pulp control, set it to your preferred texture before starting. Continue adding ingredients until all produce is processed, then let the juicer run for 15-30 seconds to extract every last drop of juice from the system.
Complete the Juicing Process Properly
Serve and Store Juice Correctly
Fresh juice delivers maximum nutritional benefits when consumed immediately after extraction. Enzymes and vitamins begin degrading shortly after juicing, with significant loss occurring within hours. Pour your juice into glasses right away, adding ice if desired for a refreshing chilled beverage.
If you must store juice, transfer it to an airtight container immediately and refrigerate. Most fresh juices remain safe for 24-48 hours when properly refrigerated, though flavor and nutritional quality diminish over time. Fill containers completely to minimize air exposure, which accelerates oxidation and nutrient loss.
Essential Electric Juicer Safety Guidelines
Prevent Common Injury Risks
Before each use, inspect your juicer for damaged cords, cracks, or bent components that could create hazards. Never insert fingers into the feed chute—even when unplugged—as residual movement could cause injury. Always use the provided food pusher to guide ingredients safely.
Keep electrical components away from water and moisture to prevent shock hazards. The motor base should never be submerged or sprayed with water during cleaning. Never leave your juicer unattended while operating, and ensure children and pets stay clear of the workspace during use.
Clean and Maintain Your Juicer After Use
Immediate Post-Juicing Cleaning Steps
Clean your juicer immediately after use to prevent pulp from drying and hardening on components. Unplug the unit and disassemble all removable parts according to manufacturer instructions. Rinse each component under warm water to remove loose residue, using a soft brush for the filter basket’s delicate mesh.
For stubborn buildup, soak parts in warm, soapy water for 10-15 minutes before gentle scrubbing. A baking soda paste effectively removes tough residue without damaging surfaces. Never submerge electrical components—wipe these with a damp cloth instead. Ensure all parts are completely dry before reassembling or storing.
Troubleshoot Common Juicer Problems

Fix Jamming and Low Yield Issues
If your juicer jams, immediately turn it off and unplug before attempting to clear the blockage. Use a spoon or spatula to carefully remove the obstruction without damaging the filter basket. Prevent future jams by cutting produce into appropriately sized pieces and feeding at a controlled pace.
Low juice yield often results from overripe produce or improper speed settings. Use firm, fresh ingredients and select the correct speed for your produce type—high for hard vegetables, low for soft fruits. Alternating between hard and soft produce maintains optimal extraction efficiency in centrifugal juicers.
Professional Tips for Better Juice Quality
Maximize Flavor and Nutrient Retention
Balance sweet fruits with vegetables to create palatable blends that deliver vegetable benefits without overwhelming bitterness. Process leafy greens first in masticating juicers followed by harder produce to push remaining juice through the system completely. Add citrus to vegetable juices to enhance flavor and prevent oxidation.
Chill your collection container before juicing for immediately refreshing beverages. For best results, consume juice within 20 minutes of extraction when nutrients and enzymes are most abundant. If storing is necessary, keep juice very cold and minimize air exposure to preserve quality as long as possible.
Mastering how to use an electric juicer properly transforms your kitchen into a personal juice bar that delivers fresh, nutrient-packed beverages whenever you desire. By following these specific techniques for preparation, operation, and maintenance, you’ll maximize juice yield while extending your appliance’s lifespan. Remember that immediate cleaning prevents the most common maintenance issues, while proper ingredient preparation ensures smooth operation every time. Fresh juice provides concentrated nutrition that supports your health goals more effectively than store-bought alternatives with their added sugars and preservatives. Start with simple combinations like apple-carrot or citrus blends, then experiment with more complex recipes as your confidence grows. With regular practice using these techniques, you’ll soon create delicious, healthy juices that become an enjoyable part of your daily routine.


