

When your angle grinder’s wheel suddenly refuses to turn during a wheel change, you’re facing one of the most frustrating interruptions to your workflow. That stubborn spindle lock can halt critical projects, whether you’re cutting rebar on a construction site or shaping metal in your workshop. Knowing precisely how to unlock an angle grinder isn’t just about convenience—it’s a safety imperative. This guide delivers field-tested methods to free jammed mechanisms across major brands, with actionable steps that get your tool back in operation while protecting you from serious injury. You’ll learn why locks fail, how to diagnose the specific problem with your model, and proven techniques that work even when the spindle refuses to budge.
Identifying Your Angle Grinder’s Locking System
Spindle Lock Button Operation and Variations
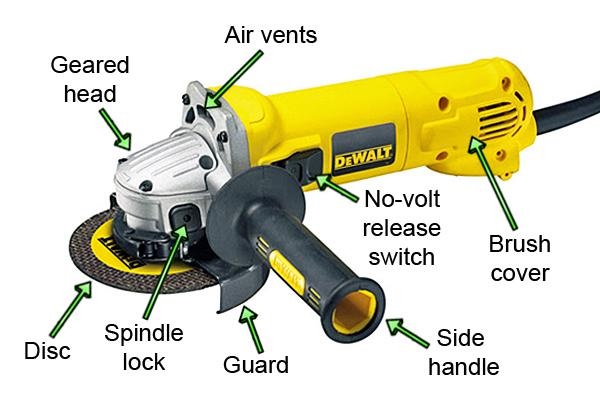
Most professional angle grinders feature a spindle lock button that physically prevents rotation when pressed. This critical component typically sits on the gear housing near the grinding wheel flange and requires firm pressure to engage. DeWalt models generally incorporate a raised, prominent button that needs substantial force, while Makita versions often use a more recessed design that protects against accidental engagement but requires precise positioning. When functioning correctly, pressing this button should create a distinct “click” as it engages with the spindle notch.
The spindle lock mechanism works by inserting a small pin into a corresponding hole on the rotating spindle. Without proper engagement, the spindle continues to rotate freely when you attempt to loosen the retention nut. If your lock button depresses but the spindle still turns, the internal mechanism has likely worn beyond safe operation or become misaligned due to impact damage. This condition requires immediate attention before attempting wheel changes, as forcing the nut can damage both the lock mechanism and the spindle threads.
Paddle Switch Lock-Off Features That Mimic Locking Problems
Many users mistakenly believe their angle grinder is mechanically locked when the issue actually involves the paddle switch lock-off mechanism. Milwaukee and Bosch models frequently incorporate a safety feature that prevents the tool from starting unless the paddle switch is fully released. If the paddle becomes stuck in a partially engaged position, the tool may appear “locked” when it’s actually in a safety lock-off state.
To distinguish between a true spindle lock issue and a paddle switch problem, try gently wiggling the paddle switch while applying slight pressure. A properly functioning lock-off mechanism should release with a distinct click when moved to the correct position. If the paddle feels gritty or requires excessive force to move, internal debris has likely infiltrated the switch housing—a common occurrence when grinding in dusty environments without proper tool protection.
Critical Safety Steps Before Attempting Unlocking
Power Disconnection Protocol
Before touching any locking mechanism, completely disconnect your angle grinder from all power sources. For corded models, unplug from the wall outlet and verify no residual power remains by attempting to start the tool (with safety gear in place). Cordless angle grinders require battery removal—don’t just turn the tool off, as electronic systems can maintain residual power that might cause unexpected startup.
This step cannot be overstated: more than 30% of angle grinder injuries occur during maintenance and accessory changes. Never skip this verification process, even if you’ve “just unplugged it.” The brief moment it takes to confirm power disconnection could prevent life-altering hand injuries from accidental activation.
Protective Gear Requirements for Unlocking Procedures
Wear ANSI-approved safety glasses with side shields or, preferably, a full-face shield when working with angle grinder locking mechanisms. Grinding operations leave microscopic metal particles embedded in wheel flanges that can dislodge during maintenance. Heat-resistant work gloves protect against sharp metal burrs on retention nuts and hot surfaces if the tool was recently in use.
Allow at least 15 minutes for the tool to cool after operation before attempting any unlocking procedures. The grinding wheel and flanges can reach temperatures exceeding 300°F during normal use, creating serious burn hazards during maintenance. Never attempt to unlock a hot angle grinder—even if you’re in a hurry to finish your project.
Effective Unlocking Techniques for Different Failure Scenarios
Standard Spindle Lock Engagement Procedure
Position your angle grinder securely on a non-slip surface with the wheel facing up. Locate the spindle lock button and press it firmly while simultaneously attempting to rotate the retention nut counterclockwise with the appropriate wrench. Most manufacturers provide a two-pin spanner wrench specifically designed for their retention nuts—using the correct tool prevents rounding off the nut flats.
If the lock engages properly, you’ll feel the spindle stop rotating when you press the button. Apply steady pressure to the wrench while maintaining firm pressure on the lock button. If the nut doesn’t budge after moderate pressure, don’t force it—this indicates either improper lock engagement or an over-tightened nut requiring alternative techniques.
Emergency Release for Seized Retention Nuts
When standard methods fail, try the controlled mallet technique. Place a wooden or rubber mallet handle against the outer flange and tap it gently in the counterclockwise direction. The brief impact often breaks the static friction holding a seized nut in place without damaging internal components. This method works particularly well when the nut has been over-tightened during previous installations.
For extremely stubborn nuts, create leverage using a breaker bar extension. Slide a length of steel pipe over your wrench handle to multiply your turning force, but apply pressure gradually rather than using sudden jerks. Even with extended leverage, if the nut won’t budge after reasonable effort, stop immediately—forcing it risks stripping internal threads or damaging the spindle shaft.
Diagnosing and Fixing Common Lock Mechanism Failures
Debris-Jammed Spindle Lock Solutions
Metal shavings and grinding dust frequently infiltrate lock mechanisms, causing them to stick or fail to engage. To clear debris, first disconnect power and remove the side handle. Use compressed air to blow out the area around the lock button, directing short bursts at different angles to dislodge particles. For stubborn buildup, apply a small amount of electrical contact cleaner with a cotton swab, working the lock button repeatedly to distribute the cleaner through the mechanism.
After cleaning, test the lock button’s operation before reassembling. It should depress smoothly with consistent resistance and return to its original position when released. If it still feels gritty or sticks, the mechanism likely requires professional servicing—don’t risk using a compromised lock during wheel changes.
Worn Lock Mechanism Warning Signs
Internal wear in the spindle lock system manifests through several telltale signs: the button may depress but fail to prevent spindle rotation, you might hear a grinding noise when engaging the lock, or the button could become difficult to press or release. These symptoms indicate worn pawls or damaged internal components that can no longer reliably engage with the spindle notch.
A worn lock mechanism represents a serious safety hazard. Without positive spindle engagement, the wheel can rotate unexpectedly during nut removal, potentially causing severe hand injuries. If you notice any of these warning signs, immediately retire the tool from service until the mechanism can be repaired or replaced. Continuing to use a grinder with a compromised lock mechanism risks catastrophic failure during operation.
Preventing Future Locking Mechanism Problems

Proper Nut Tightening Technique
Over-tightening the retention nut causes more lock mechanism problems than any other user error. After hand-tightening the nut, use the spindle lock to apply only a quarter to half turn with your wrench. This provides sufficient security without straining the spindle threads or making future removal difficult. Many professionals use a simple mnemonic: “Hand-tight plus the width of your wrench”—typically about 90 degrees of additional rotation.
When removing wheels after extended use, expect increased resistance due to thermal expansion and contraction cycles. Allow the tool to reach room temperature before attempting wheel changes, as temperature differences can create additional binding on the spindle.
Regular Maintenance Routine
After each use, especially in dusty environments, clean the lock mechanism area with compressed air. Monthly maintenance should include a more thorough inspection: remove the side handle, check for visible debris around the lock button, and verify smooth operation. Apply a light machine oil sparingly to the lock button mechanism every 50 hours of operation—too much lubricant attracts dust and creates grinding paste that accelerates wear.
Store your angle grinder in a dry location with the spindle lock button in the released position. Extended storage with the button depressed can cause the internal spring to lose tension, compromising future lock performance.
When Professional Repair Becomes Necessary

Irreparable Internal Damage Indicators
Certain problems require professional intervention rather than field repairs. If you hear clicking or grinding noises when operating the lock button, visible cracks appear in the gear housing near the lock mechanism, or the spindle rotates freely despite the lock being engaged, internal components have likely failed beyond safe field repair. These conditions indicate broken pawls, damaged spindle notches, or compromised gear assemblies that cannot be safely addressed without specialized tools and replacement parts.
Electrical issues affecting the lock mechanism—such as intermittent lock function or unexpected tool behavior—should always be evaluated by a certified technician. These symptoms can indicate wiring problems that pose shock hazards or control system failures affecting overall tool safety.
Cost-Benefit Analysis for Repair vs. Replacement
For angle grinders under warranty, always seek authorized service to maintain coverage. Out of warranty, compare the cost of professional repair (typically 40-60% of a new tool’s price) against purchasing a replacement. Consider your usage frequency: professionals using the tool daily should prioritize reliable repair, while occasional DIYers might find replacement more economical.
Never attempt to bypass or modify the lock mechanism—this creates unacceptable safety risks. A properly functioning lock system is not a convenience feature but a critical safety component designed to prevent life-altering injuries during routine maintenance.
Angle grinder locking mechanisms exist for one primary purpose: protecting your hands during wheel changes. When these systems fail, addressing the problem correctly ensures continued safe operation rather than creating new hazards through improper fixes. By understanding your specific tool’s locking system, following proper unlocking procedures, and maintaining the mechanism regularly, you’ll prevent most locking issues before they disrupt your work. Remember that when in doubt, professional service always beats injury—your hands are worth far more than any tool repair bill.


