
Your morning smoothie routine grinds to a halt when your Ninja blender starts rattling like a loose hubcap, or worse—the blades spin uselessly while frozen berries float untouched in your pitcher. Loose blade assemblies plague thousands of Ninja owners each year, but you can restore proper blade tension in under an hour without professional help. This guide delivers every proven method to fix your wobbling Ninja blender blade, from a quick 5-minute reseating trick to permanent epoxy repairs for stripped threads, saving you $80+ in replacement costs.
Diagnose Loose Blade Assembly Symptoms

Blade Stack Wobbles When Touched
Place your fingers on the blade assembly and gently push side-to-side. If the blades move more than 1/16th of an inch or spin freely without resistance, your connection has failed. A properly tightened assembly should feel solid with only slight rotational resistance when turned by hand. This wobble means the drive gear has separated from the motor shaft, preventing power transfer.
Metal Grinding During Operation
That alarming grinding noise when you hit “pulse” signals the drive gear slipping against the blade assembly. You’ll hear this most during startup or when blending thick ingredients like frozen fruit. Unlike normal blending sounds, this metallic screech indicates the rubber drive gear teeth aren’t properly engaging with the motor shaft. Continued operation in this state accelerates wear on both components.
Motor Runs But Blades Stall Under Load
Your Ninja’s motor whirs normally with an empty pitcher, but the moment you add ingredients, the blades stop spinning or struggle to chop soft items. This classic symptom means the blade assembly has lost tension against the drive mechanism. The connection holds when unloaded but fails under pressure—exactly what happens when you need your blender most.
Execute the 5-Minute Drive Gear Re-seating Fix
Access Motor Shaft Safely
Unplug your blender immediately before touching any components. Remove the pitcher or single-serve cup to expose the gray rubber drive gear sitting atop the motor base. This flexible component transfers power from the motor to your blades—when it sits too low on the shaft, proper engagement fails. Never attempt this repair with the unit plugged in.
Lift and Rotate Drive Gear
Insert a large flathead screwdriver between the rubber drive gear and motor housing. Apply steady upward pressure while simultaneously rotating the motor shaft by hand—accessible through the circular opening on the bottom of the base. As you turn, the gear will gradually climb the shaft threads. Continue until you feel increased resistance, indicating proper tension has been restored.
Verify Successful Tightening
Reassemble your blender and run it empty for 10 seconds on low speed. Listen for grinding noises and watch for blade wobble. If the blades spin smoothly without vibration, you’ve fixed the problem. This quick method typically lasts 2-6 months depending on usage frequency, buying you time before considering permanent solutions.
Repair Stripped Threads Permanently with Epoxy
Confirm Thread Damage Before Proceeding
If your drive gear keeps working loose within days of re-seating, stripped threads require permanent repair. Remove the gray rubber gear completely and inspect both the gear’s internal threads and the motor shaft’s external threads. Visible flattening or missing thread segments confirms damage. This method works on all Ninja models from the BL500 to Professional Series.
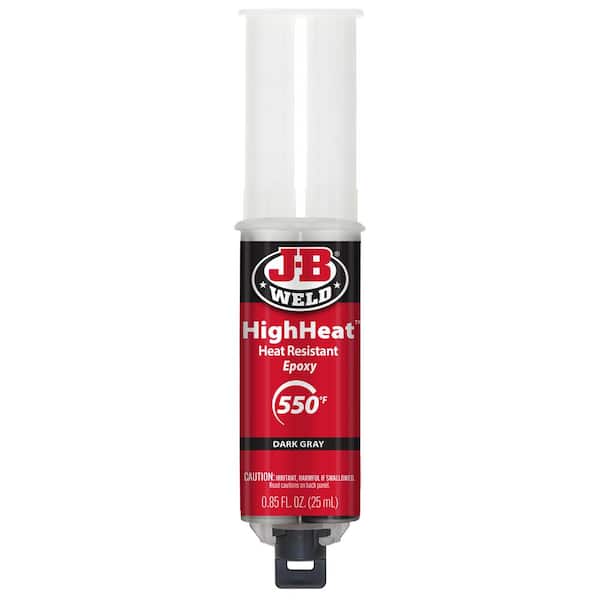
Apply Epoxy to Motor Shaft Only
Clean both components thoroughly with rubbing alcohol to remove grease and debris. Mix JB Weld Original Steel Epoxy according to package instructions. Using a toothpick, apply a thin, even layer ONLY to the motor shaft threads—never inside the motor housing or on the entire shaft. The epoxy fills damaged threads without altering the gear’s position, creating a custom fit.
Cure and Reinstall for Lasting Results
Press the gear firmly onto the shaft, aligning it with the motor’s rotation direction (usually clockwise). Clamp lightly with rubber bands if possible, then let cure undisturbed for 24 hours. After curing, the epoxy creates a permanent bond that eliminates wobble. This $6 repair typically outlasts the blender’s warranty period and avoids $80+ replacement costs.
Replace Worn Blade Assembly Hardware
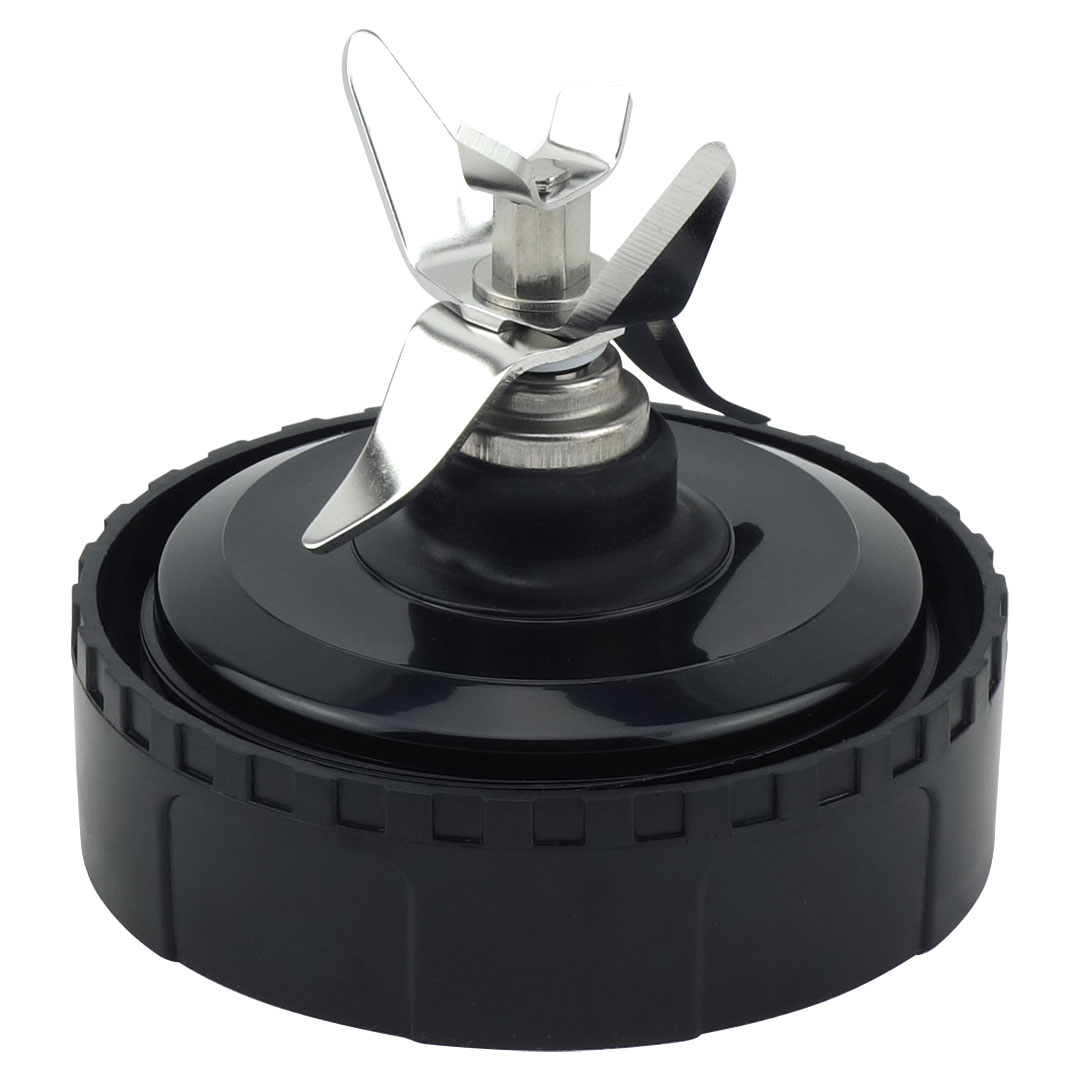
Disassemble Blade Stack Correctly
For wobbling blades independent of the drive gear, focus on the internal securing mechanism. Remove the blade assembly from the pitcher base, then carefully separate the stacked blades following your model’s design. Most Ninja units use either a central bolt or drive pin—handle these small parts over a towel to prevent loss.
Source Exact Replacement Parts
Take your worn hardware to a local hardware store for precise matching. Common sizes include M5 and M6 metric bolts, but verify thread pitch using sample nuts. Avoid standard hardware store bolts that may differ in length or thread count. Proper fit ensures the blade stack maintains compression during operation.
Reassemble with Thread Locker
Apply a single drop of blue thread-locking compound (Loctite 242) to the new bolt or pin before installation. Hand-tighten first, then give a quarter-turn with pliers—overtightening strips new threads. Reassemble the blade stack in correct order and test tension by attempting to wiggle the blades. Properly secured blades should move less than 1/32nd of an inch.
Prevent Future Blade Loosening with Daily Habits
Optimize Blending Techniques Immediately
Never fill containers beyond the max line—overfilling creates resistance that stresses the drive mechanism. Cut frozen items into 1-inch cubes before blending, and always add liquids first to cushion solid ingredients. These small changes reduce torque spikes that work blades loose over time.
Implement Weekly Gear Inspections
After cleaning, check drive gear tightness by trying to rotate it with your fingers. Look for rubber wear patterns or metal shavings around the base—early signs of failure. Clean gear teeth weekly with an old toothbrush to prevent buildup that causes uneven wear. A few minutes of maintenance prevents hours of repair.
Schedule Monthly Deep Cleaning
Disassemble the blade assembly completely once a month, checking for worn washers or cracked gaskets. Replace any damaged components immediately—small failures cascade into major repairs. Pay special attention to the rubber O-ring between blade layers, which maintains compression and prevents leaks.
Test Blade Tension After Every Repair
Conduct Empty Container Sound Check
Run your Ninja blender empty on each speed setting for 15 seconds. Listen for vibrations or grinding noises that indicate improper engagement. The blade assembly should spin smoothly without wobble at all speeds—any irregularity means your repair needs adjustment.
Perform Progressive Load Testing
Start with 2 cups of water to verify basic function, then add 5-6 ice cubes for moderate resistance. Finally, test with frozen fruit to simulate real-world conditions. The blades should maintain consistent speed without slipping or stalling under any load. If performance drops with heavier ingredients, revisit your drive gear seating.
Verify Visual Operation Indicators
Watch the blade assembly during operation for any visible wobbling or separation between layers. The drive gear should rotate smoothly without jerking motions. Check that the pitcher seats firmly against the base with no play—improper container alignment transfers stress to the blade mechanism.
Know When to Repair vs Replace Your Ninja Blender
Follow the Warranty Decision Timeline
Units under 1 year: Contact Ninja for free replacement. Between 1-3 years: DIY repair offers 5-10x better value. Over 3 years: Consider replacement given improved model features. Ninja’s official policy typically involves complete unit replacement rather than individual parts, making DIY repairs economically smart for out-of-warranty units.
Calculate Real Repair Savings
Epoxy repair costs $6 and takes 1 hour versus $19.95 shipping for Ninja’s out-of-warranty service. A new unit costs $80-$200 plus your time to select and set up a replacement. For most users, even complex blade tightening repairs pay for themselves after just 3-4 uses.
Your Ninja blender should deliver years of reliable service with proper maintenance. These proven tightening techniques restore full functionality for a fraction of replacement cost, keeping your kitchen running smoothly. Whether you need a quick fix before breakfast or a permanent solution for heavy daily use, these methods ensure your blender blades stay securely tightened through countless smoothies, soups, and sauces.


