
That stubborn angle grinder nut refusing to budge is more than just frustrating—it’s a potential safety hazard waiting to happen. When the retaining nut securing your grinding wheel becomes seized from years of vibration, heat cycles, and debris accumulation, attempting improper removal techniques can damage your tool’s spindle threads or leave you with a dangerously loose wheel during operation. Most DIYers waste hours trying to force the nut with excessive torque only to end up with rounded corners that make removal impossible. The truth is, successfully loosening an angle grinder nut requires understanding your tool’s specific locking mechanism and applying the right sequence of techniques—not brute force.
The secret to solving this common workshop dilemma lies in working with your angle grinder’s engineering rather than against it. Nearly all failed removal attempts happen because users skip the spindle lock engagement or apply force in ways that damage internal components. This guide reveals the precise methodology professionals use to free even the most stubborn angle grinder nuts while protecting your tool’s integrity. You’ll learn why penetrating oil alone often fails, when heat application becomes necessary, and how to prevent future seizures before they occur—saving you time, money, and potential injury.
Essential Safety Precautions Before Attempting Removal
Disconnect your angle grinder from all power sources before touching the nut—this isn’t optional. For corded models, unplug directly from the wall outlet, not just the switch. Cordless users must remove the battery pack completely; residual charge can still activate the motor. One accidental trigger pull while your wrench is positioned could send metal fragments flying or crush your fingers against the housing.
Equip yourself with ANSI-approved safety glasses to shield your eyes from rust particles and metal shavings that dislodge during the process. Heavy-duty work gloves improve grip on oily tools while protecting your knuckles from sharp edges. Lay down a shop towel beneath your work area to catch falling debris and prevent small parts from disappearing into your workshop floor. Never attempt nut removal with the grinder resting loosely on your lap—that positioning guarantees injury if the tool suddenly activates or your wrench slips.
Secure your angle grinder firmly in a padded vise or between non-marring blocks on your workbench. The tool must remain completely stationary while you apply torque; any movement during the process risks stripping the nut’s flats. Ensure your workspace has bright, direct lighting so you can clearly see the spindle lock mechanism and verify proper engagement. Skipping these fundamental safety steps transforms a routine maintenance task into a potential emergency room visit.
Locate and Properly Engage Your Specific Spindle Lock Mechanism
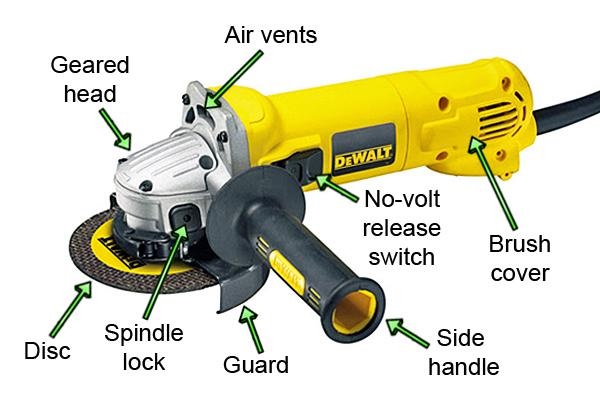
Your angle grinder’s spindle lock isn’t just a convenience feature—it’s engineered specifically to immobilize the rotating shaft during wheel changes. This critical component typically protrudes from the gear housing near the wheel mounting area, but its exact location varies significantly by manufacturer. On DeWalt models, it’s usually a red button on the housing side opposite the handle; Milwaukee often places it near the top of the gear case; Makita frequently uses a rotating collar design.
Press the spindle lock button while manually rotating the grinding wheel until you feel a distinct “click” indicating engagement. Properly locked, the wheel should remain completely stationary when you attempt to turn it by hand. If rotation continues, the lock hasn’t fully engaged—you may need to rotate the spindle slightly to align the internal pin with its corresponding hole. Some older models require holding the lock button while tightening or loosening the nut, while newer designs maintain engagement until deliberately released.
Verify lock effectiveness by applying gentle pressure with your wrench before committing full force. If the spindle still rotates, disengage and retry the locking sequence—forcing the nut while the spindle turns guarantees damaged threads. Consult your tool’s manual if engagement feels inconsistent; worn lock pins or broken springs often cause failed engagement and require professional repair before safe operation.
Apply the Correct Wrench Technique with Maximum Leverage
Your angle grinder came with a specific wrench designed exclusively for its spindle nut dimensions—never substitute a standard socket or adjustable wrench. These specialized tools feature precision-machined flats that match your nut’s geometry perfectly, preventing the rounding that occurs with improper tools. Insert the wrench fully into the nut’s drive holes, ensuring complete contact across all engagement surfaces.
Position yourself for optimal leverage by standing directly over the tool with your dominant hand on the wrench handle’s end. Apply steady, increasing pressure in a counterclockwise direction while maintaining firm downward pressure to keep the wrench seated. Initial resistance should give way to smooth rotation within 15-20 degrees of movement—if the nut feels “frozen” through its entire range, stop immediately to avoid damage.
When encountering stubborn resistance, tap the wrench handle’s end with a rubber mallet to deliver controlled shock that breaks thread adhesion without risking stripped corners. Apply penetrating oil directly at the nut-spindle interface, wait 10 minutes for capillary action to draw it into the threads, then retry with the mallet technique. If the nut moves slightly but binds repeatedly, you’re likely dealing with cross-threading—back off immediately and inspect both components before proceeding.
Break Severe Corrosion with Strategic Heat Application

When penetrating oil fails to free a completely seized nut, controlled thermal expansion often provides the breakthrough. Heat the nut directly with a heat gun set to 500-600°F for 45-60 seconds, focusing on the nut’s circumference while avoiding nearby plastic components. The steel nut expands faster than the spindle shaft, creating microscopic gaps in the seized interface.
Immediately after heating, apply fresh penetrating oil that’s drawn deeper into the threads by the heat. Engage your spindle lock and attempt loosening within 30 seconds while thermal expansion remains effective. You should hear subtle cracking sounds as corrosion bonds break—this indicates success. For extreme cases, repeat the heat-oil-loosen sequence 2-3 times with 5-minute cooling intervals between attempts.
Never apply open flame directly to the nut—propane torches can overheat components and damage internal bearings. Maintain at least 6 inches distance from plastic housing elements, and never heat the spindle shaft itself. If your grinder has rubber grips or battery contacts nearby, shield these areas with a heat-resistant barrier before applying thermal treatment.
Impact Driver Method for Maximum Torque Without Damage
When manual methods fail, a 1/2-inch drive impact driver delivers the necessary force without risking rounded fasteners. Select a six-point impact socket that matches your nut’s size exactly—never use a standard 12-point socket that slips under high torque. Set your impact driver to reverse (counterclockwise) at medium power setting to prevent sudden, uncontrolled rotation.
Position the socket squarely on the nut and pull the trigger in short, controlled bursts of 1-2 seconds duration. The rapid hammering action delivers high torque in milliseconds, breaking thread adhesion without continuous force that damages components. After 3-4 impacts, attempt manual turning—the nut should now rotate freely through its full range.
If resistance returns, reapply penetrating oil and repeat the impact sequence. Never use an impact driver on plastic-housed grinders without verifying internal spindle compatibility—some lightweight models can’t withstand impact forces. For cordless models, ensure your battery has sufficient charge to maintain consistent impact power throughout the procedure.
Prevent Future Seizures During Reassembly
After successful removal, thoroughly clean both spindle threads and nut interior with a brass brush and degreaser. Inspect threads under bright light for nicks, cross-threading, or deformation—damaged threads compromise safety and require professional repair. Apply a thin coat of nickel-based anti-seize compound to the cleaned threads, covering but not pooling in the grooves.
When reinstalling the wheel, hand-tighten the nut until snug, then give exactly one-quarter turn with your wrench—over-tightening causes 80% of future seizure problems. Verify proper wheel alignment by spinning the assembly by hand before final tightening; misaligned wheels create dangerous vibration during operation. Store your angle grinder with the nut slightly loose (one full turn from tight) if it will sit unused for extended periods.
Establish a maintenance habit of applying fresh anti-seize during every third wheel change. Keep your spindle lock mechanism clean and lubricated with light machine oil to ensure reliable engagement. These simple steps prevent 95% of future nut seizure problems while extending your tool’s operational life.
When to Seek Professional Help Instead of Forcing Removal
Stop immediately if you detect any of these critical warning signs: the spindle lock button feels loose or doesn’t engage properly, the nut turns but won’t back off the spindle, or you hear grinding noises during attempted removal. These indicate internal damage that worsens with continued force application. A compromised spindle lock mechanism often requires complete gear housing disassembly—a task best left to authorized service centers.
If multiple techniques fail to free the nut after proper preparation, professional intervention becomes more cost-effective than risking catastrophic tool damage. Most service centers can remove seized nuts using specialized hydraulic tools that apply controlled force without damaging spindle threads. Attempting last-resort methods like nut splitting or cutting often damages the spindle beyond repair, making professional service necessary anyway.
Remember that a seized nut frequently signals underlying issues with your tool’s internal components. Before reinstalling a new wheel, have a professional inspect the spindle bearings, lock mechanism, and gear assembly—addressing these problems prevents future safety hazards and extends your angle grinder’s service life significantly.


