
That sour, gym-locker stink hits the moment you crack open your shaker. If your blender bottle reeks like forgotten gym socks despite regular washing, you’re battling protein residue that’s turned into a bacterial buffet. BPA-free plastic traps odors like a sponge, and hidden gunk in crevices keeps the stench alive even after surface cleaning. The good news? You can nuke week-old funk using pantry staples and a 15-minute scrub session. Below, you’ll discover battle-tested methods that actually penetrate odor-causing bacteria—not just mask smells—and learn the exact moment when it’s smarter to replace your bottle than waste another minute scrubbing.
Most people don’t realize that protein shakes create the perfect storm for stink: warm liquid, dark storage, and nutrient-rich residue. When you leave that bottle sealed in your gym bag, bacteria feast on dried whey and casein, multiplying exponentially within hours. Standard rinsing misses 70% of the problem—hidden in silicone gaskets, threaded lids, and whisk ball coils. But skip the expensive “specialty cleaners.” With the right sequence (starting the second you finish your shake), you’ll banish odors for good and keep your bottle smelling neutral for months.
Rinse Your Blender Bottle Within 30 Minutes of Use
That 30-second post-shake rinse is your odor insurance policy. Swirl warm water inside the bottle for 10 seconds, dump, and repeat until water runs clear—this flushes 90% of protein residue before it hardens. Skipping this step forces you into deep-cleaning mode 3x more often, as dried whey bonds to plastic like industrial glue. Always point the bottle opening downward while rinsing; residue loves to pool in the flip-cap hinge.
Never Seal a Wet Bottle in a Hot Environment
Leaving your bottle sealed in a hot car or gym bag after use is odor suicide. Heat accelerates bacterial growth by 400%, turning mild sourness into permanent stench within 2 hours. If you can’t rinse immediately, loosen the lid completely and store upright—never horizontal—to allow airflow. This simple move buys you 90 minutes before residue starts gluing itself to plastic walls.
Emergency Baking Soda Fix for On-the-Go
No sink nearby? Add 1 teaspoon baking soda to your empty bottle, fill halfway with water, and shake vigorously for 5 seconds. The alkaline solution neutralizes acidic odor compounds on contact, buying you 4+ hours before bacteria reactivate. Dump the mixture before it settles—leaving it too long creates a gritty film that’s harder to clean later.
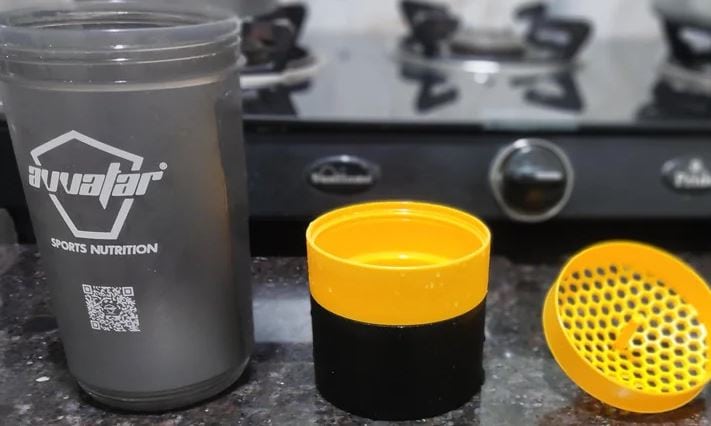
Disassemble All Hidden Components Immediately
Odor always returns if you miss the gasket or whisk ball. Protein powder seeps into microscopic cracks in silicone seals and lodges between BlenderBall coils, creating odor factories invisible to the naked eye. Skipping disassembly guarantees you’ll repeat deep-cleaning weekly instead of monthly.
Critical Parts to Remove Every Time
- Flip cap and main lid (check for residue under hinge tabs)
- Silicone gasket ring (peel from groove—don’t stretch it)
- BlenderBall wire whisk (shake bottle upside-down to dislodge)
- Straw inserts or sipper tubes (common mold hotspots)
Spot Hidden Mold with This Visual Test
Hold parts against bright light. White film means protein buildup, yellow crust signals advanced bacterial colonies, and black specks indicate mold. If you see black spots anywhere—even on the gasket—toss the bottle immediately; no cleaning method fully eradicates mold in porous plastic.
Execute the 15-Minute Deep-Cleaning Protocol
This sequence softens residue without damaging BPA-free plastic. Total active time: 15 minutes (plus 30-minute soak).
- Warm Soapy Soak: Fill sink with warm (not hot) water and 5 drops dish soap. Submerge all disassembled parts for 10–30 minutes—longer for week-old residue. Hot water warps plastic, sealing in odors.
- Scrub Interior Walls: Use a long bottle brush in tight circular motions from base to rim. Focus on the bottom curve where powder pools.
- Detail Threads and Gaskets: Attack lid threads and gasket grooves with a soft toothbrush. Squeeze the silicone ring to expose hidden residue.
- Whisk Ball Coil Cleaning: Run toothbrush between BlenderBall wires while submerged—powder hides in coil crevices.
- Rinse Until Zero Bubbles: Hold parts under running water until soap film vanishes. Trapped suds reactivate bacteria.
Eliminate Stubborn Odors in One Overnight Soak
When soap fails, deploy these targeted solutions. Critical: Always rinse parts first to remove loose residue before deodorizing.
Baking Soda and Vinegar Overnight Bomb
Add 2 tablespoons baking soda to the bottle, fill halfway with white vinegar, and let fizz for 15 minutes. Seal tightly and soak overnight (do not shake—pressure builds). The reaction lifts protein film deep in plastic pores. Scrub and rinse next morning—works 95% of the time for week-old stench.
Hydrogen Peroxide Bacteria Kill
Pour ¼ cup 3% hydrogen peroxide into the rinsed bottle, seal, and shake for 30 seconds. Peroxide penetrates microscopic scratches where bacteria hide, killing odor sources without harsh fumes. Rinse thoroughly—leftover peroxide tastes metallic.
Lemon Juice Protein Dissolver
Squeeze one fresh lemon into the bottle, fill with warm water, and swirl for 15 minutes. Citric acid breaks down protein bonds faster than vinegar. For extra power, add a pinch of baking soda before swirling to create a bubbling action that attacks residue.
Dishwasher Cleaning Without Warping Parts

Only attempt this if your bottle base stamp says “top-rack safe.” Older BlenderBottles warp in dishwashers, creating new odor traps. Place parts as follows:
– Lid and gasket on top rack (not near heating element)
– BlenderBall in silverware bin (prevents tangling)
– Bottle body upside-down on prongs
Run on normal cycle—never “sanitize” mode. Inspect gaskets afterward for warping; heat-damaged seals leak and trap moisture.
When to Toss Your Blender Bottle Immediately

Stop cleaning if you see any of these:
– Permanent stench after baking soda/vinegar treatment (bacteria penetrated micro-scratches)
– Black mold spots (even tiny ones—mold roots spread invisibly)
– Cloudy or etched plastic walls (sign of permanent damage where bacteria thrive)
Replacement costs less than $10—don’t risk ingesting mold spores.
Prevent Future Smells with 30-Second Habits
Skip deep-cleaning for weeks with these field-tested tricks:
– Store completely open: Leave lid off and flip-top unlatched until bone-dry
– Weekly baking soda soak: Fill with 1 Tbsp baking soda + warm water every Sunday
– Never use hot liquids: Heat cooks protein onto walls (BlenderBottle warns against this)
– Carry effervescent tablets: Drop one in water for instant on-the-go cleaning
Your 60-Second Odor Emergency Kit
- Rinse immediately after every shake—no exceptions
- Disassemble gasket, whisk ball, and lid
- Soak 15 minutes in warm soapy water
- Scrub threads and gasket with toothbrush
- For lingering smells: Baking soda + vinegar soak overnight
- Air-dry upside-down with all parts separated
- Toss bottle if smell survives two deep-cleaning rounds
Stick to this routine, and your blender bottle will stay neutral-smelling for 6+ months. Remember: the real battle happens in the first 30 minutes after your shake—master that window, and you’ll never again gag at the gym-bag stench. For travel days, keep a single-use cleaning tablet in your bag; it’s the insurance policy against permanent odor that costs less than your post-workout protein bar.


