
Your Cuisinart blender suddenly won’t turn on mid-smoothie, or it struggles with ice that it once pulverized effortlessly. Before you shell out $100+ for a replacement, know that 90% of common blender failures have simple fixes costing under $20 in parts. This how to fix Cuisinart blender guide delivers model-specific repair instructions using only basic tools. You’ll diagnose electrical issues, revive stuck blades, and replace failing components in under 30 minutes—saving your appliance and your budget.
Why Your Cuisinart Blender Won’t Power On (And How to Fix It)
That terrifying moment when pressing the power button yields nothing—not even a hum—usually points to three culprits: safety switch blockage, cord damage, or model-specific startup errors. The safety switch at the cup connection port is Cuisinart’s most frequent failure point. Food splatter and dried residue jam this tiny mechanism, preventing electrical contact even when the cup seems properly seated.
Cleaning the Safety Switch on Cuisinart Blenders
- Unplug immediately and remove the blending cup
- Locate the small rectangular switch at the rear of the base connection port
- Dip a cotton swab in rubbing alcohol and scrub around the switch edges
- Press the switch firmly with your finger—it must click freely without resistance
- Test operation with the cup perfectly aligned (allow 2 minutes for alcohol to evaporate)
- Pro Tip: Clean this switch weekly with a dry toothbrush to prevent future jams
Testing and Replacing a Faulty Power Cord
Visible cord damage isn’t always the issue—internal wire breaks often occur near plug connections. Before replacing:
– Plug the cord into another appliance to verify outlet functionality
– Inspect for subtle cracks in the cord insulation near the base entry point
– Gently bend the cord while attempting to power on—intermittent operation confirms internal breakage
– Replacement Shortcut: Order OEM cords ($12-$18) using your model number. Most install in 5 minutes with a Phillips screwdriver after removing the base plate.
SBC-1000 Red Light Flashing: Correct Startup Sequence
This cooking blender’s flashing red light means you’ve skipped mandatory programming steps. Unlike standard models:
1. Power on first using the main button (no lights should flash yet)
2. Set cooking time with + or – buttons before selecting temperature
3. Choose High/Medium/Low heat only after time is set
4. Finally select Pulse/Stir/Blend mode
Critical Mistake: Turning the dial immediately after power-on triggers the red light error. Reset by unplugging for 30 seconds.
Stopping Smoke and Burning Smells in Cuisinart Motors
That acrid burning odor means your motor is overheating—often from prolonged blending of frozen ingredients or stripped internal components. Unplug immediately and let the unit cool for 30 minutes before inspection. Continued operation risks permanent motor damage.
Immediate Steps for Overheating Blenders
- Remove the base plate using a Phillips screwdriver to access motor connections
- Check for loose or frayed wires at the motor terminals (re-secure with screwdriver)
- Inspect for melted plastic or scorch marks on the motor housing
- Warning: If you see black residue or burnt insulation, stop repairs—motor replacement is mandatory
- Test operation after cooling only if wiring appears intact
When to Replace Your Cuisinart Motor
If the motor still emits burning smells after cooling and wiring checks:
– Motors under $40 work for most models (BFP-703, CBT-500)
– Replacement takes 20 minutes: disconnect wire harnesses, unscrew mounting brackets, swap units
– Decision Guide: Replace motors on blenders under 5 years old; consider full replacement for older units unless sentimental value justifies repair
Fix Weak Blending Power: Blade and Coupler Solutions

When your Cuisinart runs but won’t crush ice or blend frozen fruit, the motor is likely fine—the problem lives in the power transfer system. Stripped couplers or corroded blades prevent rotational force from reaching your ingredients.
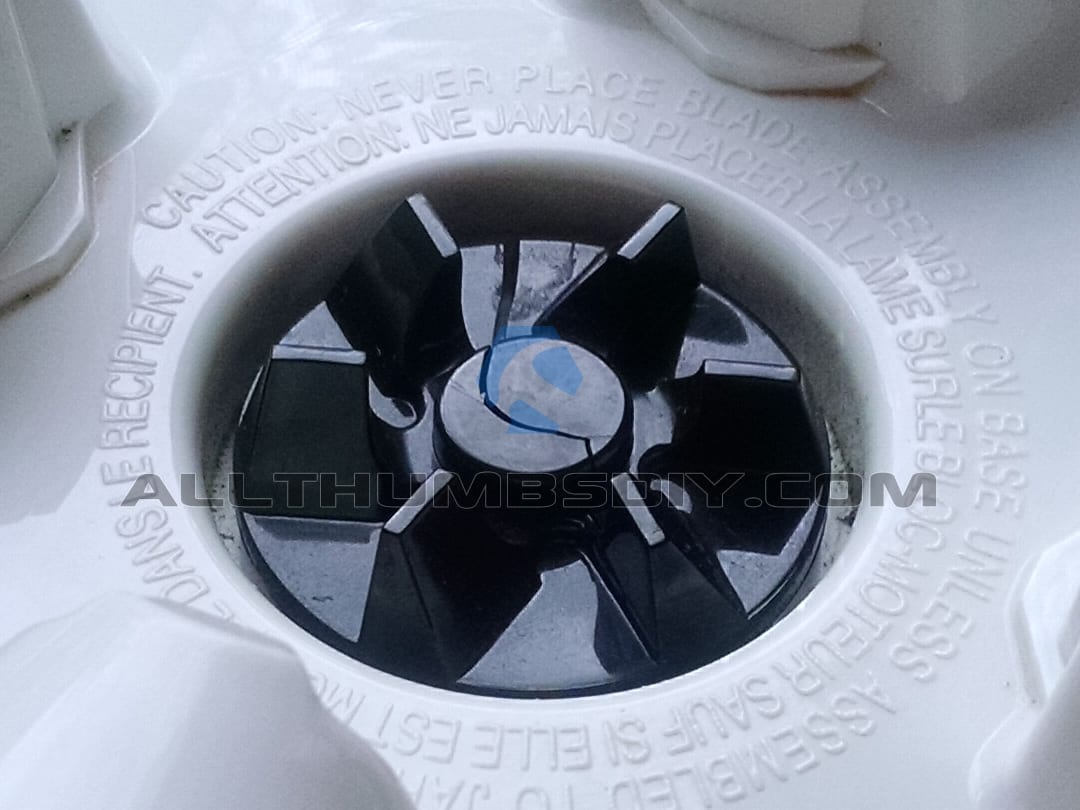
Inspecting and Cleaning Your Cuisinart Blade Assembly
- Remove the blade assembly and check for trapped food debris under the gasket
- Spin blades by hand—they should rotate smoothly with slight resistance
- Look for bent blade edges or excessive wobble (replace if damaged)
- Soak in hot, soapy water for 10 minutes to dissolve residue
- Visual Cue: Black gunk around blade bases indicates grease failure requiring full disassembly
Replacing a Stripped Coupler Connection
The coupler (plastic piece connecting blade to motor shaft) commonly cracks after heavy use:
– Symptoms: Motor runs but blades stay still, grinding noises during operation
– Removal: Hold the brass nut with pliers while turning the bottom screw clockwise
– Installation: New couplers cost $10 online—ensure teeth align perfectly during reassembly
– Time Saver: Keep a spare coupler in your repair kit—this part fails predictably every 3-4 years
Unsticking Frozen Cuisinart Blender Blades: Step-by-Step
Corrosion between the central rod and blade assembly causes blades to lock while the motor hums. This isn’t a motor issue—it’s a lubrication failure from prolonged exposure to acidic ingredients like citrus.
Safe Disassembly of Blade Components
- Wrap one rag tightly around the blades for grip, another around the rubber gasket
- Turn the rubber piece counterclockwise (lefty-loosey) while holding blades steady
- Note washer/gasket order—photograph before removal
- Critical: Never place hands near blades—use rags even when disassembled
Removing Corrosion with WD-40 and Dremel
- Spray WD-40 on corroded central rod and let penetrate 5 minutes
- Use Dremel with fine sanding drum to smooth pitted metal surfaces
- Apply food-grade grease ($2 tube) to rod before reassembly
- Wash all parts thoroughly with Dawn dish soap to remove residue
- Pro Tip: Replace rubber gaskets during reassembly—they degrade after 2 years
Replacing a Cracked Clutch in BFP-703 Blenders
The BFP-703 model’s clutch failure mimics motor problems: it spins freely when empty but stalls with food. Hairline cracks in the black plastic clutch allow initial rotation but lose grip under resistance.
Identifying Clutch Failure Symptoms
- Motor runs but jar doesn’t spin when loaded
- Visible cracks around the brass screw housing
- “Clicking” sound during startup that stops when food is added
- Diagnostic Test: Spin the empty jar by hand—if it rotates smoothly but jams with resistance, clutch is failing
BFP-703 Clutch Replacement Procedure
- Unplug and lay blender sideways on a towel
- Remove three base screws using a 5+ inch Phillips screwdriver
- Separate base carefully—wires connect to control panel
- Hold brass nut with pliers while turning bottom screw clockwise
- Install new clutch (SPB-20TXN OEM or Lonye replacement)
- Reassemble ensuring rubber bushing seats fully
– Time Estimate: 25 minutes with basic tools
– Pro Tip: Buy two clutches—they often fail in pairs
Preventing Future Cuisinart Blender Breakdowns
Most repairs stem from preventable wear. Implement these routines to double your blender’s lifespan without expensive servicing.
Weekly Maintenance Routine
- Rinse blade assembly immediately after use (never soak overnight)
- Wipe safety switch area with damp microfiber cloth
- Check coupler teeth for wear while drying components
- Critical Step: Dry all parts thoroughly before reassembly—moisture causes corrosion
Monthly Deep Clean Procedure
- Disassemble blade assembly completely
- Soak parts in hot, soapy water for 15 minutes
- Use old toothbrush to clean gasket channels
- Apply single drop of food-grade lubricant to central rod
- Warning: Never use petroleum jelly—it degrades rubber gaskets
Safe Usage Guidelines to Avoid Damage
- Hot Liquids: Only blend in SBC-1000 cooking models (never in standard blenders)
- Frozen Foods: Cut into 1-inch cubes and pulse in 10-second bursts
- Motor Rest: Wait 2 minutes between heavy batches
- Never Blend: Steel-cut oats, raw carrots, or extremely fibrous greens without pre-cutting
Your Cuisinart blender can deliver flawless performance for 10+ years with these targeted fixes. Most repairs take under 30 minutes and cost less than $20—far cheaper than replacement. Bookmark this how to fix Cuisinart blender guide for instant access when problems strike. By addressing issues immediately and implementing preventive maintenance, you’ll keep crushing ice and blending silky-smooth sauces for years to come. For model-specific parts, contact Cuisinart customer support at 1.800.726.0190—they often provide diagrams for discontinued models.


