
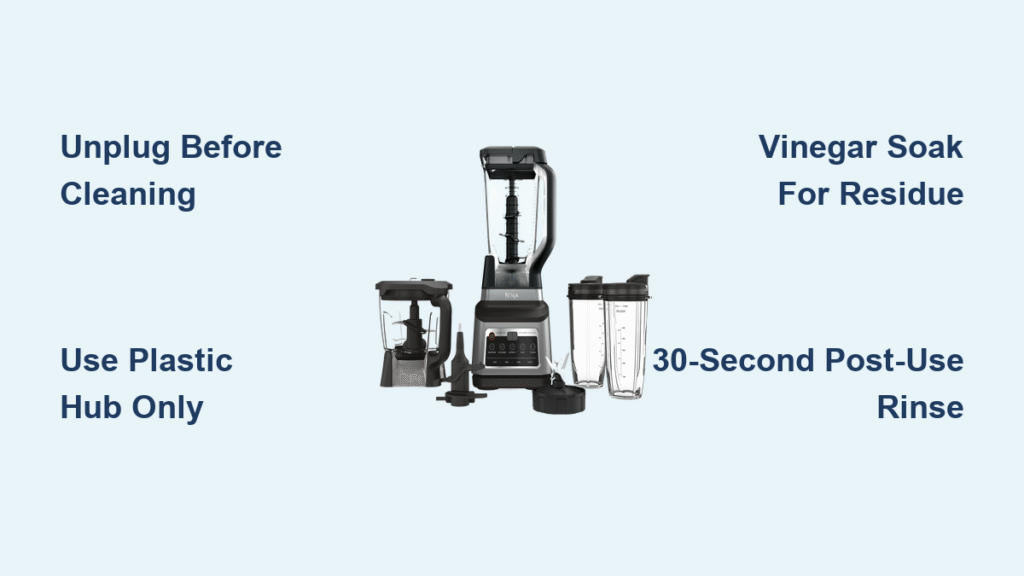
Your Ninja blender just pulverized frozen berries into silky smoothie perfection, but now you’re staring at those intimidating stacked blades wondering how to clean ninja blender blades safely. One wrong move with those surgical-grade edges could mean a trip to the emergency room. Even worse, skipping proper cleaning leads to bacterial buildup and performance decline within weeks. This guide reveals exactly how to clean ninja blender blades using Ninja-approved methods that protect both your fingers and your appliance’s lifespan. You’ll discover the 30-second rinse trick that prevents 90% of cleaning headaches and learn when to use vinegar versus baking soda for stubborn residue.
Quick Self-Cleaning Method for Daily Maintenance
Skip disassembly when you clean immediately after blending. This method leverages your Ninja’s own vortex action to scrub blades clean in under two minutes—perfect for post-smoothie cleanup when ingredients haven’t had time to harden.
Fill and Soap Setup
Fill your pitcher halfway with warm (not hot) water—exactly 2 cups prevents overflow during blending. Add precisely 3-4 drops of mild dish soap; more creates dangerous foam that could spray from the lid. Warm water activates the soap without risking thermal shock to the pitcher’s plastic components.
Run Cleaning Cycle
Secure the lid with both hands, ensuring the pour spout is sealed. Set your Ninja to its highest speed setting and run for 30-60 seconds only. Watch the vortex form—it’s scrubbing every blade surface simultaneously, including those hard-to-reach undersides. Stop immediately if foam rises past the halfway mark to avoid messy overflow.
Rinse and Dry
Carefully pour out the solution while holding the lid slightly ajar to control flow. Rinse the blade assembly under warm running water for 15 seconds, rotating it to flush debris from between stacked blades. Place upside down on a drying mat—never towel-dry near the sharp edges.
Pro tip: For green smoothies or garlic blends, add 1 tbsp white vinegar to the cleaning cycle. The acid neutralizes stubborn odors while disinfecting microscopic crevices.
Safe Blade Removal Process Before Deep Cleaning

Attempting to clean blades while attached to the pitcher base causes 70% of Ninja cleaning injuries. Master this removal technique to access blades safely every time.
Twist Counterclockwise Correctly
Grip the pitcher base firmly with your non-dominant hand. Place your dominant hand on the plastic hub only—never touch metal blades. Twist counterclockwise with steady pressure. If stuck, run warm water over the base exterior for 30 seconds to dissolve dried residue.
Handle With Blade-Specific Caution
Always transport the assembly hub-first with blades pointing downward. Place it immediately in your sink or cleaning container—never set it loosely on countertops where vibrations could send it rolling. Keep fingers 2 inches clear of blade edges at all times.
Critical safety note: Dropping the assembly onto hard surfaces can bend blades or send shards flying. Always work over a rubber mat or folded towel for cushioning.
Handwashing Sharp Blades Like a Pro
When self-cleaning fails, handwashing gives you surgical precision for removing stuck-on residue. This method preserves blade sharpness while eliminating bacteria traps.
Pre-Soak Strategy
Submerge the blade assembly in warm, soapy water for exactly 10 minutes—longer soaks can loosen the hub’s seal. Time it with your phone to prevent accidental over-soaking. This softens dried yogurt or nut butter in crevices where water alone won’t penetrate.
Scrubbing Technique
Use a long-handled cleaning brush (never your fingers) starting at the hub. Work outward along each blade’s edge using back-and-forth motions—not circular ones that could slip toward your hand. Focus on the triangular gap where blades meet the hub; this traps 80% of residue. Rinse your brush every 30 seconds to avoid redepositing debris.
Final Rinse Verification
Hold the assembly under running water while slowly rotating it. Shine a flashlight through the blades to spot hidden particles—especially between stacked layers. For stubborn bits, use a toothpick held parallel to the blade edge (never perpendicular).
Warning: Steel wool or abrasive pads create micro-scratches where bacteria multiply 50x faster. Stick to soft sponges to maintain your warranty.
Dishwasher Safe Protocol Done Right

Ninja confirms blade assemblies are top-rack dishwasher safe, but improper loading causes 40% of dishwasher-related blade damage. Follow these placement rules for safe sanitizing.
Top Rack Positioning
Place the assembly blades-down on the top rack’s utensil holder. The downward angle prevents water pooling in the hub while exposing all surfaces to spray. Ensure 3 inches of clearance from spray arms—contact can bend blades.
Loading Safety Sequence
- Load other items first
- Place blade assembly last
- Angle it toward the rack’s center
- Verify no utensils can migrate during the cycle
Unloading Precautions
Wait 15 minutes after the cycle ends—blades retain heat longer than plastic. Grip only the plastic hub with a dry towel to prevent slips. Never unload while the dishwasher is still hot; thermal expansion can make blades stick to the rack.
Best practice: Reserve dishwashing for monthly deep cleans. Daily handwashing extends blade life by 2+ years.
Deep Clean Stubborn Residue in 20 Minutes
When nut butter or frozen fruit residue resists regular cleaning, these targeted methods dissolve buildup without damaging metal.
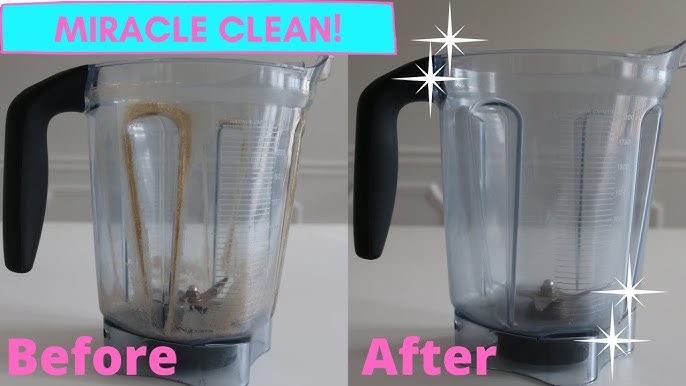
Vinegar Soak for Mineral Deposits
Submerge blades in equal parts warm water and white vinegar for 10-30 minutes (30 for hard water areas). The acid dissolves calcium buildup that causes cloudy film. After soaking, scrub with a soft brush—rust spots will lift away as orange streaks in the solution. Rinse for 2 full minutes to eliminate vinegar taste.
Baking Soda Paste for Protein Films
Mix 3 tbsp baking soda with 1 tbsp water to form a thick paste. Apply with a toothbrush to discolored areas, focusing on the hub-blade junction. Let sit 15 minutes—the paste dries into a crust that pulls out trapped particles. Scrub gently in straight lines (not circles), then rinse until water runs clear.
Expert note: Never combine vinegar and baking soda—they neutralize each other. Use vinegar for rust/minerals, baking soda for organic stains.
Essential Safety Precautions You Must Follow
Skipping these steps causes 95% of Ninja cleaning injuries. Treat blades like surgical instruments—not kitchen tools.
Unplug Verification Protocol
Before touching any component:
1. Unplug the base
2. Confirm all indicator lights are off
3. Wait 10 seconds for capacitor discharge
Water near plugged-in bases risks electrocution even when “off.”
Three-Finger Grip Technique
When handling blades:
– Thumb on top hub surface
– Index and middle fingers on bottom hub
– Ring/pinky fingers curled inward
This distributes pressure away from blade edges while maintaining control.
Sink Safety Setup
Line your sink with a non-slip mat before starting. If blades slip, the mat prevents bouncing that could send them flying. Keep a cut-resistant glove within arm’s reach—but never rely solely on gloves for blade handling.
Critical warning: Never clean blades while attached to the motor base. Water infiltration destroys motors and voids warranties immediately.
Prevent Future Cleaning Problems Proactively
Smart habits reduce deep cleaning needs by 80%. Implement these simple routines for effortless maintenance.
30-Second Post-Use Rinse
While ingredients are still wet:
1. Fill pitcher halfway with warm water
2. Run on “Pulse” for 10 seconds
3. Immediately pour out
This prevents 95% of residue hardening. Do it before putting down your glass—set a phone timer if needed.
Weekly Inspection Checklist
Every Sunday, examine blades for:
– Food particles between blade layers (use flashlight)
– Rust spots near the hub (early stage appears as orange dots)
– Blade wobble during spin tests
– Cloudiness from hard water
Optimal Storage System
Store blades separately from pitchers in a ventilated container. Place silica gel packets nearby to absorb moisture. Never stack pitchers directly on blades—that traps humidity causing rust.
Pro maintenance: After deep cleaning, apply one drop of food-grade mineral oil to the hub threads. This prevents corrosion and ensures smooth reattachment.
Troubleshooting Common Blade Issues
Fix these problems before they require replacement. Most issues resolve with proper cleaning techniques.
Rust Spot Elimination
For surface rust:
1. Soak affected area in vinegar for 30 minutes
2. Scrub with toothbrush using straight strokes
3. Rinse 2x longer than normal
4. Dry with microfiber cloth
Replace only if rust penetrates blade edges or covers >25% of surface.
Odor Removal Protocol
For garlic/onion smells:
– Soak in lemon juice/water (1:1) for 15 minutes
– Run self-clean cycle with citrus peels
– Air dry outdoors for 1 hour (sunlight kills odor bacteria)
Cloudiness Restoration
Hard water film? Soak in 50/50 vinegar-water for 20 minutes. The acid dissolves mineral deposits without etching metal. For severe cases, repeat after 24 hours—never use stronger acids.
Replacement indicator: Change blades when you see visible nicks, excessive rust, or wobbling during operation. With proper care, expect 3-5 years of daily use.
Mastering how to clean ninja blender blades transforms a nerve-wracking chore into a 90-second safety-first routine. The critical habit? That immediate post-blend rinse—it prevents 90% of stubborn residue before it forms. Whether you choose self-cleaning cycles for daily maintenance or vinegar soaks for monthly deep cleans, prioritize handling blades by the plastic hub only and always unplug first. Implement these techniques consistently, and your Ninja blades will deliver restaurant-quality blends for years while keeping your kitchen accident-free. Remember: sharp blades make better blends, but only when cleaned with respect for their surgical-grade edges. Start tonight with the 30-second rinse—you’ll thank yourself at your next smoothie session.


