
Unboxing your new Kuvings juicer brings the promise of fresh, nutrient-packed juices in your kitchen, but improper assembly can lead to leaks, reduced efficiency, or even damage to your investment. When your Kuvings silent juicer sits disassembled on the counter, knowing exactly how to put it together correctly becomes crucial to unlocking its powerful extraction capabilities. This comprehensive guide walks you through every critical step of assembling your Kuvings juicer properly, whether you’ve purchased the EVO820, B6000PRO, C7000, or another model in their professional lineup—so you can start creating vibrant, healthy juices immediately without frustration or safety concerns.
Before you begin assembly, recognize that Kuvings juicers follow a consistent design philosophy across their product range, though specific components vary by model. The instructions below provide universal guidance applicable to most Kuvings configurations. Always cross-reference with your specific model’s documentation for precise details, as locking mechanisms, component shapes, and assembly sequences differ slightly between models. Taking five extra minutes to assemble correctly prevents hours of troubleshooting later and ensures your juicer operates at peak performance from day one.
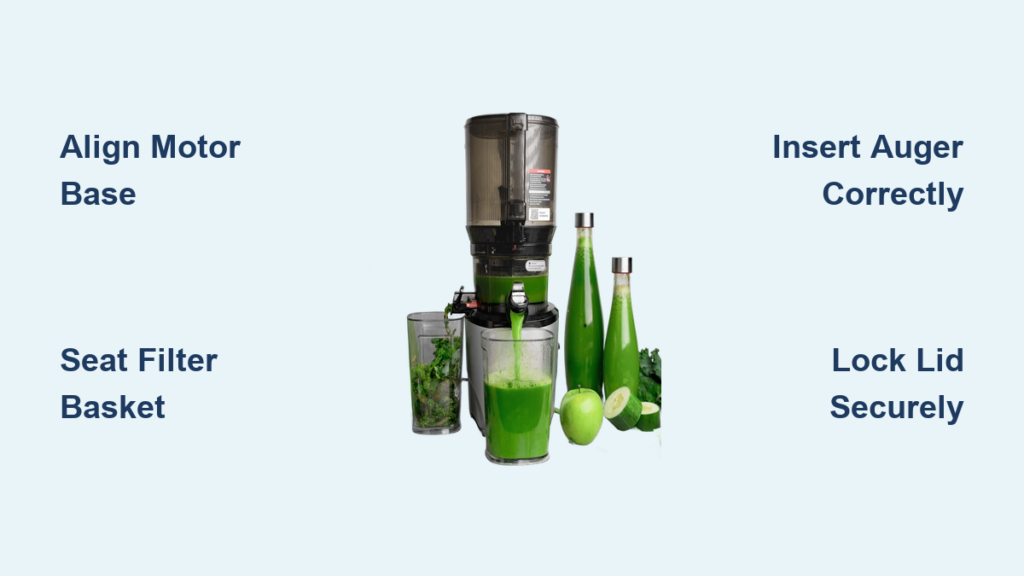
Position and Secure the Motor Base Properly

Your Kuvings juicer’s performance begins with correct motor base placement—this foundation determines stability during operation and prevents dangerous vibrations. Select a sturdy, level surface near a grounded electrical outlet with at least 24 inches of clearance above for the feed chute assembly. The motor base’s rubberized feet provide grip, but placing it on a thin rubber mat adds vibration dampening while protecting your countertop from scratches.
Examine the top surface of your motor base before positioning—it features a central circular mounting area with alignment pins or grooves that must match corresponding points on the juicing bowl. Some Kuvings models use a twist-lock mechanism requiring clockwise rotation to secure, while others employ a simple drop-and-turn design. Familiarize yourself with these connection points now to avoid cross-threading during bowl installation.
Verify Power Cord Safety Before Assembly
Before placing any components on the motor base, ensure the power cord is fully unwound with no kinks or bends that could damage internal wiring. Position the cord away from your work area with the plug easily accessible but not dangling near potential water sources. Never operate your Kuvings juicer with a damaged cord, and keep all electrical components dry during assembly—moisture exposure can permanently damage the sensitive electronics inside the motor housing.
Install the Juicing Bowl and Filter Basket Correctly

With your motor base securely positioned, it’s time to attach the juicing bowl—the central component that houses the extraction mechanism while collecting your fresh juice. Gently lower the bowl onto the motor base, aligning any guide pins with their receptacles. The bowl should sit flush without forcing—if resistance occurs, check for misalignment or debris on sealing surfaces.
Achieve Perfect Filter Basket Alignment
The filter basket must be positioned precisely within the juicing bowl for optimal juice extraction. Locate the central mounting hub on the basket and align it directly over the motor shaft protruding from the base. Lower the basket straight down until it seats fully—the basket should rotate freely within the bowl once properly installed. A misaligned filter basket creates uneven pressure during juicing, reducing yield and potentially straining the motor.
Attach the Auger Assembly Without Damage
The auger is the heart of your Kuvings juicer’s slow-speed extraction system, and improper installation compromises both performance and longevity. Identify the connection end of your auger—most Kuvings models feature a spline or tooth pattern that must align with the motor shaft. Some require specific orientation (check for alignment markings), while others use a bayonet-style connection.
Verify Correct Auger Orientation
Before securing the auger, confirm its orientation—typically the wider crushing end faces upward toward the feed chute. Installing the auger upside down prevents proper operation and may cause immediate damage when you attempt to run the machine. Once positioned correctly, push the auger firmly onto the motor shaft until fully seated, then test by gently tugging upward—it should remain securely attached without movement.
Secure the Lid and Locking Mechanism Safely

Kuvings juicers incorporate critical safety interlocks that prevent operation when components aren’t properly secured. Position the lid assembly directly above the juicing bowl, aligning any notches or markings with corresponding points on the bowl rim. Lower the lid straight down until it sits flush against the bowl without gaps.
Engage Safety Locks Completely
Rotate the lid or locking handle clockwise until you feel or hear it click into the locked position. Test that the lid cannot be lifted or rotated when locked—this security mechanism is essential for safe operation under pressure. Most Kuvings models feature automatic shut-off sensors that detect proper lid engagement; if the control panel doesn’t indicate readiness (usually via a green light), recheck your locking mechanism before proceeding.
Position Juice and Pulp Containers for Maximum Efficiency
Before operating your assembled juicer, position both collection containers to prevent spills and maximize workflow. Place the juice container directly beneath the juice spout, ensuring it’s stable enough to handle continuous flow during extended juicing sessions. For best results, position the container so the spout lip sits just above the container bottom to minimize splashing.
Optimize Pulp Container Placement
Position the pulp container beneath the pulp exit chute, which typically directs waste toward the rear or side depending on your model. The pulp container fills faster than the juice container—especially with fibrous produce—so ensure it has adequate capacity for your intended batch size. Some Kuvings models include an adjustable pulp chute that can be directed into various container sizes; set this to your preferred position before juicing begins.
Conduct Essential Pre-Operation Safety Checks
Before plugging in your newly assembled Kuvings juicer, perform these critical verification steps to ensure safe operation. First, confirm the lid is fully locked by attempting to lift it gently—if it releases easily, re-engage the locking mechanism until it clicks securely into place.
Test Component Rotation Manually
Manually rotate the auger assembly to verify it moves smoothly without binding against the filter basket walls. Any resistance or grinding indicates improper assembly that requires correction before operation. Next, check that the filter basket rotates freely within the juicing bowl—restricted movement creates pressure points that reduce juice yield and strain the motor.
Troubleshoot Common Assembly Issues Immediately
Even with careful assembly, certain issues may arise that require immediate attention before operation. If you notice juice leaking from the bowl rim during test runs, the most likely cause is an improperly seated silicone gasket or misaligned bowl on the motor base.
Fix Filter Basket Rotation Problems
When the filter basket doesn’t rotate freely, check for two common issues: debris caught between the basket and bowl, or incorrect positioning of the central mounting hub. Remove the basket and verify the silicone seal is properly seated in its groove around the bowl rim—this seal creates the pressure differential essential for proper juice extraction.
Perform Initial Test Run with Soft Produce
For your first operation, begin with soft, juicy produce like oranges or watermelon to verify correct assembly through actual performance. Cut ingredients to fit the feed chute without forcing, and always use the pusher tool—not your fingers—to guide produce toward the auger.
Listen for Proper Operational Sounds
During your test run, listen for smooth, consistent operation without grinding, squealing, or unusual vibrations. Juice should flow steadily from the spout while pulp exits through the designated chute. Any leaks around connections, excessive noise, or signs of motor strain indicate assembly issues requiring immediate attention before regular use.
Maintain Your Assembly for Long-Term Performance
Proper assembly is just the beginning—regular maintenance preserves your Kuvings juicer’s performance. After each use, disassemble components carefully and clean according to manufacturer specifications. Pay special attention to the filter basket and auger, which can retain pulp residue that hardens if left uncleaned.
Inspect Critical Seals Regularly
Examine all silicone seals and gaskets monthly for signs of wear, cracking, or deformation. These components create the airtight connections essential for proper operation, and damaged seals cause leaks and reduced juice yield. Replace seals promptly when deterioration appears—most Kuvings models use standardized seal sizes available directly from the manufacturer.
By following these precise assembly guidelines and maintenance practices, you’ll maximize your Kuvings juicer’s performance and longevity. Proper assembly ensures optimal juice extraction, prevents frustrating leaks, and maintains the safety features designed to protect both you and your investment. When components connect seamlessly and operate smoothly, you’ll experience why Kuvings juicers remain the professional’s choice for nutrient preservation and quiet operation. Take time with each assembly step—you’ll be rewarded with years of vibrant, healthy juices from your properly configured machine.


