
Wastewater backing up into your basement or lower-level fixtures signals a critical failure in your septic system that demands immediate attention. When your grinder pump stops functioning properly, the entire waste elimination process grinds to a halt, potentially causing serious sanitation issues in your home. Grinder pump removal becomes necessary when basic troubleshooting fails to resolve persistent drainage problems, alarm activations, or complete pump failure. This essential component, buried underground in a basin outside your home, grinds solid waste into slurry before pumping it to your septic tank or municipal sewer system. Understanding the proper grinder pump removal process empowers you to address this urgent situation without waiting for professional help, potentially saving hundreds in emergency service fees while restoring your home’s sanitation system.
Why Your Grinder Pump Won’t Budge During Removal
When attempting grinder pump removal, the most frustrating challenge homeowners face is a pump that refuses to come loose despite substantial pulling force. This stubborn resistance typically occurs because mineral deposits, sediment, and grime have accumulated between the pump housing and the slide rail system over time. The longer a pump remains installed, the more likely these deposits become cemented in place, creating significant friction that prevents smooth vertical movement.
Critical warning: Never apply excessive force without understanding why the pump is stuck. Forcing a removal can damage pipes, electrical connections, or the basin itself. Before escalating your efforts, consider these common binding points:
- Mineral deposits forming a “weld” between pump and rails
- Debris accumulation around the mounting plate
- Undetected set screws or locking mechanisms
- Pipe connections still partially attached
If your initial attempt to lift the pump fails, stop immediately and investigate the cause rather than risking further damage through brute force.
Essential Tools for Successful Grinder Pump Removal

Gathering the right equipment before starting your grinder pump removal project prevents frustrating mid-process interruptions and ensures you can handle unexpected challenges. While basic tools might suffice for simple removals, stubborn pumps require specialized equipment to break free without damage.
Must-Have Tools Checklist
- Phillips and flathead screwdrivers (for electrical and mounting connections)
- Adjustable wrench (for various pipe fittings)
- Wire twister tool (for safe electrical disconnection)
- Heavy-duty ratchet strap (minimum 2,000 lb capacity)
- Angle iron or sturdy structural support (to span basin opening)
- Waterproof camera or smartphone (for documentation)
Pro tip: Take comprehensive photos of the entire setup before disconnecting anything. Capture wiring configurations, pipe connections from multiple angles, and mounting hardware details. These visual references prove invaluable when installing your replacement pump and prevent costly reconnection errors.
Critical Safety Steps Before Grinder Pump Removal
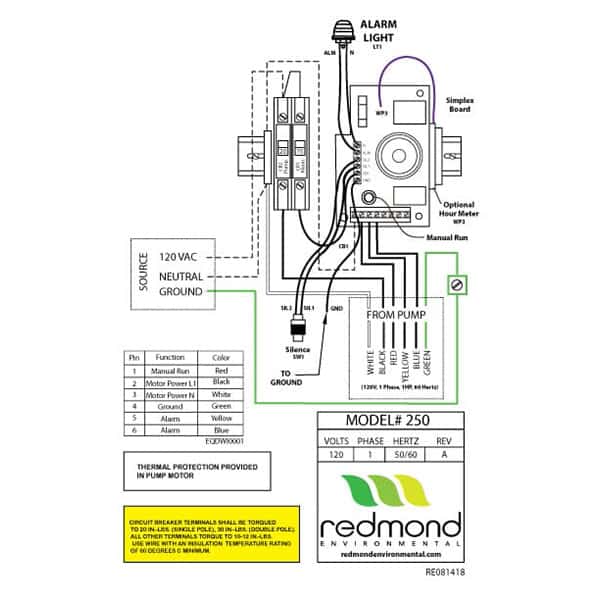
Electrical safety must be your absolute priority during grinder pump removal. One moment of carelessness can result in severe electrical shock or worse when working with submersible pumps in potentially wet environments.
Electrical Safety Protocol
- Locate your home’s main electrical panel and identify the circuit breaker powering the pump
- Switch off the breaker and verify power is disconnected using a non-contact voltage tester
- Place a piece of tape over the breaker to prevent accidental reactivation
- Remove the pump’s electrical plug if accessible
Never skip this step: Many grinder pumps have automatic thermal overload systems that can restart an overheated pump unexpectedly. Complete electrical isolation is non-negotiable for safe grinder pump removal.
Additionally, turn off your home’s main water supply before beginning. This prevents additional wastewater from entering the basin during removal, keeping your work area drier and reducing the risk of backup situations while you work.
Step-by-Step Electrical and Piping Disconnection
With safety precautions in place, methodically disconnect all connections before attempting to lift the pump. Rushing this phase often leads to damaged wiring or leaking pipes during removal.
Electrical Disconnection Process
- Document all wiring connections with photos before touching anything
- Label each wire with masking tape noting its connection point
- Use your wire twister to carefully unscrew wire nuts
- Cap all exposed electrical ends with wire nuts for safety
Piping Disconnection Sequence
- Remove basin cover and ventilation pipe
- Clear all standing water and debris from the basin
- Disconnect discharge piping from the pump’s outlet
- Disconnect inlet piping connections
- Inspect pipes for cracks or deterioration while disconnected
Key insight: Have rags and a small bucket ready for residual water that will leak from pipes after disconnection. Applying pipe sealant during reinstallation prevents future leaks at all connection points.
Breaking Free a Stuck Grinder Pump: Advanced Techniques
When standard vertical pulling fails during grinder pump removal, implement these proven techniques to free even the most stubborn units without causing damage.
Two-Person Vertical Pull Method
- Have one person stabilize the pump housing while the other pulls the chain
- Apply steady, consistent upward force simultaneously
- Coordinate breathing and pulling rhythm to maximize force
- Pause every 30 seconds to reassess progress
Ratchet Strap Mechanical Advantage System
- Position angle iron across the basin opening for secure anchor points
- Attach ratchet strap directly to the pump’s mounting plate (not the chain end)
- Ratchet the strap until significant tension develops
- While maintaining tension, apply lateral force by rocking the chain side-to-side
- The combination of vertical tension and horizontal motion typically breaks the bond
Why this works: The side-to-side motion disrupts mineral deposits and sediment that have created a vacuum-like seal between the pump and rails. Most stuck pumps release within 2-3 minutes of applying this technique.
Post-Removal Basin Inspection and Preparation

After successfully completing your grinder pump removal, don’t rush into installing the replacement. Proper basin preparation prevents repeat failures and ensures your new pump operates efficiently.
Critical Inspection Points
- Rail system integrity: Check for corrosion, bending, or misalignment
- Basin condition: Look for cracks or structural damage
- Inlet/outlet pipes: Assess for deterioration or blockages
- Sealing surfaces: Ensure smooth, debris-free mounting areas
Expert note: Clean all rail surfaces thoroughly with a wire brush before installing the new pump. Applying a thin coat of food-grade silicone lubricant to the rails significantly reduces friction and prevents future sticking issues during maintenance.
Preventing Future Grinder Pump Removal Nightmares
The most valuable lesson from a difficult grinder pump removal is implementing changes that prevent repeat challenges during future maintenance.
Proactive Prevention Strategies
- Install a proper lift-out system if your current setup lacks one
- Position the lift-out system opposite the waste entry point
- Anchor rails securely to the basin floor with corrosion-resistant hardware
- Apply silicone lubricant to rail surfaces during each maintenance cycle
- Keep the basin access area clear of obstructions for quick future access
Maintenance schedule: Perform visual inspections every 3 months and thorough cleaning every 6 months. Early detection of minor issues prevents emergency removal situations and extends your pump’s operational life.
Cost-Saving Considerations for Grinder Pump Replacement
Understanding the financial aspects of grinder pump removal and replacement helps you make informed decisions about DIY versus professional service.
Realistic Cost Breakdown
- Pump unit: $150-$1,000 depending on capacity and features
- Materials: $25-$75 for pipe sealant, gaskets, and electrical components
- Tools: $0 if you already own basics, $50-$150 for specialized equipment
- Professional installation: $500-$1,500 (if DIY proves too challenging)
Time investment: Most straightforward grinder pump removal and replacement projects take 3-5 hours for a prepared homeowner. Factor in potential delays if you need to order a specific replacement pump model.
When facing a failing grinder pump, remember that timely removal and replacement prevents minor issues from escalating into major sewage backups. By following these systematic procedures, documenting each step, and implementing preventive measures during reinstallation, you’ll transform what could be a costly emergency into a manageable DIY project that saves money and restores your home’s essential waste management system. The key to successful grinder pump removal lies in preparation, patience, and understanding the specific challenges your installation presents—especially when dealing with stubborn units that refuse to budge through conventional methods.


