
When your grinder pump clogs or fails, raw sewage can back up into your home within hours—flooding basements, contaminating living spaces, and creating health hazards nobody wants to face. This critical wastewater component grinds solid waste into slurry and pumps it uphill to municipal lines or septic tanks, but only when properly maintained. Regular grinder pump cleaning prevents the sludge buildup that causes 80% of system failures while extending your pump’s 10-15 year lifespan. This guide reveals the exact cleaning procedures you need to perform every six to twelve months, warning signs that indicate immediate action is required, and professional techniques most homeowners can implement safely with basic tools.
Ignoring routine grinder pump cleaning forces your system to work harder with each cycle as sludge accumulates in the wet well. This extra strain accelerates wear on blades, motors, and seals—components that cost $500-$2,000 to replace. More critically, a neglected pump creates dangerous conditions where sewage can back up into your home through toilets and drains. The good news is that most homeowners can perform essential cleaning tasks without specialized equipment, saving hundreds in emergency service calls while ensuring your family’s safety.
Why Grinder Pump Cleaning Prevents Costly Emergencies
Sludge accumulation in your wet well directly impacts system efficiency and reliability. As solid waste settles at the bottom of the tank, it reduces the basin’s effective capacity by up to 30% within a year of neglect. This forces your pump to cycle more frequently while processing less wastewater per cycle—increasing energy consumption by 25% or more. The extra strain accelerates wear on critical components, particularly the grinding blades which dull from continuous contact with settled solids.
Beyond mechanical wear, a dirty grinder pump creates serious health risks. When sludge buildup prevents proper wastewater processing, raw sewage backs up into your home through the lowest plumbing fixtures. Exposure to pathogens in raw sewage causes gastrointestinal illness, respiratory problems, and skin infections—requiring costly professional remediation that averages $3,000-$5,000. Regular cleaning also lets you spot developing issues like minor leaks, sticking float switches, or debris accumulation before they escalate into emergencies.
Spot These Grinder Pump Cleaning Warning Signs Immediately
Slow drains throughout your home signal your pump struggles to handle the wastewater load. If sinks drain sluggishly, toilets gurgle when other fixtures run, or water lingers in bathtubs after use, your wet well likely contains excessive sludge or the grinding mechanism is impeded. These symptoms develop gradually over weeks or months, giving you time to schedule cleaning before complete failure occurs.
Persistent foul odors from basement drains or the pump area indicate decomposing waste in an overfilled wet well. While a properly maintained system should produce no noticeable smells, accumulated sludge releases hydrogen sulfide and other toxic gases associated with sewage. Increased pump cycling frequency—more than 5-6 times daily without corresponding water usage—signals reduced efficiency from dull blades, clogged intake, or excessive sludge.
Alarm system activation that continues beyond normal pumping cycles demands immediate attention. The alarm should trigger briefly when the pump activates and stop once the basin empties. Continuous or frequent alarms when water usage is minimal indicate the pump can’t keep up due to blockage, mechanical failure, or an overfilled wet well requiring urgent cleaning.
Essential Grinder Pump Cleaning Tools and Safety Prep
Gather these tools before starting: heavy-duty rubber gloves rated for sewage handling, safety goggles, a long-handled scrub brush, a bucket or container for debris removal, a flashlight or work light, and a hose with spray nozzle. Never lean into the wet well without proper ventilation—sewage gases can displace oxygen and cause unconsciousness within seconds. Work in a well-ventilated area and have someone nearby who can assist if needed.
Before cleaning, disconnect power at the control panel’s disconnect switch—most emergency repairs happen because homeowners skip this critical safety step. Run water through your plumbing for several minutes to move pending waste through the system, ensuring normal pump cycling during your inspection. This also helps clear the discharge line before you begin working on the wet well.
Step-by-Step Wet Well Cleaning Procedure
Remove the access lid carefully, inspecting its condition and seal for cracks or warping that might allow groundwater infiltration. With the lid off, photograph the wet well’s current state for maintenance records—this helps track sludge accumulation rates and provides valuable information for future service calls.
Using a long-handled scoop or bucket, remove accumulated solid waste from the bottom of the tank, working systematically around the pump intake while avoiding damage to the float switch mechanism. Most material will be semi-solid sludge, but you may encounter larger items that caused the buildup—dispose of these according to local regulations.
Scrub the tank walls and pump assembly with your brush to loosen adhered material, then rinse thoroughly with your hose, directing spray toward the pump intake so water carries loosened debris into the pump. Inspect components for damage: check grinding blades for excessive wear, examine seals for leakage, and verify the float switch moves freely through its full range.
Critical Discharge Pipe Inspection During Cleaning
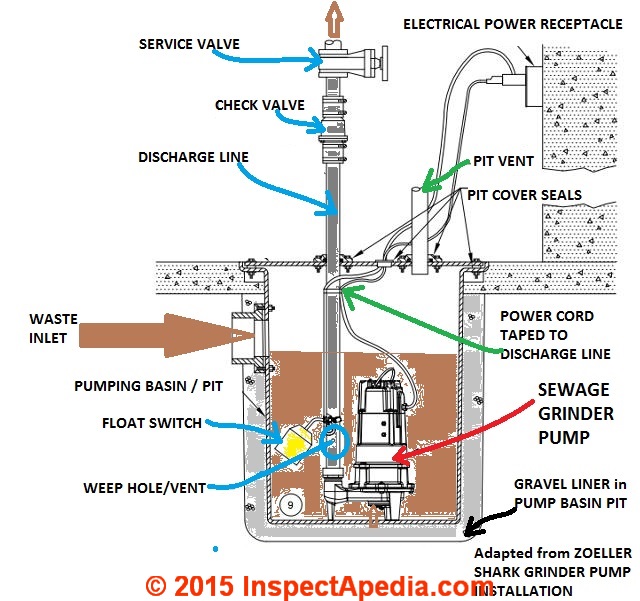
Walk the discharge pipe’s path from pump to connection point, looking for signs of damage, leakage, or ground movement. Check all joints and fittings for seepage or corrosion—these often cause slow leaks that gradually undermine system efficiency. In freezing climates, ensure pipes remain below the frost line or are adequately insulated, as frozen discharge lines cause immediate system failure.
Verify the discharge line maintains proper slope—most systems require at least 1/4 inch per foot of pipe run. Standing water in any section indicates compromised slope from ground settling, requiring professional correction. Check valves should operate freely and seal completely; failing check valves allow waste to flow back into the wet well, forcing the pump to reprocess material and increasing wear.
Professional Grinder Pump Cleaning Frequency Guidelines
Most homes benefit from wet well cleaning every six to twelve months, but high-usage households serving multiple occupants may need quarterly attention. Track sludge accumulation during inspections—if the wet well fills significantly between cleanings, reduce your interval. Homes with garbage disposals connected to grinder pump systems typically need more frequent cleaning due to added food waste.
Before winter in cold climates, ensure your system is clean and functioning properly to minimize freeze risks. Spring cleaning after harsh winters helps identify any freeze damage. Properties in heavy rainfall areas may need additional cleanings as groundwater infiltration through minor tank leaks accelerates fill rates.
Grinder Pump Cleaning Mistakes That Cause Damage
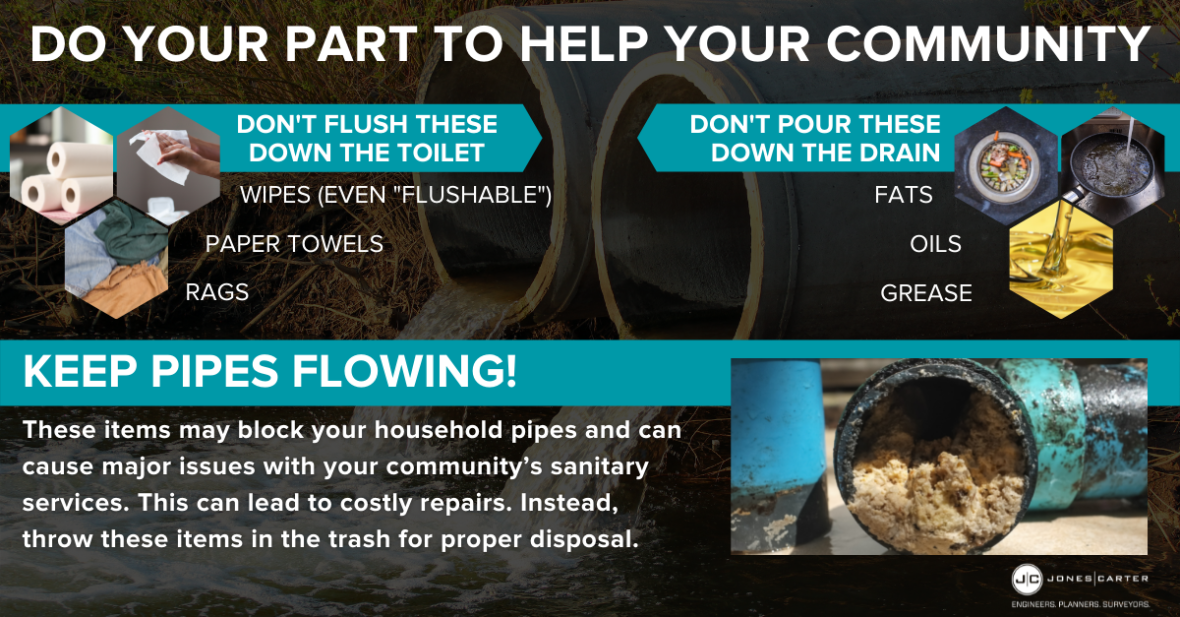
Never pour grease, oils, or fats down drains connected to your grinder pump—these solidify as they cool, creating severe flow restrictions that force the pump to work harder until failure. Collect grease in containers for trash disposal instead. Harsh chemicals like excessive bleach or drain cleaners corrode internal components; dispose of hazardous substances through proper waste channels.
“Flushable” wet wipes destroy grinder pumps despite marketing claims—they re-form into obstructions after passing through grinding blades. Feminine hygiene products, dental floss, cotton swabs, and paper towels also create persistent clogs. After using garbage disposals, run 2-3 gallons of water through the system to flush particles, but use disposals sparingly as they significantly increase solid waste load.
Emergency Grinder Pump Cleaning Situations
Call professionals immediately if sewage backs up into your home—raw sewage exposure creates serious health hazards requiring proper protective equipment and sanitizing procedures. Persistent alarms despite checking obvious causes indicate mechanical or electrical problems needing trained diagnosis. Continuous pump operation without emptying the basin, grinding or screeching sounds, or complete pump failure all require professional intervention.
Electrical work on grinder pump systems should always involve qualified technicians due to shock hazards and fire risks. If your pump approaches the end of its 10-15 year service life or repairs would cost more than half a new unit’s price, discuss replacement options with a qualified installer rather than attempting further DIY fixes.
Extend Grinder Pump Life Through Consistent Cleaning
Document every maintenance activity in a logbook or digital record, noting dates, observations, issues discovered, and actions taken. This history proves invaluable when selling your property and helps technicians identify developing problems. Test backup power systems periodically if your pump includes generator connection or battery backup capabilities.
Before extended absences, run water through the system until the pump fully cycles to move accumulated waste. Never turn off the pump during vacations—components require periodic operation to maintain function. For winter protection, ensure all access lids seal properly, add insulation above the tank if necessary, and verify exposed piping remains protected from freezing temperatures.
Regular grinder pump cleaning costs a fraction of emergency repairs and sewage cleanup. By understanding your system, performing scheduled maintenance, using it properly, and recognizing warning signs early, you transform potential disasters into manageable routine care—keeping your home safe, your family healthy, and your wallet intact for years to come.


