
Your morning coffee ritual hits a wall when your grinder refuses to work. That familiar frustration of pressing the button only to hear silence—or worse, strange grinding noises—can derail your entire routine. Knowing how to fix coffee grinder issues saves you money, extends your appliance’s life, and gets your caffeine fix back on track. Most problems fall into three categories: electrical failures, mechanical obstructions, or component wear. The good news? Many common issues can be resolved with basic tools and systematic troubleshooting. Whether your grinder won’t power on, makes unusual sounds, or produces inconsistent grounds, this guide provides targeted solutions for getting your machine back in action.
Most coffee grinder problems can be diagnosed and repaired in under 30 minutes with minimal tools. From simple fixes like clearing blockages and checking power connections to more advanced repairs involving motor maintenance, you’ll learn exactly what to do based on your specific symptoms. By following these procedures, you’ll determine whether a DIY repair is feasible or if professional service is required—ensuring your coffee routine gets back on track quickly without unnecessary expense.
Why Your Coffee Grinder Suddenly Stopped Working (Diagnostic First Steps)
Before grabbing tools, accurately diagnose what’s wrong with your grinder. Coffee grinder failures typically manifest in three distinct ways: the unit fails to power on entirely, it powers on but operates abnormally, or it runs normally but produces poor grinding results. Each symptom category points to different underlying causes and requires different troubleshooting approaches.
Start by performing a systematic assessment. First, determine whether the grinder turns on at all—listen for motor noise when activating the switch and check for indicator lights. If the unit activates but behaves strangely, note the specific problem: does it hum without grinding, make rattling sounds, or fail to dispense ground coffee? Document when the problem first appeared and any circumstances that might have contributed, such as recent cleaning or grinding beans that contained foreign objects.
Visual inspection often reveals problems without disassembly. Check that the hopper contains beans and slide mechanisms are open. Inspect the collection bin and chute for visible blockages or residue. Examine the exterior for damage, discoloration from overheating, or loose components. Coffee dust buildup on external surfaces typically indicates internal accumulation that may be causing mechanical issues. For grinders with removable parts, verify all components are properly seated according to manufacturer instructions—improper seating often triggers safety interlocks that prevent operation.
How to Test for Mechanical vs Electrical Problems

Unplug the unit completely, then attempt to rotate the blades or burrs by hand. If rotation is difficult or impossible, a mechanical jam or bearing problem is preventing operation—the motor may be functional but cannot drive the obstructed mechanism. If the mechanism turns freely but fails to operate when powered, the problem lies with the motor, brushes, or electrical control circuitry rather than the grinding mechanism itself. This simple test saves hours of unnecessary troubleshooting by immediately directing your efforts to the correct system.
Fix Power Connection Issues: When Your Grinder Won’t Turn On
Power-related problems represent one of the most common reasons coffee grinders fail to operate. Before assuming serious failure, systematically verify the power supply. Many “broken” grinders simply have loose plugs, tripped breakers, or malfunctioning safety mechanisms.
Begin by confirming the power cord is securely plugged into a functional outlet. Test the outlet by plugging in another device. Check for cord damage including fraying or exposed wires, particularly near the plug end and where the cord enters the grinder body. If the cord shows damage, discontinue use immediately—damaged power cords create fire and shock hazards.
Many grinders, especially commercial models like Mazzer or Anfim units, include safety mechanisms that must be properly engaged. Inspect the back and bottom for pins, buttons, or alignment indicators that must be in specific positions. If your grinder has a removable hopper or grounds bin, remove and reinstall these components to ensure proper seating, as improper positioning often triggers safety interlocks that prevent operation.
Clear Coffee Grinder Blockages in Under 10 Minutes
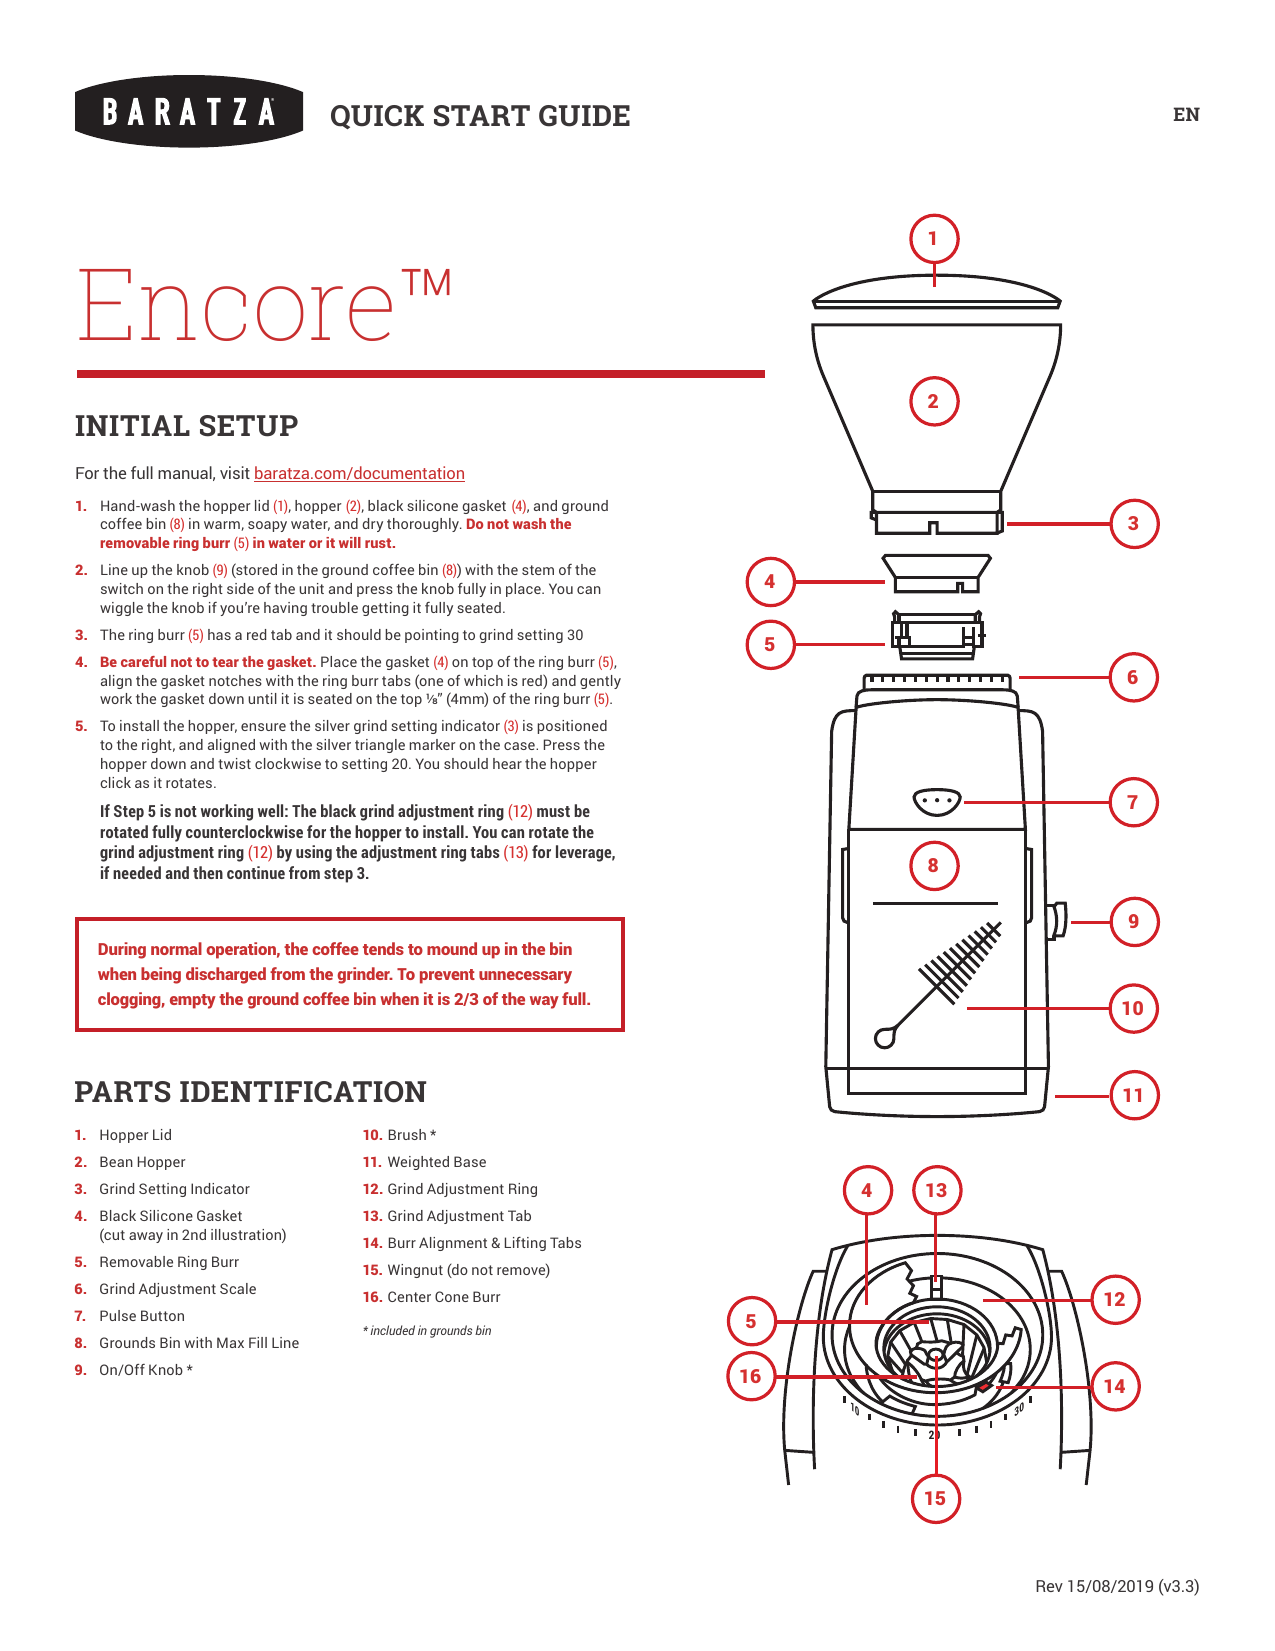
Coffee grinder blockages cause many operational problems and are often preventable with regular cleaning. Blockages typically occur in the hopper entrance, grinding mechanism, discharge chute, and clump crusher components. Causes include whole beans lodged in narrow passages, compacted coffee grounds hardened from oil accumulation, and foreign objects from beans.
To clear blockages safely, always unplug the grinder first and allow it to cool if recently used. Disassemble removable components according to manufacturer instructions. For hopper blockages, remove all beans and inspect the entry pathway, using a wooden or plastic tool to dislodge obstructions without damaging the mechanism. For grinding mechanism blockages, carefully remove accumulated coffee from between blade teeth or burr grooves.
Deep Cleaning to Prevent Recurring Blockages
Coffee grinders accumulate coffee dust and oil residues that impact performance. For blade grinders, clean around the blade assembly using a soft brush, avoiding contact with sharp edges. For burr grinders, clean burrs with a soft brush designed for this purpose, being careful not to damage precision-ground surfaces. Some manufacturers recommend periodic cleaning with specialized grinder cleaning tablets or raw rice, which absorbs oils and dislodges residue. Never use metal tools that could scratch surfaces or damage grinding components—this creates future problems by altering the grinding geometry.
Repair Grinding Mechanism Problems: Dull Blades & Misaligned Burrs
When your grinder runs but produces inconsistent results, the issue typically involves the grinding mechanism itself. Problems include dull blades, worn burrs, misalignment, or grind setting malfunctions.
Blade grinders rely on sharp cutting edges. Dull blades produce inconsistent particle sizes, generate excess heat, and cause the motor to work harder. To inspect blade condition, unplug the grinder and carefully remove the blade assembly. Examine the blade edges for visible dulling or damage. Replacement blades are generally available and straightforward to install by reversing the removal procedure.
Burr grinders require periodic inspection for wear and alignment. The stationary and rotating burrs must maintain precise alignment for even particle sizing. Inspect burrs for visible wear patterns or accumulated residue. Worn burrs should be replaced with manufacturer-specified parts. Alignment procedures vary by model but generally involve adjusting positioning screws while measuring the gap between burrs using a feeler gauge.
Fix Motor and Electrical Issues Without an Electrician

Universal motors in coffee grinders can develop issues including brush wear, commutator problems, and winding failures. Symptoms include motors that fail to start, run intermittently, or produce excessive sparks.
When a motor hums but fails to turn, this indicates either a mechanical jam or electrical supply problem. If you’ve cleared blockages and the motor still hums without turning, the issue may be brush-related. Universal motors use brushes that contact a rotating commutator—worn brushes, weakened springs, or a pitted commutator can prevent reliable operation.
Brush replacement extends motor life significantly. Locate the brush housing at the motor sides or ends, typically secured by small screws. Remove old brushes, noting their orientation and commutator condition. Examine the commutator surface for discoloration or pitting; a worn commutator can often be polished with fine sandpaper. Install new brushes of the correct specification, ensuring they move freely and make solid contact.
Essential Maintenance to Prevent Future Coffee Grinder Failures
Regular maintenance prevents most common coffee grinder problems and extends appliance lifespan significantly. Implementing a systematic cleaning routine takes minimal time but delivers substantial benefits in reliability and grinding consistency.
Daily maintenance involves emptying the grounds bin after each use and wiping external surfaces with a dry cloth to remove coffee dust. Before each use, briefly inspect the hopper and grinding mechanism for visible debris. Weekly cleaning should include brushing out the grinding chamber and chute to remove accumulated coffee dust. Monthly deep cleaning involves complete disassembly of removable components for thorough washing and detailed cleaning of burrs or blades.
Proper operation practices complement cleaning. Avoid overfilling hoppers, which causes binding in the grinding mechanism. Allow grinders to cool during extended use to prevent overheating. Use the appropriate grind setting for your brewing method, avoiding settings that cause excessive motor strain. Never operate grinders without beans or with empty hoppers—this damages blade or burr assemblies and creates safety hazards.
By following these targeted repair procedures and maintenance routines, you’ll keep your coffee grinder operating smoothly for years. Most common problems can be resolved with basic tools and systematic troubleshooting, saving you the cost of replacement or professional service. When issues exceed your capability, recognize when to seek professional help—particularly for complex electrical problems or high-value commercial units. With proper care, your grinder will consistently deliver the perfect grounds for your daily coffee ritual.


