
Your angle grinder suddenly stops working in the middle of a critical metal-cutting job. The motor sputters, vibration intensifies unexpectedly, or the tool simply won’t power on. When this happens, knowing how to fix angle grinder issues can save you hundreds of dollars in replacement costs and get you back to work immediately. This guide provides proven diagnostic methods and repair solutions for the most frequent angle grinder failures, helping DIYers and professionals alike restore their essential cutting tool to full functionality.
Angle grinders fail for predictable reasons that fall into specific categories: electrical failures, motor component wear, mechanical breakdowns, and user-induced damage. By learning to identify symptoms accurately, you can systematically diagnose problems and implement effective fixes without wasting time on unnecessary part replacements. Most common issues can be resolved with basic tools and moderate mechanical skill, making professional repair services unnecessary in many cases.
Why Your Angle Grinder Won’t Start
When pressing the trigger delivers complete silence, your angle grinder’s electrical system has failed at a fundamental level. This complete power loss typically stems from three critical failure points that require immediate investigation.
Check Power Cord and Electrical Connection
Begin by inspecting the entire power cord length for visible damage, especially near the plug and where the cord enters the tool housing—common stress points where internal wires break from repeated bending. Flex the cord gently at these locations while attempting to power on the tool; if it briefly activates during flexing, you’ve identified a broken internal wire requiring cord replacement. Use a multimeter to test for continuity through the cord by checking resistance between the plug prongs and corresponding wire connections inside the motor housing. An open circuit confirms a broken wire that must be replaced.
Diagnose Switch Failure Symptoms
The power switch endures thousands of activation cycles, making it one of the most failure-prone components. Disassemble the handle housing to access the switch and look for visible signs of burning, melting, or carbon tracking that indicate electrical arcing. Test the switch with a multimeter set to continuity mode—when activated, you should measure near-zero resistance across the terminals. Infinite resistance or erratic readings confirm switch failure requiring replacement. Note the exact part number before ordering a replacement, as angle grinder switches vary significantly between models and manufacturers.
Verify Carbon Brush Condition
Worn carbon brushes often cause complete power loss when they reach the end of their service life. Remove the brush holder caps (typically located on the motor housing sides) and measure remaining brush length. Most brushes require replacement when reduced to 1/4 inch or less. Examine the commutator for uneven wear, scoring, or discoloration that indicates brush-related damage. If brushes appear intact but the tool remains unresponsive, check for broken brush springs or corroded holder contacts that prevent proper electrical connection.
Repairing Intermittent Operation Issues

When your angle grinder starts and stops unpredictably during use—especially when tilted or under load—you’re dealing with an intermittent electrical connection that requires precise diagnosis.
Identify Loose Wire Connections
Vibrations gradually loosen internal wire connections over time, causing power interruptions that worsen with tool movement. Disassemble the motor housing and inspect all wire connections to the switch, brushes, and internal components. Gently tug on each connection to identify loose terminals that require re-securing. Pay special attention to connections near moving parts where vibration is most intense. Re-crimp or resolder any questionable connections and apply electrical tape for added security.
Replace Worn Carbon Brushes
Intermittent operation frequently signals carbon brushes nearing failure. As brushes wear down, they lose consistent contact with the commutator, especially during movement or under cutting load. Measure both brushes—even if one appears adequate—as uneven wear causes operational problems. Install new brushes of identical specification and run the tool briefly at low speed to seat them properly against the commutator. Watch for excessive sparking during this break-in period, which should diminish as the brushes conform to the commutator surface.
Fixing Dangerous Vibration Problems
Excessive vibration during operation creates control issues and safety hazards while accelerating internal component wear. This symptom demands immediate attention before further damage occurs.
Balance or Replace Grinding Wheel
An unbalanced grinding wheel causes violent, dangerous vibration that worsens with speed. Remove the wheel and inspect for cracks, chips, or uneven wear patterns. Clean both sides of the wheel and the mounting flanges thoroughly before reinstallation. If vibration persists with a new wheel, check the spindle for runout by rotating it slowly while holding a stationary pointer close to the mounting surface—visible wobble indicates spindle damage requiring professional repair.
Replace Worn Bearings
Bearing failure produces distinctive rumbling or humming vibrations that increase with speed. Test bearings by grasping the spindle firmly and attempting side-to-side movement—any detectable play confirms bearing replacement is necessary. Rotate the shaft by hand to feel for roughness or binding. Bearing replacement requires proper tools: support the assembly correctly and use a bearing puller for removal, then press the new bearing onto the shaft while applying even pressure only to the inner race.
Solving Overheating Issues
An angle grinder that becomes uncomfortably hot during normal use is suffering from restricted cooling or internal friction that will cause catastrophic failure if ignored.
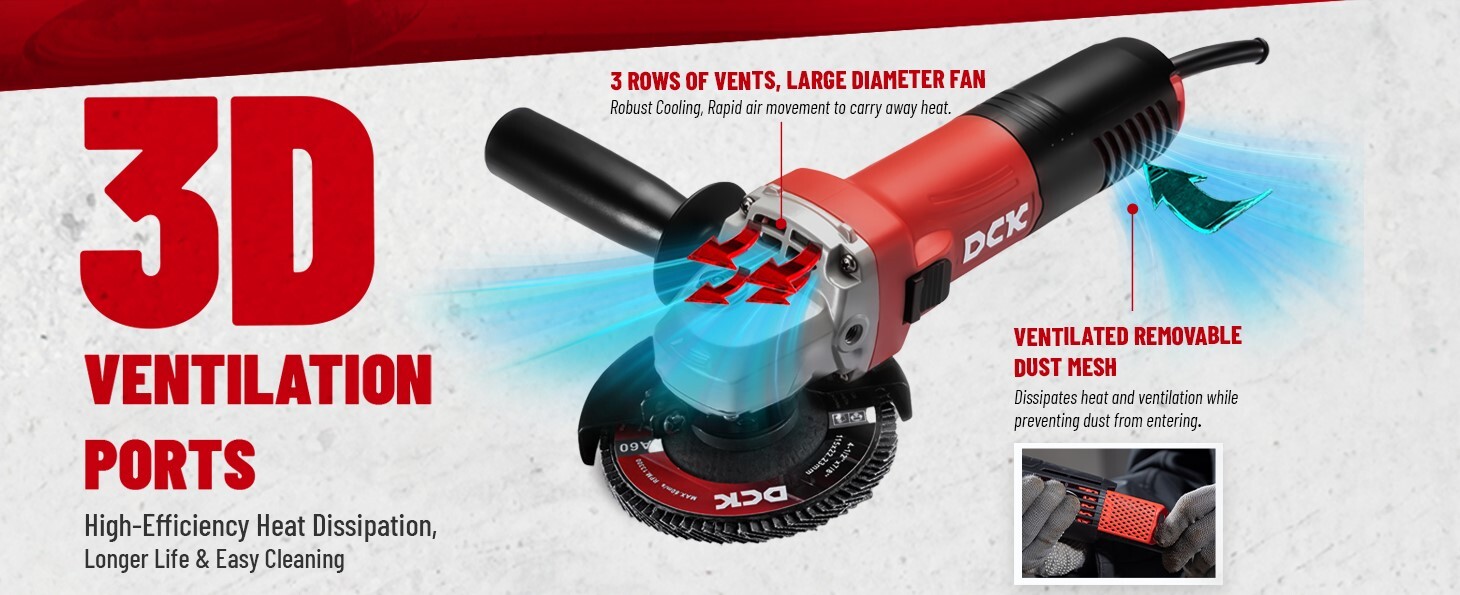
Clean Ventilation System Thoroughly
Accumulated dust and debris block critical airflow through motor housing vents, causing rapid temperature buildup. Use compressed air to blow out dust from all ventilation openings after each heavy use session. For metal-cutting applications, perform internal cleaning monthly by removing the motor housing and brushing out conductive metal dust that accumulates around motor components. This preventative maintenance extends tool life significantly and prevents electrical shorts from metal dust contamination.
Inspect Bearings for Failure Signs
Worn bearings generate substantial friction heat that makes the tool housing dangerously hot. If the motor housing becomes excessively warm during use, inspect bearings for roughness or play as described in the vibration section. Replace bearings immediately when overheating occurs, as continued operation will likely damage the motor windings or melt internal components.
When to Repair vs Replace Your Angle Grinder
Evaluating whether repair makes financial sense requires careful consideration of multiple factors beyond simple parts costs.
Cost-Benefit Analysis for Major Repairs
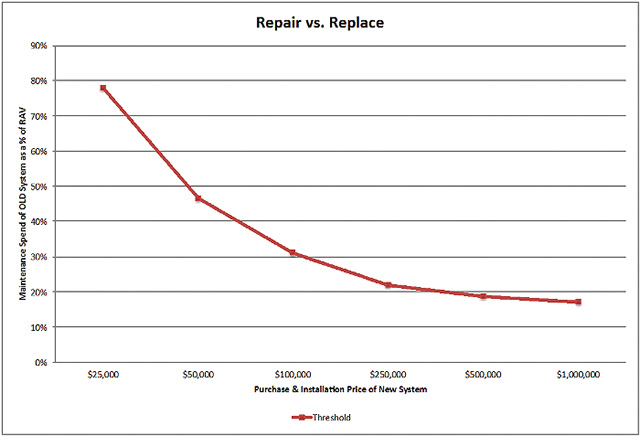
Simple repairs like brush replacement, switch repair, or cord replacement typically cost $5-$30 in parts plus your time investment, making them economically sensible for tools of any value. However, motor or armature repairs often approach 50% or more of a new tool’s cost, especially for premium brands. Factor in potential professional labor costs if you lack repair expertise—when total repair expenses exceed 60% of a replacement tool’s price, purchasing new becomes the practical choice.
Consider Total Tool Condition
Older angle grinders with multiple worn components may require several simultaneous repairs to restore reliable operation. Calculate the cumulative cost of all needed repairs against a new tool’s price. Premium tools from quality manufacturers often justify repair investment due to better parts availability and remaining service life in other components. Budget tools with limited parts support typically make replacement more practical when major components fail.
Essential Safety Steps Before Any Angle Grinder Repair
Safety must be your top priority when working on powerful rotating tools that combine electrical and mechanical hazards.
Ensure Complete Power Disconnection
Always unplug corded models or remove battery packs from cordless units before beginning any work. Never rely solely on the power switch for safety—internal wiring faults could bypass the switch. Wait several minutes after unplugging to allow capacitors to discharge fully, as residual electrical charge can deliver painful shocks even when disconnected.
Wear Proper Protective Equipment
Safety glasses or a face shield are mandatory when disassembling angle grinders, as internal springs or components can release unexpectedly. Heavy-duty work gloves protect against sharp metal edges inside the housing. A dust mask prevents inhalation of accumulated metal particles during cleaning and repair operations. Keep your work area clean, well-lit, and free of bystanders to minimize accident risks.
Regular maintenance prevents most common angle grinder failures before they disrupt your work. Clean ventilation ports after each use, inspect carbon brushes monthly for tools in regular service, and replace worn components before they cause secondary damage. These simple practices extend your tool’s service life dramatically and ensure reliable performance when you need it most. When problems do occur, systematic diagnosis and targeted repairs will get your angle grinder back in action faster than waiting for replacement parts or professional service.


