Ever struggled to order replacement parts because you couldn’t identify that mysterious metal disc in your grinder? Knowing electric meat grinder parts names is crucial whether you’re troubleshooting a clogged unit, ordering replacements, or expanding your processing capabilities. Without proper terminology, you’ll waste time and money ordering incompatible components that won’t fit your specific model. This guide cuts through the confusion with precise naming conventions, visual descriptions, and practical identification tips that transform you from confused owner to confident operator.
Understanding your grinder’s anatomy prevents costly mistakes—like ordering a #22 plate when your unit requires #12 size, or mistakenly purchasing a hubless plate for a hub-required model. Proper part identification ensures seamless operation whether you’re processing family meals or running a commercial kitchen. By the end of this guide, you’ll confidently name every component from the cutting assembly to specialty attachments, saving hours of frustration during maintenance and part replacement.
How to Identify Your Grinder Plate Type by Hole Configuration
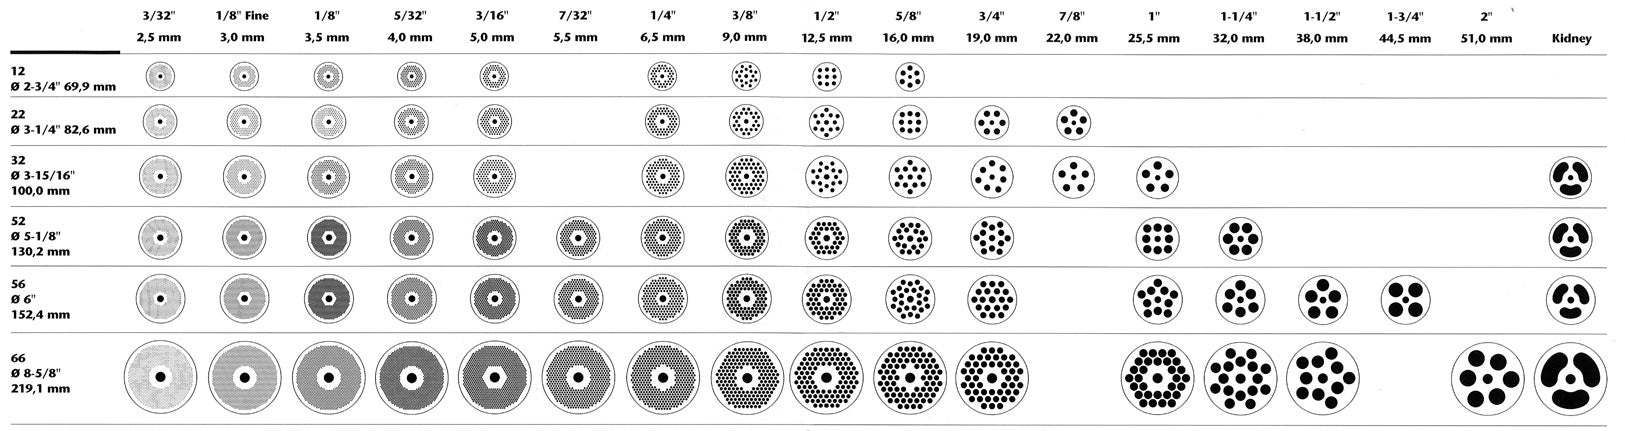
Your grinder plate—often called a chopper plate—determines the final texture of your ground meat through its precisely engineered hole pattern. This stationary cutting surface works with the rotating knife to slice meat as it passes through, with hole size directly correlating to ground meat consistency. Confusing these sizes leads to disappointing results, like overly fine sausage or chunky burger meat.
Critical hole size specifications you must recognize:
– 1/8″ (3 mm): Produces very fine ground meat ideal for patties and smooth sausages
– 3/8″ (10 mm): Creates standard medium texture perfect for most recipes
– 1/2″ (13 mm): Delivers coarse grinding suitable for cubed meat preparations
– 3/4″ (20 mm): Generates very coarse chunks for specialty applications
Don’t overlook hub configuration—a critical detail that determines compatibility. Hub-style plates feature a central mounting protrusion that locks securely to the grinder shaft, preventing rotation during heavy use. Hubless plates rely solely on the retaining ring for stability and only work with specific grinder models. When ordering replacements, always verify whether your unit requires hub or hubless configuration to avoid receiving unusable parts.
Spotting the Correct Grinder Knife for Your Model

The rotating grinder knife (or chopper knife) works in tandem with your plate to slice meat efficiently, and selecting the wrong type causes uneven grinding and excessive motor strain. This component features a central mounting hole for the drive shaft and one or more cutting wings that interact with the plate holes. Most commercial units use either two-wing or four-wing configurations, with the latter providing additional cutting action for high-volume operations.
Key knife identification points:
– Wing count: Two-wing for standard home use, four-wing for commercial applications
– Mounting diameter: Must precisely match your grinder’s drive shaft specifications
– Cutting edge angle: Typically 25-30 degrees for optimal meat shearing
– Gap tolerance: Must maintain precise spacing (measured in thousandths of an inch) from the plate
When replacing your knife, never assume all knives fit your model. Commercial units like Hobart or ButcherBoy require specific knife geometries that differ from home models. A mismatched knife creates dangerous vibration, inconsistent grinding, and accelerated wear on both the knife and plate. Always cross-reference your grinder’s model number with replacement parts before purchasing.
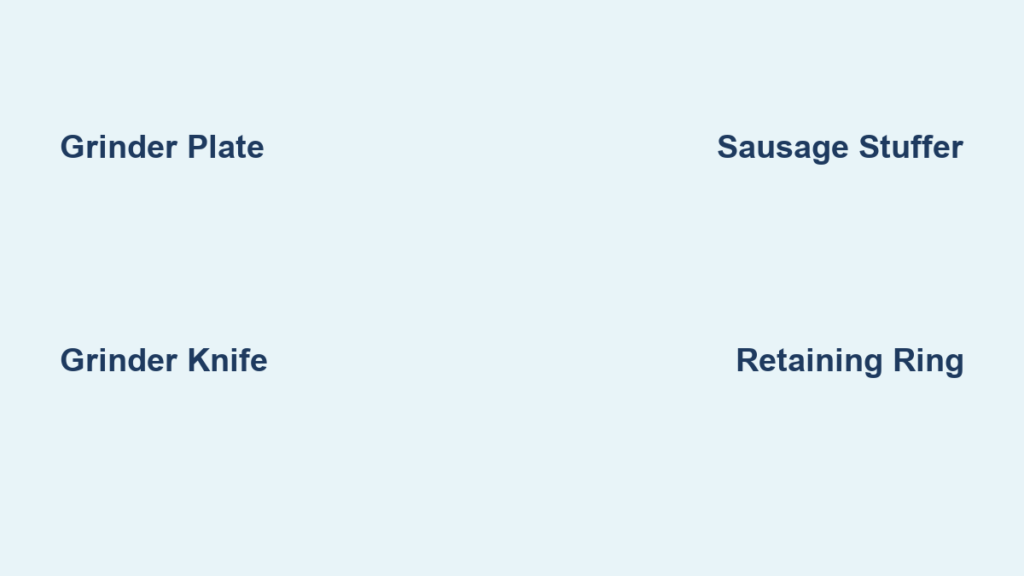
Sausage Stuffer Attachment Components Explained
Transforming your electric meat grinder into a sausage production system requires understanding three critical attachment components that many users confuse. The sausage stuffer unit connects directly to your grinder output, converting rotational force into controlled pressure for casing filling. Major manufacturers like F Dick and Tre Spade produce units designed for specific grinder models, so compatibility matters greatly.
Essential sausage processing parts:
– Stuffer body: The main housing that attaches to your grinder’s front plate
– Plunger rod: Transfers force from the grinder motor to the meat column
– Stuffing tubes (horns/nozzles): Stainless steel delivery components in various diameters
Selecting the correct stuffing tube diameter ensures professional results—too small causes casing bursts, while too large creates loose fill. Breakfast links require 15-20 mm tubes, standard bratwurst needs 25-32 mm, and jumbo sausages demand tubes exceeding 32 mm. Many users mistakenly order tubes based on inch measurements rather than millimeters, resulting in incompatible parts that won’t seal properly with their stuffer body.
Decoding ALFA Part Numbers to Avoid Costly Mistakes
The ALFA SKU system follows a precise naming convention that, once understood, prevents ordering errors that waste time and money. This structured format combines grinder size, hole specification, configuration, and material type into a single identifier. Misreading these codes leads to receiving unusable parts—like getting a #22 plate when your unit requires #12.
Break down this example: “12 012 HUB SS”
– 12: Grinder size classification
– 012: Hole size (12/64″ = 1/2″)
– HUB: Hub configuration
– SS: Stainless steel construction
When ordering replacement plates, always provide the complete specification. A supplier might interpret “12 012″ as #12 size with 1/2” holes, but without specifying “HUB” or “SS,” you could receive a standard carbon steel plate that corrodes quickly or a hubless version that won’t secure properly. Many commercial kitchens maintain a physical sample of their most-used plates to prevent misidentification during urgent replacements.
Critical Retaining Components: Locking Nuts vs. Retaining Rings
The retaining ring and locking nut work together to secure your cutting assembly during operation, yet many users confuse these components or install them incorrectly. The retaining ring (sometimes called a retaining clip) prevents assembly loosening, while the locking nut provides primary fastening. Installing these backward or with improper tension causes catastrophic failure—suddenly releasing the cutting assembly during operation.
Proper installation sequence:
1. Position grinder plate against the grinding head
2. Add grinder knife with cutting edges facing the plate
3. Slide on the hub adapter (if applicable)
4. Secure with locking nut tightened to manufacturer specifications
5. Install retaining ring in the designated groove
Over-tightening the locking nut damages threads and creates dangerous pressure points, while under-tightening allows movement that dulls cutting edges prematurely. Most commercial grinders require 15-20 ft-lbs of torque—use a torque wrench for precision rather than guessing by hand. Always inspect these components for wear before reassembly, as a cracked retaining ring can fail catastrophically during operation.
When to Choose Kidney Plates Over Standard Circular Patterns
Kidney plates offer specialized cutting dynamics that standard circular-hole plates can’t match, but many users don’t recognize when to deploy them. These plates feature elongated, kidney-shaped openings rather than round holes, creating different meat shear patterns that affect texture and consistency. The 2-hole version works best for controlled, fine-textured products, while the 3-hole design increases throughput for commercial operations.
Ideal applications for kidney plates:
– Processing large meat chunks without pre-cutting
– Creating textured sausage with varied particle size
– Handling connective tissue-heavy cuts that clog standard plates
– Achieving specific traditional sausage textures
Don’t confuse kidney plates with coarse plates—while both create larger particles, kidney plates produce distinctive texture profiles due to their elongated openings. They’re particularly valuable for specialty sausages like Italian soppressata or Spanish chorizo where texture variation is desirable. When ordering, specify “kidney” rather than “coarse” to receive the correct plate type.
Grinder Size Compatibility: Why #12 Won’t Fit #22 Models
Electric meat grinders use standardized size classifications (#12, #22, #32) that determine complete component compatibility, yet many users mistakenly assume parts interchange across sizes. The #12 designation refers to the grinding head diameter, which affects every component from plates to knives to stuffing attachments. Attempting to force a #22 plate into a #12 grinder damages both the part and your equipment.
Size-specific considerations:
– #12: Home and light commercial use, limited attachment options
– #22: Heavy-duty commercial applications, broader plate selection
– #32: High-volume processing facilities, industrial-grade construction
Never assume size compatibility based on visual similarity—measure your grinder head diameter precisely before ordering parts. A #12 grinder typically has a 1.5-2 inch head diameter, while #22 models range from 2.5-3 inches. Even within the same size classification, brands like Biro and ButcherBoy have proprietary mounting systems requiring specific part configurations.
Maintenance Must-Knows: When to Replace vs. Sharpen Components
Regular inspection prevents catastrophic failures during operation but knowing when to replace versus sharpen components saves unnecessary expenses. Grinder knives can typically be sharpened 3-5 times before requiring replacement, while plates with worn or damaged holes usually need full replacement rather than restoration.
Inspection checklist before each use:
– Check knives for nicks, chips, or uneven wear patterns
– Examine plates for deformed holes or excessive wear around edges
– Verify proper gap between knife and plate (should be paper-thin)
– Inspect retaining components for cracks or deformation
Commercial operations processing daily should inspect components weekly, while home users need monthly checks. Watch for warning signs like increased motor strain, inconsistent texture, or unusual noise during operation—these indicate immediate component replacement is necessary. Never continue grinding when components show significant wear, as this damages your entire grinder mechanism beyond simple part replacement.