
You crack eggs into the pan only to end up with rubbery, dense curds that taste like cafeteria food—no matter how gently you whisk or how much milk you add. What if you could make scrambled eggs so pillowy they’d make clouds jealous in under 5 seconds? The secret hides in your kitchen cabinet: eggs in a blender transform into soufflé-soft clouds without extra dairy. Forget whisking until your arm aches; this method aerates proteins to create billowy texture traditional techniques can’t match. You’ll discover exactly how to blend eggs for maximum fluffiness, why some chefs warn against blenders (and when to ignore them), and the single mistake that turns blended eggs rubbery.
The magic happens because blenders force air into egg proteins at lightning speed—something forks and whisks physically can’t achieve. When you blend eggs properly, you’re not just mixing yolks and whites; you’re engineering microscopic air pockets that expand during cooking. Skip this technique for large batches or crowd cooking, and you’ll waste time straining rubbery results. By the end of this guide, you’ll master cloud-like scrambled eggs in 3 minutes flat, understand the science behind the fluff, and avoid dangerous blender blunders (like adding shells).
The 5-Second Blender Trick for Soufflé-Soft Scrambled Eggs
Why Traditional Whisking Can’t Match Blender Aeration
Hand-whisking traps minimal air because human arms lack the speed to fully unfold egg proteins. Blenders spin at 10,000+ RPM, violently stretching ovalbumin and ovomucin proteins until they form a stable foam matrix. This isn’t just mixing—it’s engineering lift. When heated, these proteins expand six to eight times their original size, creating the “fluffy little pillows” chefs describe. Whisked eggs? They barely double in volume, leaving you with flat, streaky curds.
How Egg Proteins Transform During Blending
The real alchemy happens in under 5 seconds. As blades shear through the mixture, ovalbumin unravels to create the foamy foundation while ovomucin locks in air bubbles. Crucially, yolks contain 11.8% fat that normally blocks air retention—but high-speed blending overcomes this by forcing fat droplets to disperse rapidly. Stop at 3–5 seconds on low speed, and you’ll get uniform, pale-yellow ribbons ready to cook. Over-blend by just 2 seconds, and proteins fracture, yielding dense, watery eggs.
Why Some Chefs Ban Blenders for Eggs (And When They’re Right)
The Fat Interference Myth: Why Yolks Block Air Bubbles
Traditional cookbooks warn against “rough handling” because yolks sabotage foam. Egg whites are 90% water and 10% protein—ideal for trapping air like meringue. But yolks introduce 11.8% fat, which coats proteins and prevents bubble formation. This is why separated whites whip into stiff peaks while whole eggs resist fluffiness. Critics claim blenders can’t overcome this, making “fluffy whole eggs” scientifically impossible. They’re half-right: without high-speed aeration, yolks do ruin foam.
When Over-Blending Turns Eggs Tough and Rubbery
Violent agitation can destroy eggs—but only if you ignore timing. Blend beyond 5 seconds, and proteins over-unfold, releasing trapped water during cooking. Result? Tough, weepy curds resembling overcooked rubber bands. The fix is surgical precision: pulse once until yolks and whites merge into a pale ribbon (no streaks!). This respects historical wisdom—1800s chefs insisted on “barely beating”—while leveraging modern tech for superior aeration.
Ninja Nutri Pro vs. Immersion Blenders: Best Tools for Egg Blending

Why Compact Blenders Outperform Full-Size Models
Full-size blenders create vortexes that pull eggs away from blades, requiring longer blending and risking over-processing. The Ninja Nutri Pro’s compact 16-oz cup keeps eggs in constant blade contact for consistent aeration in 3–5 seconds. Its leak-proof seal prevents spills, and dishwasher-safe parts mean cleanup takes 30 seconds. For immersion blenders, choose models with narrow blending heads—they concentrate force better than wide wands for small egg batches.
Dishwasher-Safe Convenience for Crowd Cooking
When scrambling for four or more, skip the whisking fatigue. Dump all eggs into a Ninja cup, blend 4 seconds, and pour directly into the pan. You’ll save 2+ minutes versus hand-whisking while ensuring uniform texture. Post-cooking, toss the cup and blade in the dishwasher—no scrubbing egg gunk from crevices. This efficiency makes eggs in a blender essential for brunch hosts or meal preppers.
Step-by-Step: Making Perfect Blended Scrambled Eggs in 3 Minutes
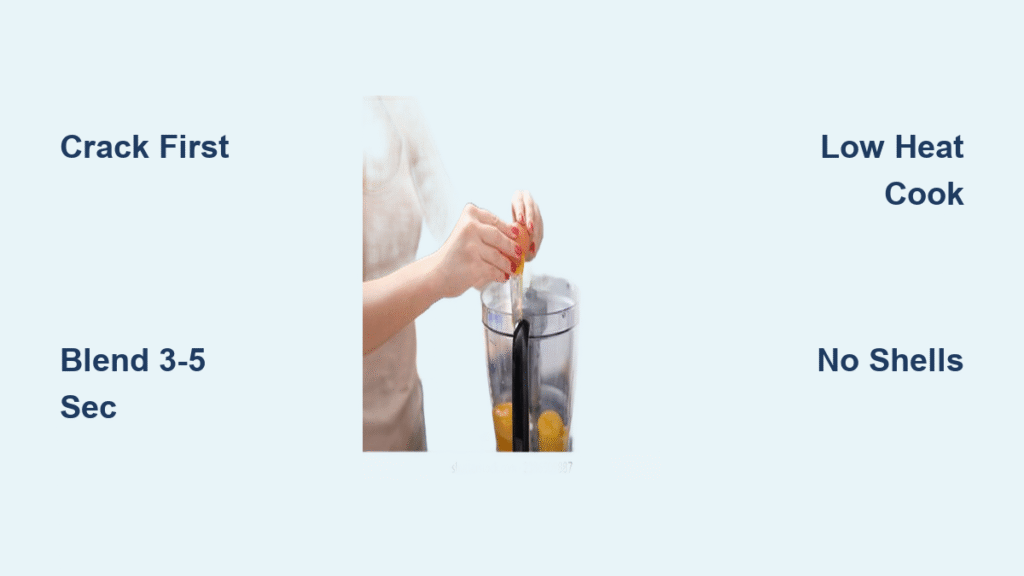
Crack Eggs Into Bowl First (Never Directly in Blender)
Blending shells risks dangerous fragments and Salmonella exposure. Always crack eggs into a bowl first to inspect for shell shards or blood spots. Transfer to your blender cup—this double-check prevents gritty, contaminated eggs. Skipping this step might save 10 seconds but risks ruined texture and food poisoning.
Blend 3-5 Seconds on Low: The Exact Timing
Set blender to low speed. Pulse once for 3–5 seconds until mixture turns pale yellow with zero white streaks. Over-blending creates a frothy head that collapses into rubber. Stop when it resembles thin pancake batter—this signals optimal air incorporation without protein damage.
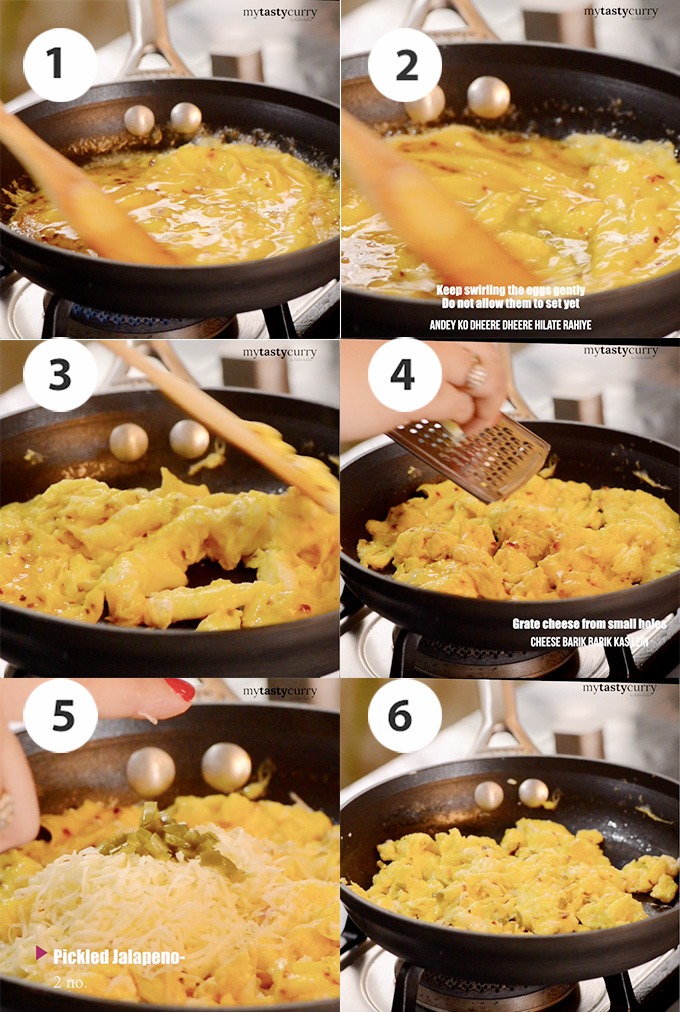
Cook Over Low Heat With Constant Stirring
Melt 1 tsp butter in a nonstick skillet over low heat. Pour in blended eggs and stir continuously with a silicone spatula for 120–180 seconds. Low heat prevents browning (which triggers toughness) while constant motion forms small, creamy curds. Never let eggs sit—even 10 seconds creates tough spots.
Stop Before Fully Set: Residual Heat Finishes Cooking
Remove eggs from heat when 80% set (soft, glossy curds). Residual heat finishes cooking without drying them out. Overcooking by 15 seconds turns pillowy eggs into rubber. Rest 30 seconds before serving for peak fluffiness.
Never Blend Whole Eggs With Shells (Critical Safety Warning)
Shell Fragments Create Gritty, Dangerous Eggs
Blending shells pulverizes calcium carbonate into invisible sand-like particles. These survive cooking, creating a gritty mouthfeel and potential tooth damage. Even “thoroughly cleaned” shells harbor microscopic cracks where Salmonella hides. One study found 1 in 20,000 eggs carry internal Salmonella—blending shells spreads bacteria throughout your mixture.
Salmonella Risk From Blending Contaminated Shells
Eggshells are porous and often contaminated during laying. Blending forces bacteria deep into the egg liquid, making heat penetration uneven. Cooking won’t kill all pathogens if eggs aren’t heated to 160°F uniformly—a risk solid shells wouldn’t pose. Always crack eggs into a separate bowl to contain contamination.
Thomas Keller’s Chef-Approved Blender Method for French-Style Eggs
Blending for Ultra-Creamy Texture (No Milk Needed)
The famed chef blends eggs 5 seconds for French-style scrambled eggs, skipping dairy entirely. The aeration creates natural creaminess by expanding proteins—not diluting with milk. For extra silkiness, he strains blended eggs through a chinois to remove any unincorporated bits. Result? Velvety, restaurant-quality eggs with zero graininess.
Silky Finish: Straining Through a Chinois
After blending, pour eggs through a fine-mesh sieve to catch unblended yolk pockets or foam bubbles. This step ensures uniform texture critical for Keller’s 5-star dishes. Skip straining for rustic home cooking, but use it when impressing guests—it transforms blended eggs from great to extraordinary.
3 Deadly Sins That Turn Blended Eggs Rubbery
Mistake #1: High Heat Cooking (Creates Tough Eggs)
Medium or high heat coagulates proteins too fast, squeezing out water and creating tight, rubbery networks. Always cook blended eggs on low—this matches the 144–158°F coagulation range of egg proteins for tender curds.
Mistake #2: Skipping Fat (Butter is Non-Negotiable)
Blended eggs need fat even in nonstick pans. Butter’s milk solids create a protective barrier that prevents protein bonding to the pan. Without it, eggs stick and tear, losing fluffy structure. Use 1 tsp per 3 eggs—never substitute water.
Mistake #3: Letting Eggs Sit While Cooking
Blenders create uniform mixtures that cook evenly—but only if stirred constantly. Pausing lets bottom layers overcook while top stays liquid. Keep the spatula moving in slow figure-eights for consistent 1/8-inch curds.
Blending eggs isn’t a gimmick—it’s physics-powered perfection. By respecting the 5-second rule, using low heat, and never blending shells, you’ll consistently create soufflé-soft scrambled eggs that shame traditional methods. Remember Thomas Keller’s straining trick for special occasions, and always crack eggs into a bowl first for safety. For crowd cooking, this technique saves time without sacrificing texture—no arm fatigue, no rubbery results. Your next batch of eggs in a blender will prove why chefs guard this secret: when done right, it’s the only method worth using.


