

Cutting paving stones doesn’t require expensive specialized equipment. With the right angle grinder, diamond blade, and safety precautions, you can achieve professional-quality cuts for patios, walkways, and driveways. This guide walks you through everything you need to know—from selecting the proper blade to executing clean, precise cuts that fit your project perfectly.
Whether you’re installing a curved patio edge, trimming pavers around obstacles, or fitting stones into tight spaces, mastering this technique saves both time and money. Let’s explore how to cut paving stones with an angle grinder safely and effectively, avoiding common pitfalls that waste materials and compromise your project’s appearance.
Essential Tools and Equipment for Professional Results
Gathering the right tools before starting your paving project ensures smooth cuts and protects you from potential hazards. The angle grinder serves as your primary cutting tool, but selecting compatible accessories makes all the difference in results. Investing time in proper tool selection prevents frustration and material waste during your project.
Choosing the Right Angle Grinder for Paver Projects
A 4.5 to 5-inch angle grinder provides the ideal balance of power and maneuverability for most paving projects. Smaller grinders lack the torque needed for dense materials, while larger models become unwieldy for detailed work. Look for a variable-speed model if available, as slower speeds reduce chipping on brittle materials. Corded grinders deliver consistent power throughout the cut, making them preferable for extended projects where battery life might become an issue. When selecting your grinder, consider the weight—lighter models reduce fatigue during extended cutting sessions, especially when making multiple precise cuts.
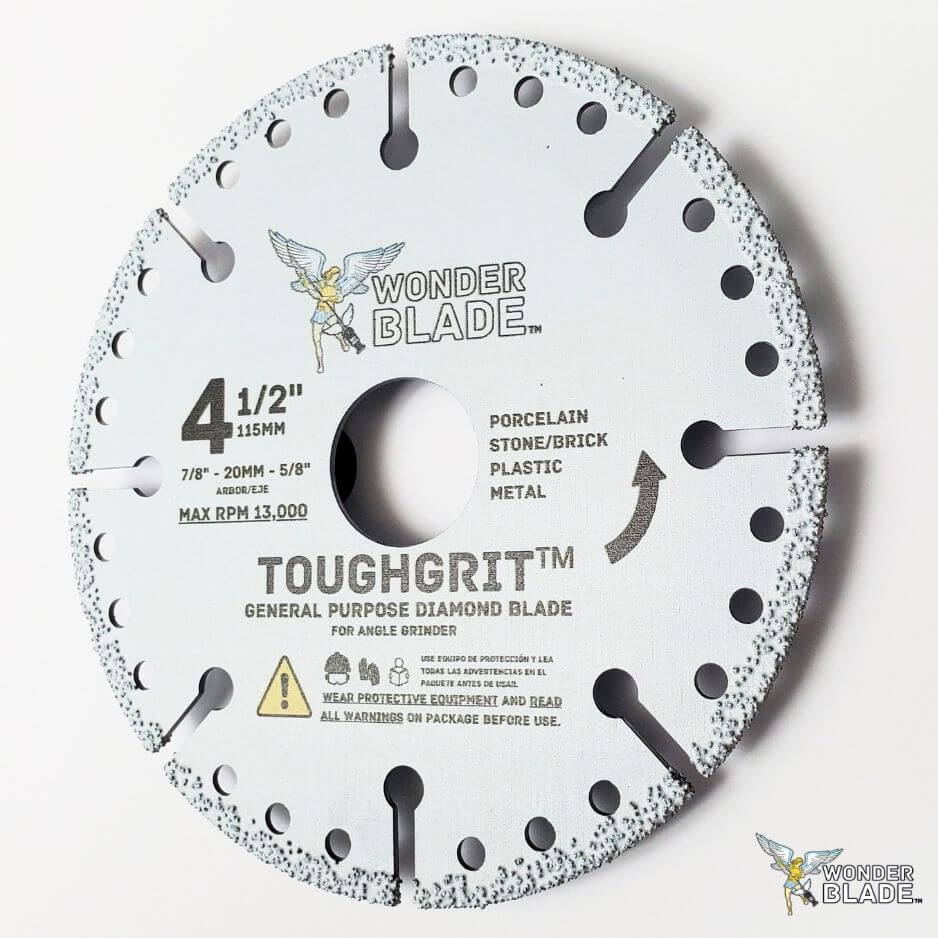
Selecting Diamond Blades for Different Paver Types
Not all diamond blades perform equally with paving stones. Porcelain and concrete pavers require different blade specifications. Continuous rim diamond blades produce the cleanest cuts with minimal chipping, making them ideal for decorative pavers where appearance matters. Segmented rim blades cut faster but leave rougher edges, which works fine for utility installations or areas hidden from view. Ensure your blade’s arbor size matches your grinder—standard sizes are 7/8-inch for most angle grinders. For porcelain pavers, select a blade specifically designed for hard, dense materials with finer diamond grit. Concrete pavers can handle more aggressive blades with larger diamond segments. Always verify the blade’s maximum RPM rating exceeds your grinder’s operating speed for safety.
Safety Gear Requirements for Stone Cutting
Personal protective equipment isn’t optional when cutting stone. Safety glasses shield your eyes from flying debris, while a dust mask or respirator prevents inhalation of harmful silica particles. Work gloves protect your hands from both the grinder and rough paver edges. Steel-toed boots provide foot protection if pavers accidentally drop. Consider hearing protection for extended cutting sessions, as angle grinders produce significant noise. A full-face shield offers superior protection when making deep cuts or working with particularly brittle materials. Never skip safety gear—even small stone fragments traveling at high speed can cause serious injury.
Prepare Your Work Area for Clean, Accurate Cuts

Proper workspace setup prevents accidents and improves cut quality. Taking time to organize your materials and environment pays dividends in both safety and efficiency. A well-prepared workspace minimizes material waste and reduces physical strain during the cutting process.
Stable Cutting Surface Setup
Position your pavers on a stable work surface where they won’t shift during cutting. A pair of sawhorses with a piece of plywood across them creates an effective cutting station. Alternatively, lay the pavers flat on clean, level ground—though this positions you in less ideal cutting posture. The critical factor is ensuring the paver remains firmly supported throughout the entire cut to prevent binding or kickback. For curved cuts, consider using sand or sawdust in a shallow container to cradle the paver and absorb vibration. Always position your cutting station away from foot traffic and ensure adequate lighting on your work surface.
Mark Your Cut Lines Clearly for Precision
Use a straightedge and marker to define your cut path before touching the grinder to the stone. A carpenter’s square ensures 90-degree cuts, while flexible curve guides help with custom shapes. For curved cuts, a compass or template made from cardboard helps maintain consistent curves across multiple pavers. Apply the marker along the entire length of your intended cut, double-checking measurements before proceeding. Lightly score the paver surface with a utility knife along marked lines—this shallow groove guides the blade and prevents wandering during the actual cut. For complex patterns, create multiple templates from scrap material to verify your measurements before cutting valuable pavers.
Wet Cutting vs. Dry Cutting: Making the Right Choice
Wet cutting suppresses dust and extends blade life by continuously cooling the diamond segments. Attach a water hose or spray bottle to your work area if using this method, directing water at the cut line throughout the operation. Dry cutting generates significant dust clouds and requires more frequent blade breaks to prevent overheating, but offers greater mobility and simpler setup. For indoor projects or areas where water cleanup poses problems, dry cutting with a high-quality dust collection system becomes necessary. When wet cutting, maintain a consistent water flow—not too heavy to obscure your vision, but sufficient to keep the blade cool and suppress dust. Remember that wet cutting requires electrical safety precautions to prevent shock hazards.
Execute Precise Cuts with Professional Technique
With preparation complete, it’s time to make your cuts. Proper technique determines whether you achieve clean edges or jagged, split pavers. Follow these steps for optimal results and minimize wasted materials during your project.
Initial Scoring Pass for Clean Cut Lines
Begin by lightly guiding the blade along your marked line to create a shallow score approximately 1/8 to 1/4 inch deep. This initial pass establishes the blade’s path and prevents it from wandering during deeper cuts. Hold the grinder with both hands, positioning your body to the side of the cutting line rather than directly behind the blade. Move along the score line smoothly without forcing the blade—let the diamond segments do the work. Keep the grinder at a consistent 15-30 degree angle to the paver surface for optimal cutting performance. Pause briefly at the beginning and end of each cut to ensure clean starts and stops without chipping.
Progressive Deepening Technique for Clean Edges
After scoring, make a second pass slightly deeper than the first. Continue deepening in stages rather than attempting to cut through the paver in one pass. This progressive approach reduces stress on both the blade and the paver, minimizing chipping and extending blade life. Each pass should remove approximately 1/4 inch of material for concrete pavers, slightly less for porcelain which tends to chip more easily. Maintain consistent pressure and speed throughout each pass—varying your technique creates uneven edges. For curved cuts, slow your feed rate slightly to maintain control and accuracy through the turn.
Complete the Cut Without Damage
On your final pass, cut through the remaining material while maintaining steady forward pressure. Support the piece being cut off as it separates from the main paver to prevent it from falling and cracking or causing injury. For thick pavers exceeding 2 inches, consider cutting from both sides—flip the paver carefully and complete the cut from the opposite face, meeting in the middle. This technique prevents blowout on the exit side of the cut. When making multiple identical cuts, create a jig from scrap wood to guide your grinder for consistent results. Always allow the blade to come to a complete stop before setting the grinder down after each cut.
Solve Common Cutting Problems Immediately

Even experienced cutters encounter issues with paving stone projects. Understanding common problems and their solutions keeps your project moving forward smoothly and prevents wasted materials.
Prevent Excessive Chipping on Decorative Pavers
Chipping along cut edges frustrates many DIY installers. Several factors contribute to this problem, and addressing each one improves results significantly. Ensure your blade is specifically designed for the paver type you’re cutting—harder blades needed for dense porcelain differ from those optimal for concrete. Reduce cutting speed slightly, as aggressive feed rates increase chipping. Support the paver completely along its length, preventing flex that leads to stress fractures. Finally, use a continuous rim blade rather than segmented options when clean edges matter most. For particularly delicate pavers, make your final pass from the “good” side of the material to minimize exit-side chipping.
Manage Blade Binding During Deep Cuts
When the blade binds in the cut, stop immediately rather than forcing continued operation. Binding typically occurs when debris accumulates in the cut kerf, the blade overheats, or lateral pressure shifts the cut path. Clear debris with compressed air, allow the blade to cool, and realign your cut path before proceeding. For deep cuts, periodically back out of the kerf to clear material and allow cooling. A slight wedge inserted behind the blade prevents the cut from closing and binding during extended operations. If binding persists, consider switching to a narrower kerf blade or adjusting your cutting technique to create more clearance.
Address Inaccurate Cuts Before They Compound
Misplaced cuts waste materials and delay projects. If your cut deviates from the marked line, assess whether the error occurred from blade wander, an inaccurate initial score, or shifting during cutting. Small errors of 1/8 inch or less often disappear in mortar joints or under edge restraints. Larger errors require either recutting the paver (if sufficient material remains) or using it in a less visible location. Double-checking measurements before each cut and scoring deeply enough to create a definitive groove prevents most accuracy issues. For complex patterns, practice on scrap pieces first to verify your technique before cutting valuable materials.
Maintain Your Equipment for Long-Term Performance
Regular maintenance extends tool life and ensures consistent cutting performance. Neglected equipment produces poorer results and poses greater safety risks. Proper care of your cutting tools saves money in the long run and prevents frustration during critical project phases.
Blade Care and Replacement Timing
Inspect your diamond blade before each use for cracked segments, missing teeth, or wobble indicating segment loss. A damaged blade poses serious safety hazards and should be replaced immediately. Clean accumulated debris from blade segments between uses, as packed material reduces cutting efficiency. Store blades flat or hanging—never stack them where segments might chip. Expect blade life to vary significantly based on paver hardness and cutting technique, but quality blades typically complete dozens of cuts before requiring replacement. When blade performance noticeably declines, replace it rather than forcing continued use that compromises cut quality.
Grinder Maintenance for Reliable Operation
Keep your angle grinder clean by blowing out dust accumulation after each use, particularly around the motor vents and gear housing. Check power cords regularly for fraying or damage that could create shock hazards. Verify blade mounting hardware remains tight before each use, as vibration can loosen mounting nuts over time. Lubricate gear components according to manufacturer specifications, typically every 25 to 50 hours of operation. Store your grinder in a dry place with the blade removed to prevent corrosion. Regular maintenance prevents unexpected tool failures that could ruin multiple pavers during a critical project phase.
Key Takeaways for Successful Paver Cutting
Cutting paving stones with an angle grinder becomes straightforward when you approach it methodically. Select appropriate diamond blades for your specific paver material, and always prioritize safety equipment. Prepare your work area with stable supports and clearly marked cut lines. Execute cuts using progressive deepening rather than single-pass attempts, and support separating pieces to prevent damage. Address common issues like chipping and binding immediately before they compound project problems. With proper technique and equipment maintenance, your angle grinder produces cuts rivaling professional equipment—transforming your patio, walkway, or driveway project from dream to reality. Practice on scrap materials before beginning your actual project, and don’t hesitate to adjust technique based on results for the cleanest possible edges.


