
Gutters that don’t fit properly can cause serious water damage to your home’s foundation, siding, and landscaping. When standard gutter sections don’t match your home’s dimensions, you’ll need to cut them to size—but doing this incorrectly can ruin expensive materials or create safety hazards. Cutting gutters with a grinder offers precision and speed compared to traditional hacksaw methods, but requires proper technique to avoid dangerous sparks, uneven cuts, or material damage. If you’ve ever struggled with jagged gutter edges or inaccurate measurements that led to leaks, this guide will transform your gutter installation process. You’ll learn the exact steps professional contractors use to make clean, precise cuts that ensure perfect water flow and seamless connections.
Essential Safety Gear for Gutter Cutting Operations
Before touching your angle grinder, proper safety equipment is non-negotiable. Cutting metal gutters creates intense heat, flying debris, and potentially dangerous sparks that can cause serious injury without protection. The aluminum or steel composition of most gutters means you’re working with material that can shatter or create sharp edges when cut improperly.
Mandatory Protective Equipment Checklist
- Safety goggles with side shields (regular glasses won’t protect against metal shards)
- Heavy-duty work gloves with heat resistance
- Hearing protection (angle grinders operate at 10,000+ RPM)
- Fire-resistant long-sleeve shirt (synthetic fabrics can melt on contact with sparks)
- Steel-toe boots to protect feet from falling tools or materials
- Dust mask or respirator for aluminum cutting (metal fumes are hazardous)
Never skip eye protection—metal fragments from cutting operations have caused permanent vision damage to DIYers who thought “it would just take a second.” Position yourself so sparks fly away from your body and any flammable materials, and keep a fire extinguisher nearby when working on or near your home’s structure.
Selecting the Right Grinder and Cutting Disc
Not all angle grinders perform equally well for gutter cutting tasks. Using the wrong tool can cause excessive vibration, uneven cuts, or dangerous kickback that ruins your materials and risks injury.
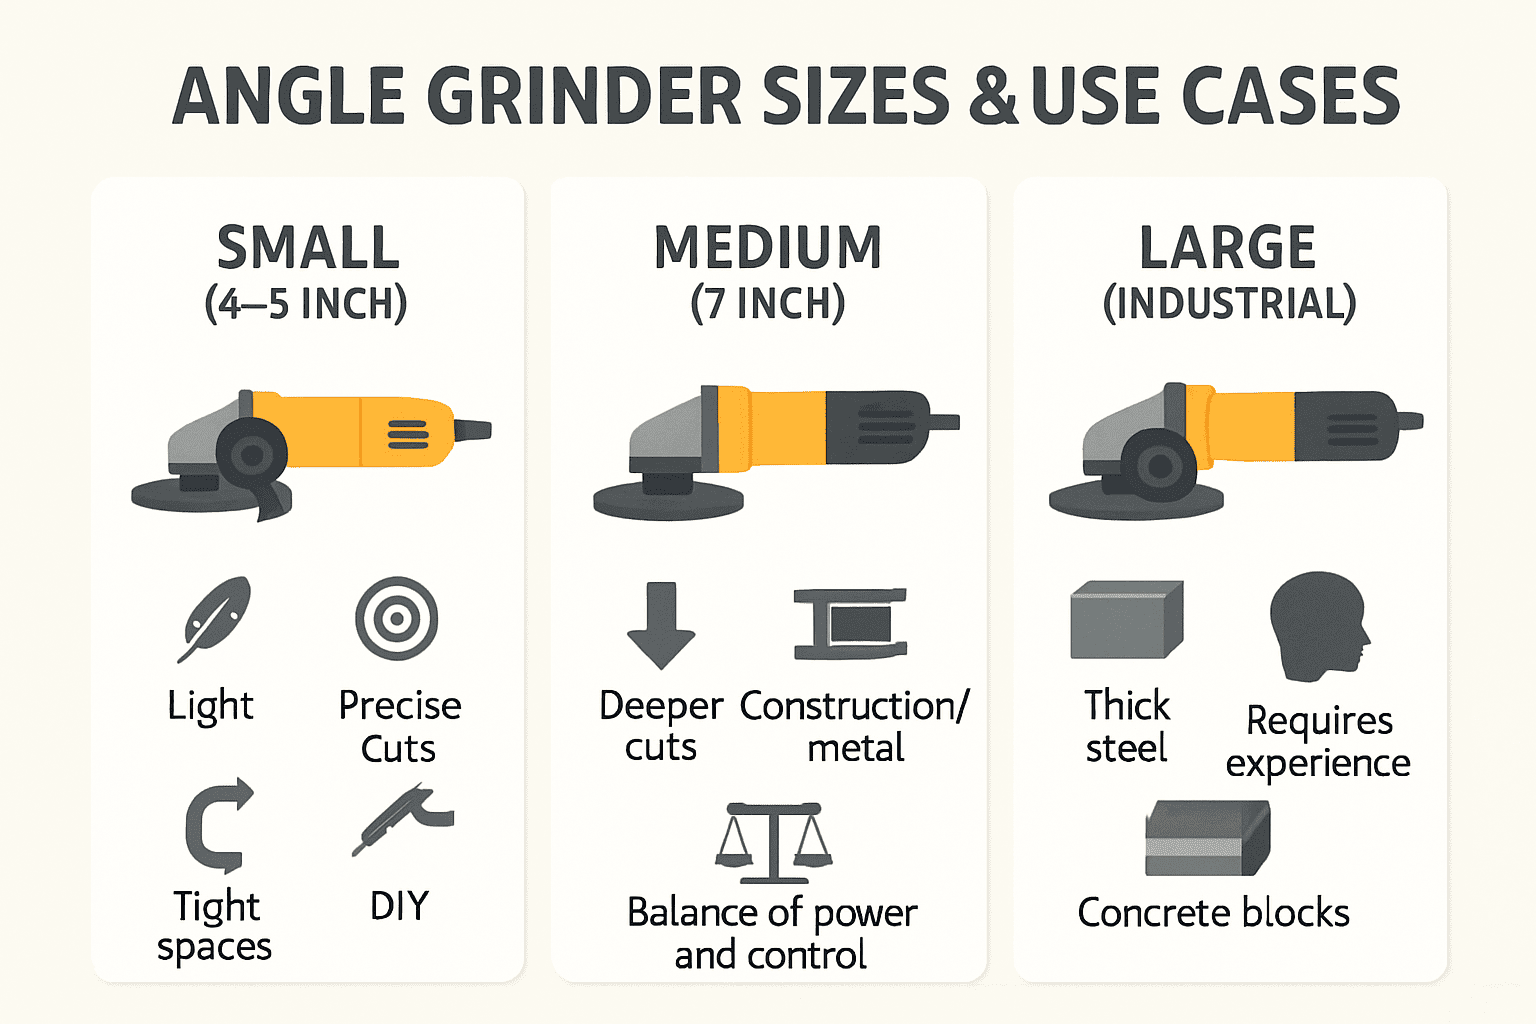
4-Inch vs. 7-Inch Grinder Comparison
| Feature | 4-Inch Grinder | 7-Inch Grinder |
|---|---|---|
| Best For | Aluminum gutters | Heavy steel gutters |
| Cutting Depth | 1.25 inches (perfect for standard gutters) | 2.5+ inches (overkill for most gutters) |
| Control | Superior maneuverability for precise cuts | More difficult to control for detailed work |
| Vibration | Minimal | Significant at high RPMs |
| Disc Cost | $2-$5 per cutting wheel | $5-$10 per cutting wheel |
For most residential gutter projects, a 4.5-inch angle grinder with a thin metal cutting disc (0.045″ thickness) delivers the perfect balance of power and precision. Thinner discs create less material waste and reduce the chance of binding during the cut. Purchase aluminum-specific cutting discs that prevent material discoloration—standard steel discs can leave a bluish tint on aluminum gutters that indicates heat damage.
Proper Gutter Securing Techniques Before Cutting

Unsecured gutters move unpredictably during cutting, causing dangerous kickback and inaccurate cuts. How you position and clamp your gutter section determines whether you get a clean, straight cut or a ruined piece that must be discarded.
Three-Point Clamping Method
- Place the gutter section on sturdy sawhorses with the open side facing up
- Position the cut line 6-8 inches from the end of your work surface
- Secure the gutter with three C-clamps: one near the cut line and two at opposite ends
- Place a wood block under the section to be cut to prevent vibration
Never hold gutters with your hands while cutting—this is the leading cause of serious grinder injuries among DIYers. If your clamp positions interfere with the grinder’s path, create a custom jig from scrap wood that holds the gutter at the perfect angle for unobstructed cutting.
Executing the Perfect Gutter Cut: Professional Technique
The actual cutting process requires specific movements and pressure to avoid common mistakes that ruin gutter sections. Most DIYers apply too much pressure or move too slowly, causing excessive heat buildup that warps the metal.
Step-by-Step Cutting Procedure
- Mark your cut line with a permanent marker and verify measurements twice
- Start the grinder away from the gutter material
- Approach the cut line at a 15-20 degree angle, not straight down
- Apply light, consistent pressure—let the disc do the work
- Maintain 60-70% of full speed throughout the cut
- Complete the cut in one smooth motion (don’t stop mid-cut)
- Allow the disc to stop completely before lifting from the material
Critical mistake to avoid: Forcing the grinder through the cut. Excessive pressure causes disc binding, which can lead to violent kickback. If you see excessive sparks or hear the grinder laboring, you’re pressing too hard. The cutting process should take 3-5 seconds per gutter section when done correctly.
Troubleshooting Common Cutting Issues
Problem: The cut edge curls or warps after cutting
Solution: Reduce cutting speed and apply less pressure—you’re generating too much heat
Problem: The disc binds or gets stuck mid-cut
Solution: Start your cut at a shallow angle and maintain consistent motion without stopping
Problem: Uneven cut line despite careful marking
Solution: Verify your clamps aren’t shifting the gutter during cutting; use more anchor points
Post-Cut Finishing for Leak-Proof Gutters

Raw cut edges on gutters create immediate failure points where water escapes, causing damage to your home’s structure. Proper finishing transforms a basic cut into a professional installation that performs as well as factory-made sections.
Deburring and Smoothing Process
- Use a metal file to remove sharp edges along the entire cut line
- Round the top 1/8 inch of the cut edge to prevent injury during handling
- Sand the cut edge with 120-grit sandpaper to create a smooth transition
- Wipe clean with a dry cloth to remove metal particles
- Apply gutter sealant to the cut edge before installation
Aluminum gutters particularly benefit from this finishing process because raw aluminum edges oxidize quickly, creating a rough surface that interferes with proper sealing when connecting sections. Never install gutters with unfinished cut edges—this is the most common reason for early leaks in DIY installations.
Preventing Common Gutter Cutting Mistakes
Even experienced DIYers make critical errors when cutting gutters that compromise the entire installation. Recognizing these pitfalls before you start can save you time, money, and potential water damage.
Top 3 Costly Cutting Errors
- Measuring from the wrong reference point (always measure from the back of the gutter, not the front lip)
- Cutting without accounting for end caps or connectors (most connections require 1/4 inch overlap)
- Ignoring gutter slope requirements (cuts must maintain the 1/4 inch per 10 feet downward slope)
Mark your cut lines with two reference points on opposite sides of the gutter and connect them with a straight edge—never eyeball your cuts. For long gutter runs, cut the sections slightly long (1/8 inch) then test-fit before making your final cut to ensure perfect alignment.
Maintaining Your Grinder for Future Gutter Projects
A poorly maintained grinder creates dangerous conditions and inconsistent cuts. After completing your gutter project, proper maintenance ensures your tool remains safe and effective for future use.
Post-Project Maintenance Checklist
- Clean the grinder body with a dry brush to remove metal dust
- Inspect the guard for proper alignment and damage
- Check the power cord for nicks or exposed wires
- Verify all screws and fasteners are tight
- Store the grinder in a dry location with a protective case
Replace cutting discs after 5-7 gutter sections—worn discs create more heat and vibration, increasing the risk of kickback. A well-maintained grinder will deliver clean, consistent cuts for years, making future gutter projects faster and safer.
When to Call a Professional Gutter Installer
While cutting gutters with a grinder is a valuable DIY skill, certain situations warrant professional help to avoid costly mistakes. If you’re working with copper gutters, extremely long runs requiring multiple precise cuts, or complex architectural features like dormers and turrets, the margin for error becomes too small for most DIYers.
Professionals bring specialized tools like portable gutter brake machines that create perfect bends without cutting, and they understand how to maintain proper slope across complex roof lines. For multi-story homes or when working near electrical lines, the safety risks often outweigh the cost savings of a DIY approach.
Final Note: Properly cut gutters form the foundation of an effective drainage system that protects your home for decades. By following these precise techniques for cutting gutters with a grinder, you’ll achieve professional results while avoiding the most common—and costly—mistakes DIYers make. Remember that safety should always come first: never rush the process, always wear proper protection, and take the time to verify measurements before cutting. With these skills mastered, you’ll handle future gutter projects with confidence, knowing each precise cut contributes to a watertight system that safeguards your home’s structural integrity.


