
Your coffee grinder not fine enough to produce the ultra-fine powder required for espresso transforms your morning ritual from pleasure to frustration. That rich, creamy extraction you crave becomes weak, sour, and disappointing—no matter how many times you adjust the settings. The core issue is simple: grind fineness controls extraction. Too coarse means under-extraction and weak flavor, while the right fineness unlocks the full spectrum of coffee compounds that create exceptional cups.
This guide addresses the specific problem of grinders that simply cannot achieve adequate fineness regardless of setting. Whether you use a budget burr grinder, manual mill, or blade grinder, you’ll discover exactly why your equipment fails to deliver and precisely what to do about it. No more guessing or wasting money on ineffective solutions—you’ll have a clear path to restoring proper performance or making an informed upgrade decision.
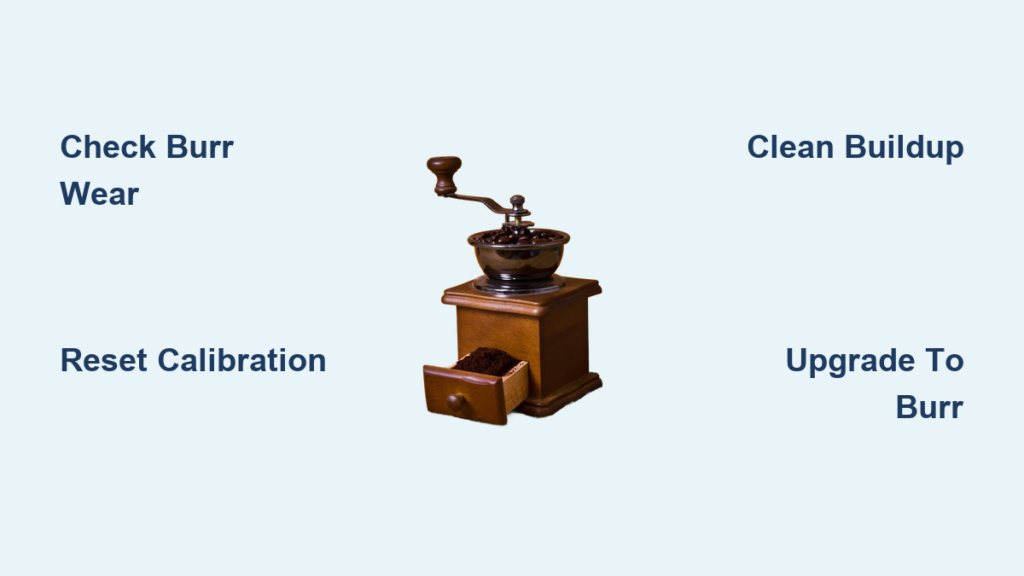
Why Your Grinder Suddenly Can’t Achieve Fine Settings
Identifying the Root Cause of Fineness Failure
When your coffee grinder not fine enough to reach required settings, the problem typically stems from one of three specific issues: burr wear, calibration drift, or environmental interference. Worn burrs lose their sharp edges over time, physically incapable of producing the fine particles they once created. Calibration drift occurs when mechanical components shift during cleaning or regular use, altering the critical gap between grinding surfaces. Environmental factors like humidity cause beans to absorb moisture, making them denser and harder to grind finely.
Burr grinders that once produced perfect espresso may gradually lose fineness capability over months of use. If you notice significantly longer grinding times, inconsistent particle sizes (a mix of fines and unexpectedly coarse chunks), or visible polishing on burr surfaces, wear has likely reached critical levels. For sudden fineness failures after cleaning, check whether components were reassembled in exactly their original orientation—many grinders use precise alignment to maintain proper burr spacing.
Differentiating Between Grinder Types
Burr grinders offer the most control but require proper maintenance to maintain fineness capability. Blade grinders face fundamental limitations in producing consistent fine particles due to their chopping action. Manual grinders present unique challenges regarding mechanical wear and user technique consistency. Understanding your specific grinder type determines your troubleshooting path—what works for a blade grinder won’t help a burr model, and vice versa.
Spotting Critical Burr Wear Before It Ruins Your Espresso
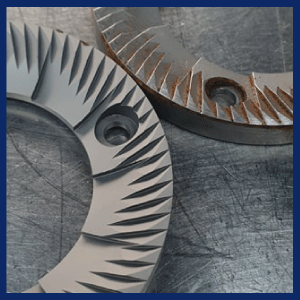
Visible Signs Your Burrs Need Replacement
Healthy burrs display crisp, defined edges across their entire grinding surface. Worn burrs show visibly rounded corners, polished surfaces where sharp edges once existed, and potentially chips or damage from foreign objects. To inspect your burrs, unplug the grinder, remove the hopper, and examine the grinding mechanism with a flashlight. If edges appear smooth rather than sharp, replacement is likely necessary.
Professional-grade burrs typically maintain optimal performance through 500-750 pounds of coffee, while home-use grinder burrs generally require replacement after 300-500 pounds. However, these figures serve as guidelines—actual replacement timing depends on observed grind consistency and visible wear patterns. When burrs wear beyond their adjustment range, no amount of setting tweaking will restore proper fineness.
Testing for Burr Efficiency Loss
Run a small amount of beans through your grinder on its finest setting and inspect the output under good lighting. Note whether particles appear uniformly sized or show a bimodal distribution (lots of fines mixed with coarse chunks). Time how long grinding takes compared to when the grinder was new. Significant increases in grinding time combined with inconsistent particle size confirm critical burr wear.
Pro tip: Listen carefully while grinding hard, unroasted popcorn on the finest setting. You should hear a distinctive high-pitched sound when burrs make contact. If you cannot hear this contact sound even at the finest setting, burrs have likely worn past their adjustment range.
How Calibration Drift Sabotages Your Finest Grind Settings
Diagnosing Alignment Shifts After Cleaning
Disassembly for cleaning frequently causes calibration drift when components aren’t reassembled in exactly their original position. The hopper attachment point, retaining mechanisms, and adjustment rings all play critical roles in maintaining precise burr alignment. Even slight rotational differences in the burr mount can shift alignment enough to affect fineness. Users commonly report losing fine grind capability after routine cleaning, finding that reassembly changed burr spacing.
Some grinder designs, including the popular Bodum Bistro, use hopper position as part of the adjustment mechanism—moving the hopper changes the effective grind setting. If you removed and replaced the hopper during cleaning, this simple action may have shifted your calibration enough to impact fineness.
Resetting Your Grinder’s Calibration
For grinders with external adjustment, note your current setting before making changes, then make small adjustments (typically one to two clicks) and test results. Moving too far from your starting point makes it difficult to return to previously functional settings. Some grinders benefit from the “coarse to fine” approach: start at a coarse setting and gradually move finer while listening for burr contact.
Critical warning: Without model-specific documentation, internal calibration adjustment risks damaging your grinder or voiding warranties. When self-calibration proves insufficient, professional service can restore proper burr alignment and ensure all components function as designed.
Blade Grinder Limitations: Why “Fine” Isn’t Really Fine
Understanding Fundamental Design Constraints
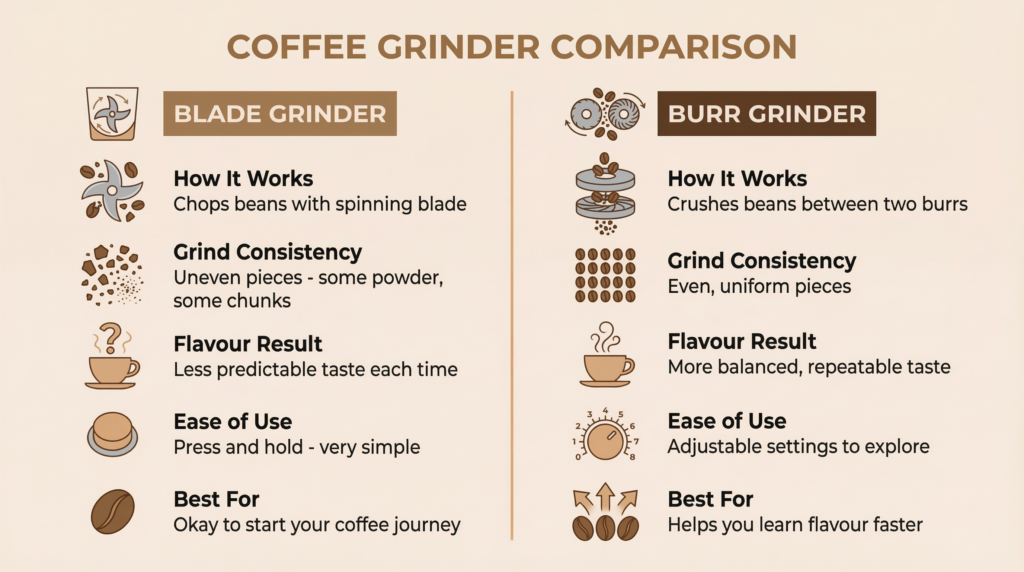
Blade grinders operate on a fundamentally different principle than burr grinders, using spinning blades to chop coffee beans rather than crushing them between controlled surfaces. This chopping action produces unavoidable inconsistency in particle size—even if the resulting powder appears fine to casual observation, the actual distribution includes particles ranging from dust-like fines to unexpectedly coarse chunks.
Manufacturer documentation explicitly acknowledges these limitations. The Krups F203 manual states that grinding coffee longer than 20 seconds doesn’t produce finer results but instead overheats the coffee. While acceptable for moka pots, blade grinders aren’t recommended for pump espresso machines due to coffee dust production that can clog filters.
Maximizing Blade Grinder Performance Within Limits
Despite inherent limitations, blade grinder owners can improve results through proper technique. Pulsing the grinder rather than running it continuously allows blades to redistribute beans for more uniform results. Avoid overfilling the grinding chamber to ensure blades have adequate space to process all beans effectively. However, these techniques cannot overcome the fundamental physics of blade chopping—consistent fine grinding requires burr-style equipment.
For espresso preparation, recognize that consistent espresso-fine grinding falls outside your equipment’s fundamental capabilities. While technique improvements can maximize your current grinder’s performance, true consistency requires upgrading to a burr grinder.
Essential Cleaning Steps to Restore Grinding Precision
Removing Residue That Interferes With Fineness
Accumulated coffee oils and residue can physically alter the grinding gap in burr grinders, reducing effective fineness. Unplug your grinder and remove the hopper. Examine the grinding mechanism with a flashlight, noting any visible coffee buildup, foreign objects, or damage. Clean accessible surfaces with a dry brush or slightly damp cloth, being careful not to introduce moisture into electrical components.
Critical step: For deep cleaning, use specialized grinder cleaning tablets or raw rice to remove accumulated oils that regular wiping cannot address. Run the cleaning agent through your grinder on a medium setting, then follow with a small amount of coffee beans to clear any residual cleaning material.
When to Replace Burrs vs. Upgrade Your Entire Grinder
Cost-Benefit Analysis for Grinder Repair
When burr wear causes inadequate fineness, determine whether replacement makes economic sense. Check your grinder’s documentation or manufacturer website for replacement part availability and cost. Genuine manufacturer parts ensure proper fit and function, though high-quality aftermarket options exist for popular models.
Compare the cost of replacement burrs plus any necessary tools or professional installation against the price of a new grinder with equivalent or better capabilities. For grinders not designed for user service, assessment by a qualified repair technician can determine whether replacement parts exist and are cost-effective versus replacing the entire unit.
Pro tip: For serious espresso work, experienced users consistently recommend the Eureka Mignon (or similar quality equivalent) as the minimum viable grinder. Budget grinders like the Bodum Bistro may work initially but often lose their ability to produce fine enough settings after relatively limited use—sometimes within eight weeks of regular operation.
Preventing Future Fineness Problems With Smart Maintenance
Creating a Maintenance Schedule That Works
Daily maintenance should include emptying the grounds container and wiping down the grinder to remove visible coffee residue. Weekly maintenance involves more thorough cleaning of the hopper and all accessible surfaces. Monthly deep cleaning with specialized grinder cleaning tablets prevents oil buildup that affects fineness.
Every three to six months, verify calibration accuracy and inspect burrs for visible wear patterns. This inspection interval may need adjustment based on usage volume—heavy daily use requires more frequent attention than occasional weekend brewing. Annual professional inspection becomes worthwhile for home units used extensively.
Critical prevention: Store coffee beans in airtight containers away from direct sunlight and temperature extremes. Allowing beans to acclimate to room temperature before grinding prevents condensation issues. Locate your grinder away from heat sources like ovens to reduce thermal drift that affects calibration.
When your coffee grinder not fine enough to produce the required fineness, systematic diagnosis leads to effective solutions. By addressing burr wear, calibration drift, environmental factors, or recognizing fundamental design limitations, you’ll restore proper performance or make an informed upgrade decision. Regular maintenance prevents most fineness issues before they disrupt your coffee ritual, ensuring every brew achieves the extraction balance that makes coffee truly exceptional. Remember: consistent fine grinding isn’t just about settings—it’s about understanding your equipment’s capabilities and limitations to produce the perfect cup, every time.


