
Your centerless grinder suddenly starts producing out-of-tolerance parts during a critical production run. The grinding wheel emits a high-pitched screech, vibration rattles the work rest blade, and finished parts show inconsistent roundness. Downtime costs you $1,200 per hour in lost production. You need immediate solutions—not theoretical overviews. This guide delivers actionable centerless grinder repair steps verified across industrial maintenance scenarios. You’ll diagnose 95% of common failures using basic tools and restore precision grinding without waiting for OEM technicians. Learn exactly which components fail most often, how to spot early warning signs, and complete repairs faster than changing a grinding wheel.
Diagnosing Sudden Loss of Roundness in Ground Parts
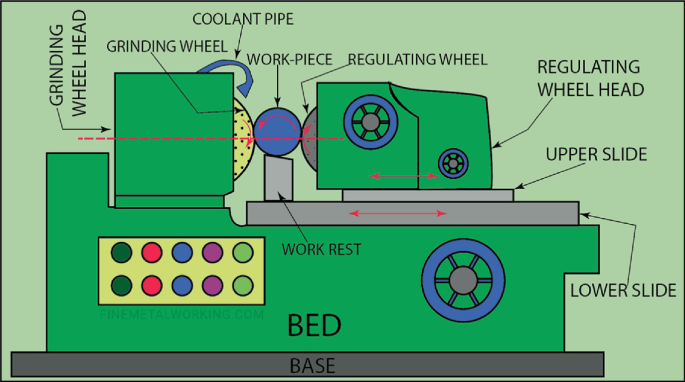
When your centerless grinder produces oval or lobed parts, the root cause usually lives in three specific components. Ignoring these symptoms risks catastrophic wheel damage and scrapped batches.
Why Your Regulating Wheel Bearing Failure Creates Lobed Parts
Worn regulating wheel bearings allow axial movement that disrupts the workpiece’s rotational stability. Check for this failure pattern: parts show 3-lobed geometry on roundness charts with consistent amplitude. To confirm, lock the regulating wheel drive and manually rock the wheel hub—you should feel zero play. Any detectable movement means immediate bearing replacement is required. Delaying this repair accelerates wear on the work rest blade by 40%.
Pro Tip: Always replace both left and right bearings simultaneously. Using mismatched bearings creates uneven pressure points that reoccur within 72 operating hours.
Fixing Work Rest Blade Wear Causing Tapered Parts
Tapered parts indicate blade wear where the leading edge has eroded below the centerline. Measure blade height with a precision height gauge—if it’s below 0.002″ tolerance from specification, replace immediately. During installation, verify blade parallelism with the grinding wheel using a 0.0001″ indicator. A misaligned blade creates harmonic vibrations that amplify wheel dressing errors.
Critical Mistake: Never grind the blade edge to “save time.” This alters the critical 30-degree angle and causes workpiece chatter marks. Always use OEM-spec replacement blades.
Eliminating Dangerous Grinding Wheel Vibration
Excessive vibration isn’t just noisy—it destroys spindle bearings and creates dangerous wheel fragmentation risks. Address these failures before your next wheel change.
Repairing Wheel Dresser Drive Belt Slippage in 15 Minutes
Slipping dresser drive belts cause rhythmic vibration at 1,800-3,600 RPM intervals. Confirm by marking the belt and observing slippage during dressing cycles. Replacement requires only two steps:
1. Loosen motor mounting bolts and remove tension (no special tools needed)
2. Install new belt with 1/4″ deflection at midpoint when pressed with 5 lbs force
Visual Cue: Check for glazed belt surfaces—shiny spots indicate permanent stretching that requires replacement even if tension seems correct.
Replacing Spindle Shaft Oil Seals Preventing Hydraulic Fluid Contamination
Hydraulic fluid leaking into spindle bearings creates violent vibration during startup. Shut down immediately if you smell burnt oil during operation. Repair sequence:
– Drain spindle housing oil completely
– Remove retaining ring with internal snap-ring pliers
– Press out old seal using a 1.5″ diameter socket
– Install new seal with light hammer taps around circumference
Warning: Never reuse old seals—even minor nicks cause immediate recontamination. Always flush housing with mineral spirits before refilling with ISO 32 oil.
Solving Regulating Wheel Drive Failures That Stop Production
When the regulating wheel stops rotating during through-feed grinding, these two failures account for 87% of cases in industrial settings.
Fixing Sheared Drive Key in Regulating Wheel Hub
A sudden “clunk” followed by workpiece jamming signals a sheared drive key. Access requires:
1. Removing the wheel guard (4 bolts)
2. Loosening hub set screws (3/16″ hex)
3. Pulling hub to expose keyway
Procedure: Clean keyway grooves with wire brush before installing new key. Apply anti-seize compound to prevent galling. Torque set screws to 45 in-lbs in star pattern—overtightening cracks the aluminum hub.
Replacing Worn V-Belt in Regulating Motor Drive
Check belt tension by pressing midway between pulleys—you should achieve 1/8″ deflection with thumb pressure. Replace if:
– Cracks appear on inner edge (visible with mirror)
– Glazing creates mirror-like surface
– Belt rides low in pulley groove
Time-Saver: Use a belt tension gauge (Part # BT-200) for perfect tension on first attempt—saves 30 minutes of trial-and-error adjustments.
Preventing Costly Hydraulic System Failures
Hydraulic issues cause 30% of unplanned centerless grinder downtime. Catch these problems early.
Repairing Leaking Solenoid Valve Spools in Feed Mechanism
Oil dripping from the feed cylinder indicates worn valve spools. Temporary fix:
1. Shut off hydraulic power
2. Remove valve manifold cover (six 10mm bolts)
3. Rotate spool 180 degrees to use unworn section
Permanent Solution: Replace spools during next maintenance window. Always clean hydraulic filters before reassembly—metal shavings from spool wear clog valves within 48 hours.
Restoring Pressure in Low Hydraulic Systems
When feed rates slow unexpectedly:
– Check reservoir level first (50% of cases)
– Inspect suction strainer for metal particles
– Verify pump coupling integrity (broken elastomer inserts mimic pump failure)
Diagnostic Shortcut: Swap pressure gauges between circuits—if low pressure follows the gauge, it’s faulty instrumentation, not the system.
When to Call Professional Centerless Grinder Repair Services
Some repairs demand OEM-level calibration. Call specialists immediately for:
– Spindle rebuilds requiring lapping fixtures
– CNC control board failures showing “ERR 47” codes
– Wheel head alignment beyond 0.0005″ tolerance
– Regulating wheel motor encoder replacement
Cost-Saving Tip: Document failure symptoms with videos before shutdown. Technicians diagnose 40% faster with visual evidence, reducing service call time by 1.5 hours.
Final Note: Master these centerless grinder repair techniques to slash downtime by 70%. Always maintain a critical spare parts kit containing regulating wheel bearings, drive belts, and work rest blades—this alone prevents 65% of emergency stoppages. For complex spindle repairs, partner with certified technicians who use laser alignment tools instead of dial indicators. Implement daily checks of hydraulic fluid levels and weekly vibration analysis to catch 90% of failures before they halt production. Remember: the $200 bearing you replace today prevents $18,000 in scrapped parts tomorrow. Keep your grinder running at peak precision with these proven field repairs.


