
Your Ninja blender can transform a humble cauliflower head into restaurant-quality rice grains faster than boiling water—and with just 24 calories per serving compared to 200+ in traditional rice. This grain-free, keto-friendly staple solves the biggest pain points of hand-grating: no sore arms, no food processor clogs, and zero uneven chunks. The secret lies in a water-blending technique that leverages your Ninja’s vortex action to create uniform, fluffy grains ready for any recipe.
Imagine ditching carb-heavy rice without sacrificing texture. One medium cauliflower yields 6 servings of this paleo-approved powerhouse packed with 51% of your daily vitamin C and 2g of fiber per serving. Skip the soggy results from other methods—this foolproof Ninja approach delivers dry, rice-like grains in under five minutes with just three essential tools. You’ll master the exact water ratio, pulsing rhythm, and moisture-removal tricks that professional chefs use.
No more wasting money on pre-riced cauliflower at $4 per bag. Your Ninja becomes a low-carb kitchen hero capable of processing stems and florets equally well. By the end of this guide, you’ll consistently create perfect cauliflower rice for stir-fries, burrito bowls, or even sushi—without the frustration of mushy results.
Optimize Your Ninja Blender Settings
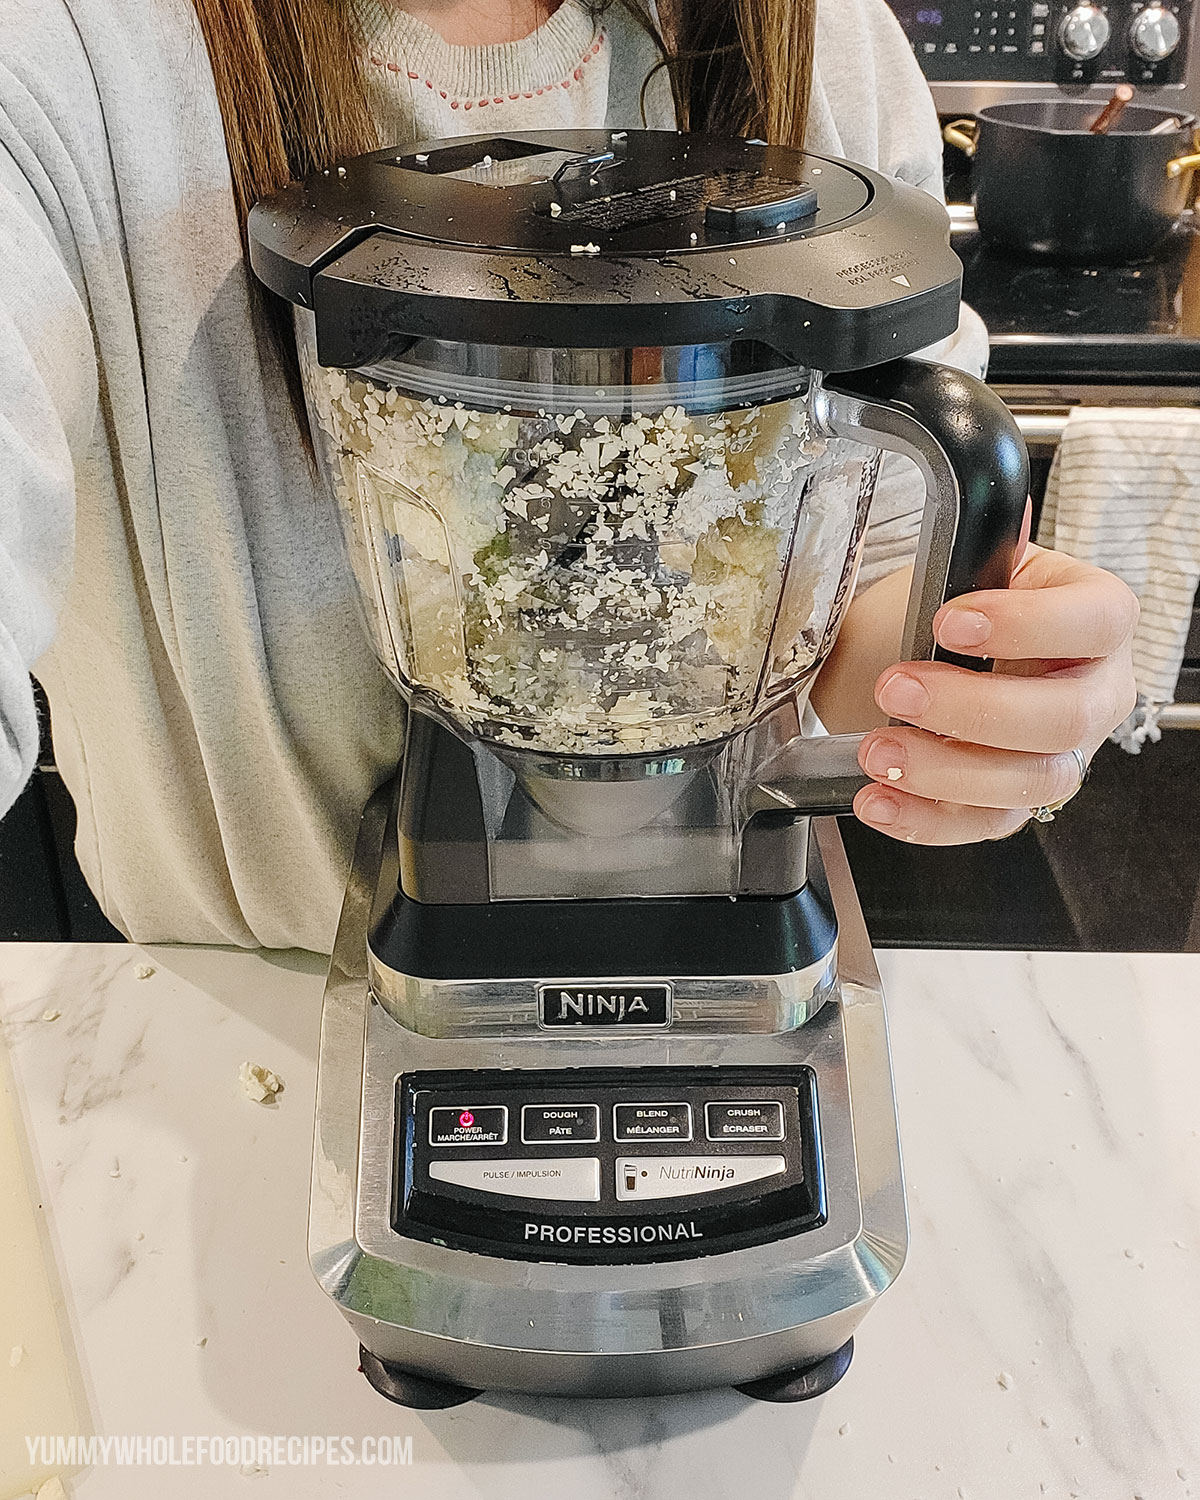
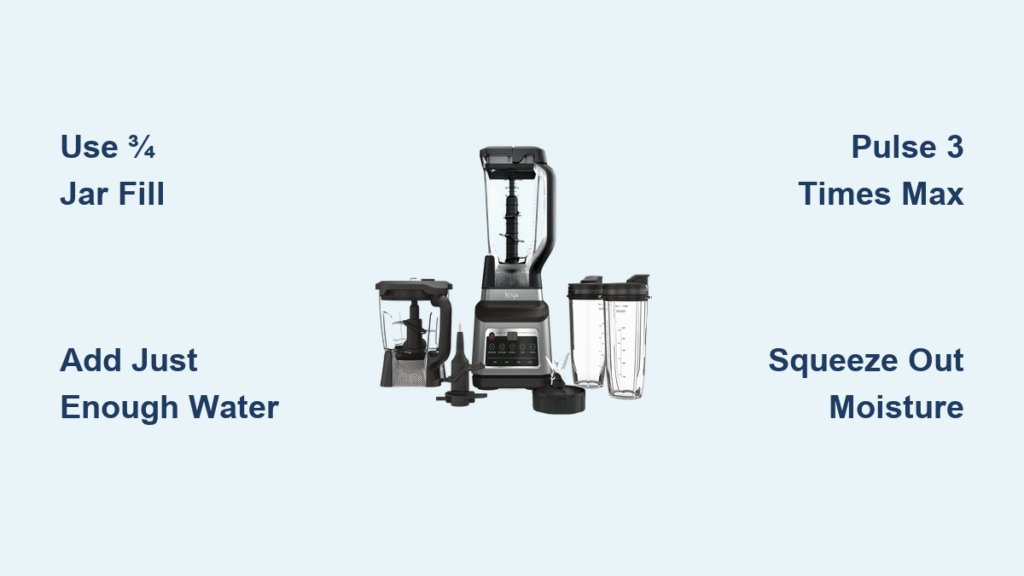
Fill capacity determines texture success. Load cauliflower pieces to only ¾ of your Ninja jar’s height—overfilling causes uneven chopping where bottom florets turn to paste while top pieces stay chunky. One medium head typically requires 2-3 batches, so work in manageable portions. This prevents motor strain and ensures every grain gets identical pulsing action.
Water level is your texture control. Add filtered water until it barely covers the cauliflower pieces, staying 1 inch below your model’s max fill line (like the 2000ml marker on Vibe blenders). Too much water creates a slurry; too little leaves unprocessed chunks. The water acts as both lubricant and consistency guide, allowing blades to glide smoothly through the florets.
Lid security prevents kitchen disasters. Wet cauliflower generates pressure during pulsing—always press the lid down firmly until you hear the distinct click. Test stability by gently shaking the jar before starting. A loose lid could spray water and cauliflower across your countertops mid-process.
Prep Cauliflower for Flawless Blending
Efficient Cutting Technique
Remove tough outer leaves and rinse the cauliflower head under cool running water. Pat thoroughly dry with a clean towel—residual moisture here means extra drying time later. Place the cauliflower flat-side down on your cutting board and slice vertically through the core to create two stable halves.
Uniform Floret Sizing
Chop florets into consistent 1-2 inch pieces while keeping stems attached. This minimizes waste since stems blend just as effectively as florets. Discard only the tough core section. Critical tip: Uneven sizing causes processing disasters—small pieces turn mushy while larger chunks remain unblended. Use a chef’s knife for clean cuts rather than tearing.
Perfect the Water-Blending Process
Exact Pulsing Sequence
- Load: Place dry cauliflower pieces to ¾ jar capacity
- Hydrate: Add water until it barely covers the top layer
- Pulse: Use medium speed for three 1-second bursts
- Inspect: Stop immediately when grains resemble short-grain rice
- Repeat: Process remaining batches without delay
Visual checkpoint: Perfectly riced cauliflower has distinct, separate grains with no visible chunks or paste-like consistency. Over-pulsing by even one burst creates irreversible mush.
Batch Processing Strategy
Process one medium head in 2-3 batches for optimal results. Crowding the jar forces longer pulsing, which overheats the motor and releases excess starch. Each batch takes just 45 seconds from start to finish. Pro move: While one batch drains, prep the next cauliflower pieces to maintain workflow.
Eliminate Excess Moisture Effectively
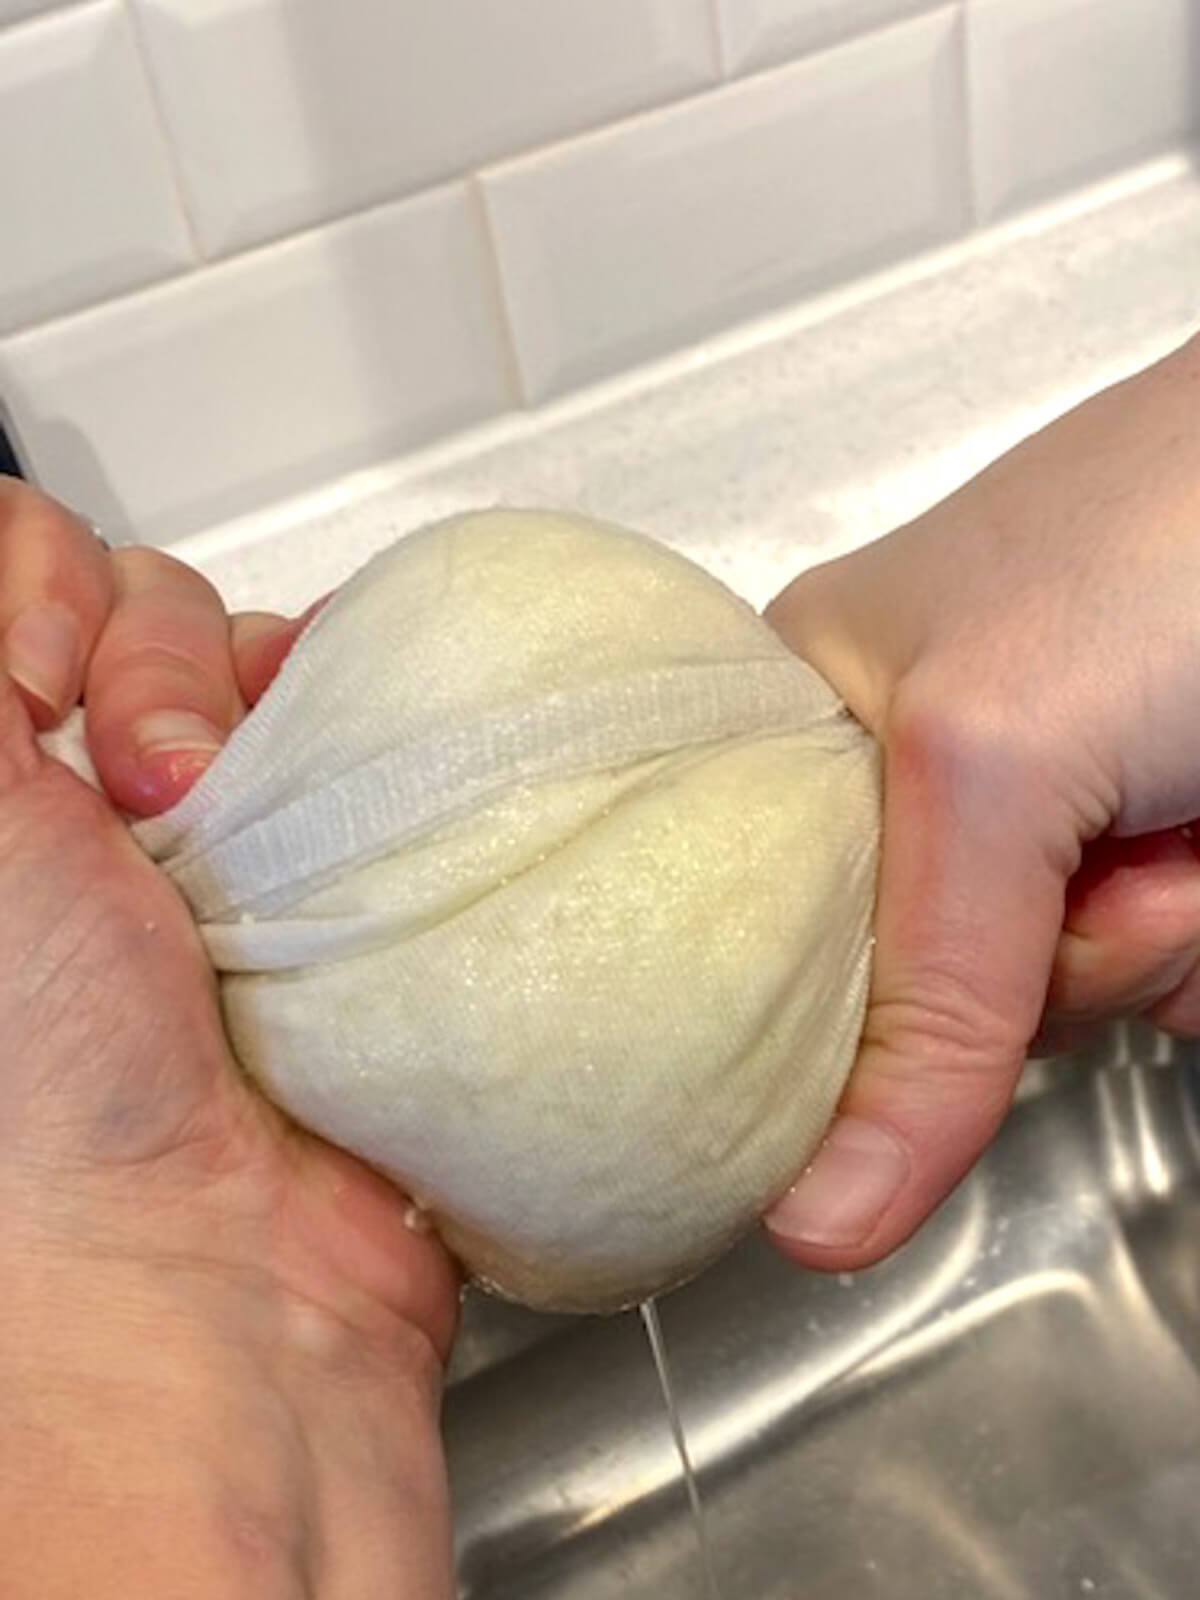
Towel-Squeeze Method
Pour blended cauliflower through a fine-mesh strainer into the sink. Let it drain for 30 seconds, then transfer to a clean cotton tea towel. Twist the towel tightly over the sink, applying firm pressure until no more water drips. This step is non-negotiable—skipping it guarantees soggy, steamed results instead of sautéed perfection.
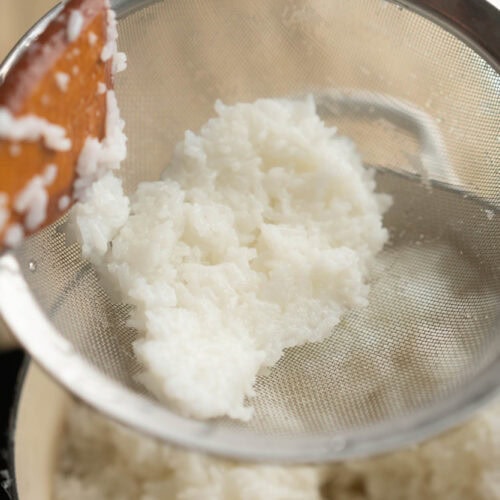
Spoon-Press Alternative
For small batches, place the strainer over a bowl and press firmly with the back of a large spoon. Rotate the spoon to extract water from all angles. While faster, this method removes 30% less moisture than the towel technique—reserve it for emergency single-serving needs.
Warning: Waterlogged grains steam instead of sautéing, creating a gummy texture. Always remove maximum moisture before cooking—your Ninja’s water-blending method requires this extra step that dry-blending skips.
Store for Long-Lasting Freshness
Raw Cauliflower Rice Storage
- Refrigerator: Seal in airtight containers with paper towels to absorb moisture (lasts 3 days)
- Freezer: Portion into flat, stackable zip bags (keeps 2 months)
- Critical rule: Cook frozen rice directly—never thaw—to prevent sogginess
Cooked Rice Preservation
Store cooled cooked rice in glass containers for 4 days. Reheat in a dry skillet over medium heat for 3 minutes, stirring constantly. Microwaving creates uneven texture—always choose stovetop revival.
Master Instant Cooking Methods
Stovetop Sauté Technique
Heat 1 tbsp coconut oil in a cast-iron skillet until shimmering. Optional: Sauté 2 minced garlic cloves for 30 seconds until fragrant. Add cauliflower rice, spread evenly, then cover and steam 6 minutes undisturbed. Uncover, stir, and cook 2 more minutes until grains separate. Season with sea salt and black pepper.
Microwave Express Method
Combine 2 cups riced cauliflower with 1 tbsp water in a microwave-safe bowl. Cover with a damp paper towel and cook 3 minutes on high. Immediately transfer to a clean towel and squeeze out residual moisture before serving.
Fix Common Texture Problems
Mushy Grain Solutions
Cause: Over-pulsing or inadequate water removal
Fix: Pulse only 3 times max and twist towel harder. If already mushy, spread on a baking sheet and bake at 300°F for 10 minutes to dry out.
Chunky Grain Fixes
Cause: Underfilled jar or insufficient water
Fix: Ensure water covers all pieces and process in smaller batches. Never exceed ¾ jar capacity.
Watery Final Dish
Cause: Skipping the towel-squeeze step
Fix: Always wring grains until the towel shows no moisture—this takes 15 seconds of firm twisting.
Create Exciting Flavor Variations
Transform basic rice into gourmet sides with these Ninja-friendly mixes:
- Mediterranean: Toss with lemon zest, chopped Kalamata olives, and fresh dill
- Mexican: Sauté with cumin, chili powder, and fire-roasted corn
- Umami Boost: Stir in nutritional yeast and tamari after cooking
- Herb Garden: Fold through minced parsley, chives, and tarragon
Upgrade Your Favorite Recipes
Replace traditional rice in these high-impact dishes:
- Low-Carb Jambalaya: Sauté with andouille sausage, bell peppers, and Creole seasoning
- Burrito Bowls: Layer with seasoned ground turkey, black beans, and avocado
- Stuffed Peppers: Mix with ground beef, tomato sauce, and melted cheese
- “Fried Rice”: Stir-fry with scrambled eggs, peas, and toasted sesame oil
Nutritional Advantage Breakdown
Each 1-cup serving delivers:
– 24 calories (vs 216 in white rice)
– 5g net carbs (vs 45g in traditional rice)
– 46mg vitamin C for immune support
– 287mg potassium for muscle function
– 2g fiber promoting digestive health
Key insight: You’d need to eat 9 servings of cauliflower rice to match the calories in one cup of cooked white rice—making it ideal for weight management.
Ninja-Specific Pro Techniques
Speed optimization: Complete the entire process in 4 minutes 30 seconds by prepping your strainer and towel before starting. One head yields 6 perfect servings—ideal for weekly meal prep.
Freezer efficiency: Portion cooked rice into 1-cup silicone molds, freeze solid, then transfer to bags. These “rice pucks” thaw in 90 seconds when added directly to stir-fries.
Texture customization: For sushi-grade rice, pulse exactly 3 times. For chunkier fried rice texture, pulse only twice and process larger florets.
Maintain Your Ninja After Processing
Clean immediately while cauliflower starch is wet—dried residue clogs blade assemblies. Fill the jar halfway with warm water and one drop of dish soap, then pulse 3 times on low. Rinse thoroughly and air-dry upside down. The water-blending method actually keeps your Ninja cleaner than dry processing since moisture prevents starch adhesion.
Stop wasting money on pre-riced cauliflower. Your Ninja blender unlocks restaurant-quality, low-carb rice in less time than it takes to boil water—no special attachments needed. Master these water-blending techniques to transform any cauliflower head into fluffy, versatile grains perfect for keto burrito bowls, paleo stir-fries, or even vegan sushi. The secret isn’t your equipment—it’s knowing the exact water ratio, pulse count, and moisture removal tricks that prevent soggy disasters. Grab your Ninja today and turn that forgotten cauliflower into your new kitchen staple.


