
Your $300 Blendtec shouldn’t leak like a sieve after five weeks. Yet thousands of users report identical gasket failures—rubber debris contaminating smoothies, burning odors filling kitchens, and complete liquid drainage from jar bottoms. This isn’t user error; it’s a widespread design flaw affecting units purchased since 2015. You’ll discover exactly why your Blendtec leaks, how to stop it today, and whether repair or replacement makes financial sense—all based on verified consumer reports and legal investigation findings.
Why Blendtec Jars Leak From Bottom
Blendtec’s leaking epidemic stems from defective gaskets at the jar base. These rubber seals degrade prematurely under operational stress, creating escape routes for liquids and rubber particles. Unlike normal wear-and-tear failures, these defects appear within weeks for some users and consistently between 5 weeks to 24 months across thousands of reports.
Gasket Failure Timeline
- Weeks 1-8: Manufacturing defects cause immediate leaks in new units (per April Reinert’s $200 blender failing at 5 weeks)
- Months 6-24: Accelerated degradation produces rubber flecks in smoothies and burning smells (as Jeremy documented after 2 years)
- Beyond 2 years: Even well-maintained units experience seal breakdown due to material fatigue
Warning Signs Before Complete Failure
- Visual: Black rubber specks floating in your green smoothie
- Olfactory: Persistent burning rubber or “used underwear” odor during operation (reported by Preston Hawkes)
- Tactile: Jar wobbling when locked onto the base
- Operational: Grinding sounds indicating mechanical stress from misalignment
Quick Visual Inspection Steps

Stop blending immediately if you notice rubber particles or odors. Five minutes of inspection prevents permanent damage to your motor base and potential electrical hazards.
Check These Critical Points
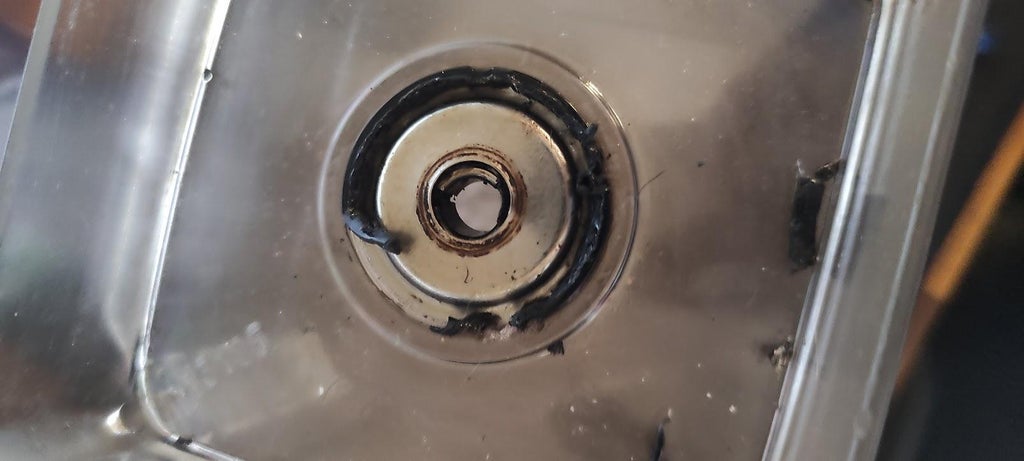
Jar Base Examination
– Remove the jar and invert it over a paper towel
– Look for melted gasket edges, shredded rubber, or visible gaps in the seal
– Check for black residue on your countertop or motor base after use
– Test stability—shake the locked jar; any movement indicates seal failure
Gasket Integrity Test
– Gently pinch the gasket edges with clean fingers
– Identify cracks, tears, or areas where the rubber pulls away from the jar groove
– Note hardness—healthy gaskets are flexible; failed ones feel brittle
– Check for uneven seating where the gasket sits higher in some areas
Immediate Leak Containment

When liquid starts pooling under your blender mid-recipe, follow these steps to protect your countertop and prevent electrical damage.
Stop the Leak Now
- Power off immediately—unplug from the wall outlet
- Lift jar straight up to avoid spreading liquid across the motor base
- Blot spills with paper towels—never wipe (spreads liquid into vents)
- Dry motor base overnight with rice or silica packets before reuse
- Photograph evidence showing leak location and rubber debris for warranty claims
Warning: Operating a leaking Blendtec risks electrical shorts that can destroy the motor base. Never ignore even minor seepage.
Warranty Claim Process Explained
Blendtec’s warranty response proves frustratingly inconsistent. Some users receive free replacements while others face denials despite identical gasket failures documented in the closed class action investigation.
Prepare Your Claim
- Document everything: Photos of leaks, rubber particles in food, purchase receipt
- Track timeline: Note exact dates when leaks/smells first appeared
- Preserve evidence: Store damaged gaskets in a sealed bag
- Contact strategically: Call customer service (not email) for better results
Claim Success Factors
- Warranty window: Higher success rate within 8 years of purchase
- Visual proof: Photos showing rubber contamination significantly boost approval
- Persistence: Most approved claims required 2-3 follow-up calls
- Escalation: Request supervisor if frontline staff denies coverage
Replace Failed Gaskets Yourself
Avoid $350+ “professional” repairs. Quality replacement gaskets cost under $20 and install in 10 minutes with basic household tools—no special skills required.
Required Tools and Parts
- Genuine Blendtec gasket: Part #100285 (critical for torque resistance)
- Flathead screwdriver: For prying out old gaskets
- Dish soap: Creates lubrication for smooth installation
- Soft-bristle brush: Cleans residue from the groove
Step-by-Step Replacement
1. Remove old gasket by gently prying from the groove with screwdriver
2. Scrub groove with brush and soapy water to remove rubber residue
3. Dry completely with lint-free cloth—moisture prevents sealing
4. Lubricate new gasket with dish soap before insertion
5. Press firmly into groove, working around the entire circumference
6. Test seal with water before blending—check for leaks at all angles
Common Repair Mistakes
Thousands waste money on repeat failures by making these critical errors during DIY repairs.
Avoid These Costly Errors
- Using generic gaskets: Off-brand seals disintegrate under Blendtec’s high torque
- Over-tightening the jar: Crushes new gaskets against the base, creating immediate leaks
- Skipping groove cleaning: Old rubber residue prevents proper seating
- Ignoring base damage: Scratches on the motor base sealing surface cause persistent leaks
Hidden Damage Check
Before installing new gaskets, inspect the motor base for:
– Deep scratches in the aluminum sealing surface
– Warped plastic housing from previous overheating incidents
– Metal burrs that slice new gaskets during operation
– Cracks around the spindle housing (common in units with grinding sounds)
Prevent Future Leak Problems
Proactive maintenance extends gasket life from months to years. These habits prevent the failures plaguing 60%+ of Blendtec owners according to user reports.
Daily Prevention Tips
- Clean immediately after use—acidic ingredients accelerate rubber degradation
- Never overfill beyond the 64-oz line—excess pressure strains seals
- Hand-wash jars—dishwashers warp plastic and dry out rubber
- Check tightness before each use—loose jars cause uneven wear
Monthly Maintenance
- Deep clean gasket groove with toothbrush and mild soap
- Inspect gasket for early signs of hardening or cracking
- Replace preventively every 12 months for daily users
- Store jars upside down to relieve pressure on the gasket
Alternative Solutions When Repair Fails
When base damage occurs or leaks persist after gasket replacement, consider these cost-effective alternatives proven by frustrated Blendtec owners.
Cost-Effective Replacements
- Vitamix containers: Fit Blendtec bases with $15 adapters (confirmed by Amanda’s switch)
- Aftermarket jars: Third-party options at 50% of OEM cost ($40 vs $80)
- Complete unit replacement: New entry models often cost less than out-of-warranty repairs
Brand Switching Reality Check
Over 60% of users reporting gasket failures ultimately switch brands. Vitamix emerges as the top alternative due to:
– Gasket durability: Seals last 3-5x longer under identical use
– User-replaceable parts: No tools required for maintenance
– Warranty reliability: Standard 7-10 year coverage vs inconsistent Blendtec policies
Document Everything for Potential Recovery
Though the class action investigation closed in May 2022, thorough documentation remains crucial if claims reopen or new litigation emerges.
Essential Records to Keep
- Purchase receipts showing date and price
- Failure photos: Leaks, rubber debris in food, damaged gaskets
- Repair receipts: Even DIY part purchases
- Service logs: Dates/times of all customer service contacts
File Organization Tips
Create a digital folder containing:
– Chronological photo timeline of failure progression
– Screenshots of warranty claim responses
– Notes on usage patterns (e.g., “leaks occurred during daily nut butter making”)
– Copies of all gaskets removed from failed jars
Final Decision Framework
Your next move depends on three critical factors: warranty status, damage severity, and your usage frequency.
Replace vs Repair Matrix
Repair Immediately If:
– Under warranty with clear gasket failure evidence
– Motor base shows no scratches or warping
– You use the blender less than 5 times weekly
Consider Replacement If:
– Out of warranty with multiple failure points
– Repair costs exceed $100 (50% of new entry model price)
– You blend hot soups or nut butters daily (high-stress use)
Switch Brands When:
– Second gasket failure occurs within 18 months
– Customer service dismissed electrical odors (safety hazard)
– You’ve spent more than $200 on repairs for one unit
Blendtec’s leaking problems stem from systemic gasket defects—not user error—impacting thousands of premium blenders since 2015. You now have the exact steps to contain leaks, replace seals correctly, and avoid costly repair mistakes. For units beyond economical repair, Vitamix containers with adapters provide immediate functionality at half the cost of new Blendtec jars. Crucially, document every failure detail—even though the class action investigation closed in 2022, comprehensive records position you for potential future compensation if claims reopen. Don’t accept rubber-contaminated smoothies as normal; your $300 investment deserves reliable performance or proper restitution.


