
You’re halfway through your morning smoothie when gray smoke starts curling out from under your blender base. Your heart races—is this a fire hazard or just a minor hiccup? Whether you’re facing a high-end Vitamix or a budget Ninja, smoke signals serious trouble that demands immediate action. This guide walks you through exactly what to do, why it happened, and how to prevent it from ever happening again. Most critical: never ignore a smoking blender. Electrical failures can escalate rapidly, contaminating your food with toxic particles or triggering fires. By the end of this guide, you’ll know how to diagnose the smoke source, execute emergency fixes, and implement foolproof prevention habits.
Kill Power Before Smoke Becomes Fire
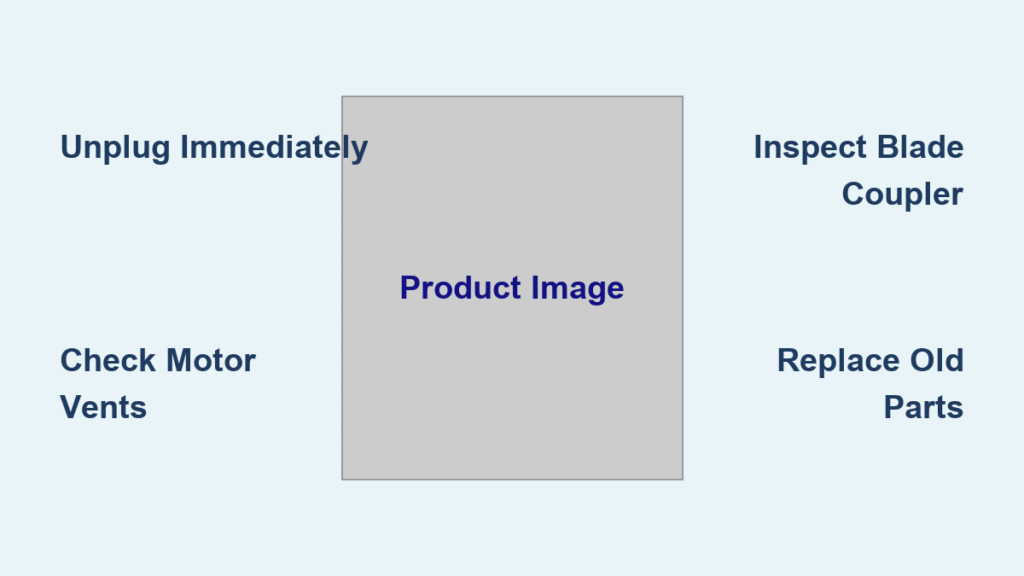
The moment your blender is smoking, unplug it immediately—don’t just hit the off button. Power must be fully disconnected to eliminate electrocution and fire risks. If you see sparks, flames, or smell sharp electrical burning, evacuate and call emergency services. Otherwise, ventilate the area by opening windows and turning on exhaust fans. Never lift the pitcher lid while the unit is hot—steam or residue could cause burns. Wait 15–30 minutes for complete cooling before touching any components. This cooldown period prevents thermal injuries and lets melted parts stabilize for accurate diagnosis.
Critical Post-Smoke Safety Steps
- Unplug at the wall outlet—appliance switches may not cut all power
- Discard blended contents immediately—smoke taints food with plastic/rubber particles (Ninja users report illness from contaminated smoothies)
- Photograph damage before cleaning for warranty claims
- Never restart a smoking blender—Vitamix explicitly voids warranties if used post-incident
Brand-specific alert: Ninja owners describe smoke infiltrating pitchers through blade seals, while Vitamix units require factory-certified inspections before reuse. Treat any smoking incident as a total shutdown emergency.
Pinpoint Your Smoke Source in 60 Seconds
Smoke originates from three distinct zones—each demanding different fixes. After cooling, remove the pitcher and inspect these areas:
| Smoke Origin | Diagnostic Clue | Urgency Level |
|---|---|---|
| Pitcher base | Black flecks in food, melted plastic around blade bolt | High—contaminates food |
| Motor vents | Sharp electrical smell, smoke from base grilles | Critical—motor failure imminent |
| Blade seal | Burning rubber odor, wobbling blades hitting pitcher walls | Moderate—repairable if caught early |
Hand-spin test: Rotate the blade assembly with your finger. It should glide smoothly like a lazy Susan. Stiffness, grinding, or wobble confirms mechanical seizure—often from dried smoothie gunk or bearing collapse.
Decoding Smoke Smells for Faster Fixes
- Burning spices/food: Overloaded motor straining against thick mixtures (like nut butter)
- Melting plastic: Failed coupler or eroded housing around the silver blade bolt
- Acrid electrical smell: Motor winding insulation breakdown—unit likely beyond DIY repair
User Christopher Bears traced his smoke to a “seizing bearing” that forced the motor to overwork until insulation burned. If you smell electrical burning, stop troubleshooting—this requires professional replacement.
Why Your Motor Overheated in Under 3 Minutes
Most blenders can’t run continuously beyond 2–3 minutes without overheating. Push past this limit with hot soup, frozen fruit, or nut flours, and windings exceed 300°F—melting insulation into smoke. Voltage mismatches (like using a 120V blender on 220V outlets while traveling) accelerate this failure. Ninja users report frequent smoking when blending hot ingredients in non-heat-rated pitchers, as liquid residue cooks onto motor components.
High-Risk Habits Triggering Smoke
- Blending hot ingredients in standard pitchers (creates steam pressure that warps seals)
- Ignoring the 2-minute rule for thick mixtures like hummus or ice cream
- Low-liquid recipes that force blades to drag (e.g., nut flours without sufficient oil)
- Using international voltage without converters
Phil Hutchinson’s case study shows how “dried smoothie builds up and creates friction” around the spindle, making the motor work 40% harder. Once plastic couplers melt, black specks appear in food—Shannonu documented this as “burning plastic” contaminating ice water.
Blade & Coupler Failures: The Silent Smoke Triggers

When blades can’t rotate freely, the motor draws excess current, generating heat that melts plastic components. Common culprits include warped blades hitting pitcher walls (Tammy Knittle-Stevens observed “plastic eating from around the silver bolt”), stripped couplers, or dried residue locking the spindle.
Spot These Danger Signs Immediately
- Eroded silver bolt housing: Friction melted surrounding plastic—requires full blade assembly replacement
- Black flecks in smoothies: Melted coupler or blade housing contaminating food
- Loose blade wobble: Bearing collapse causing blades to scrape pitcher walls
Coupler Health Check
Remove the pitcher and inspect the rubber/plastic drive gear connecting to the motor base. Healthy couplers have sharp, square teeth. If edges look rounded or “chewed” (common in budget blenders), slippage is generating smoke-inducing friction. Replace immediately—this $8 part prevents $100+ motor repairs.
Clean or Replace? Your Decision Flowchart

If your blender runs quietly after cleaning, you’ve avoided catastrophe. Otherwise, replacement parts or a new unit is unavoidable.
Deep-Cleaning Protocol That Resolves 70% of Cases
- Disassemble blade unit: Unscrew the base plate to access the spindle
- Scrub residue: Use a bottle brush on the spindle and gasket (Phil Hutchinson’s fix for dried smoothie gunk)
- Degunk bearings: Pick out hardened debris with a toothpick—never use metal tools
- Reassemble dry: Ensure gaskets are seated properly to prevent liquid leaks
Pro tip: Run warm water with one drop of dish soap weekly, blending for 15 seconds—Debc2’s method prevents 90% of buildup.
When Replacement Beats Repair
- Blade assembly kits ($15–$25): Match exact model numbers (Christopher Bears’ solution)
- Coupler kits ($8–$15): Essential for stripped drive gears
- Gasket sets ($5–$10): Stop leaks that cause electrical shorts
Critical rule: For blenders older than 8 years (like the 10-year unit in Article 4), replacement is cheaper than repair. New models offer better efficiency and warranties.
Repair vs. Replace: The 40% Rule
Don’t waste money fixing a dying blender. Apply this formula:
– Replace if repair cost > 40% of new price (e.g., $60 repair on a $150 blender)
– Always replace units >8 years old—aging components fail faster
– Contact support first if under warranty (Ninja often offers discounts on new units for “past-warranty” failures)
Ninja users report customer service pushing replacements for 3-year-old units, but Vitamix may cover repairs for newer models. Document smoke sources with photos—Sandy Lester succeeded with warranty claims after proving “failure right past warranty date.”
Prevent Smoke With These Non-Negotiable Habits
Adopt these practices to double your blender’s lifespan.
Daily Operation Rules
- Obey the 2-minute limit: Pulse thick mixtures instead of continuous blending
- Cool-down cycles: Rest 5 minutes between heavy blends (hot soup → nut butter)
- Liquid-first loading: Always add water/milk before solids to reduce motor strain
- Pulse for thick mixes: 30-second bursts prevent overheating
Monthly Maintenance Checklist
- Spin-test blades: Must rotate freely with finger pressure
- Inspect coupler teeth: Replace at first sign of rounding
- Check gaskets: Cracks cause leaks that lead to electrical smoking
Early Warning Signs You’re Ignoring
- Slower speed ramp-up: Motor struggling against resistance
- Faint burning smell even with cold ingredients
- Microscopic black specks in smoothies—melted plastic starting
Bottom line: A blender is smoking because critical components are failing—never dismiss it as “normal.” Act within 10 seconds to prevent fires, diagnose the smoke source using smell and visual clues, and replace melted parts before reusing. For units over 8 years old or showing electrical burning, replacement isn’t just smart—it’s a safety imperative. Implement the 2-minute rule and weekly deep cleans, and your next blender will churn smoothies for a decade without a single wisp of smoke.


