

Your battery-operated pepper grinder suddenly stops working right when you’re preparing dinner. You press the button repeatedly, but nothing happens—no familiar whirring sound, no freshly ground pepper. Instead of enhancing your dish, you’re left with a useless gadget and the frustration of having to hunt for your old manual grinder. This common kitchen crisis affects thousands of home cooks each year, but here’s the good news: 90% of battery-operated pepper grinder issues can be resolved in under 20 minutes with basic troubleshooting. Whether you own a Cole & Mason, Peugeot, or store-brand electric grinder, this guide delivers precise solutions to get your seasoning tool back in action.
Dead Batteries Are the Culprit 70% of the Time
When your electric pepper grinder refuses to activate, your first diagnostic step should always involve the power source. Most consumers immediately assume mechanical failure, but battery issues account for the vast majority of “broken” grinders. Even brand-new batteries can have manufacturing defects or lose charge during storage, making simple battery replacement the most effective first fix.
Proper Battery Replacement Protocol:
Access your grinder’s battery compartment by twisting the base counterclockwise—most models feature a quarter-turn mechanism that releases the housing. If you encounter resistance, check for a small release button or tab that must be pressed while twisting. Never force the compartment open, as this can crack the plastic housing. Once open, remove the batteries and inspect for leakage, which appears as white or green crystalline deposits around the terminals.
Before inserting new batteries, clean the compartment thoroughly using a cotton swab dipped in white vinegar to neutralize any corrosion. For stubborn buildup, gently scrape with a plastic toothpick rather than metal tools that could damage contact points. Dry the compartment completely with a lint-free cloth—any moisture left behind creates electrical shorts that mimic battery failure.
Install high-quality alkaline batteries with the correct polarity, pressing each firmly into place until you feel definite resistance. A battery that moves when you shake the compartment won’t maintain proper contact. Test the grinder immediately after installation—many users incorrectly assume batteries are seated properly when they’re actually slightly misaligned. If your model uses button cell batteries, ensure the flat side faces downward as most compartments are designed with spring contacts on the bottom.
Critical Battery Tip: Track your battery life by noting installation dates. Most quality electric grinders operate 6-12 months on a single set, but humidity and frequent use shorten this timeframe. Grinders used daily in coastal kitchens may require battery changes every 4 months due to accelerated corrosion.
How to Remove Stubborn Jams in 5 Minutes
A jammed grinding mechanism causes your grinder to either remain completely silent or produce a strained humming noise without dispensing pepper. This typically happens when peppercorns fracture during grinding, creating small fragments that wedge between the burrs. Salt grinders experience similar issues when crystals absorb moisture and clump together.
Effective Jam Removal Technique:
Disassemble the grinding chamber by unscrewing the top section from the motor housing. Most models require a firm counterclockwise twist while stabilizing the base—don’t confuse this with the battery compartment opening mechanism. As you separate the components, note the orientation of any washers or springs; these small parts are easily misplaced during cleaning.
Inspect the ceramic or stainless steel burrs for visible obstructions using a bright flashlight. Whole peppercorns often lodge between the upper and lower grinding plates, preventing rotation. Remove debris with precision tweezers or a specialized cleaning brush with stiff nylon bristles. For compacted residue, soak the grinding assembly in warm (not hot) water for 5-7 minutes to soften the material, then gently scrub with a toothbrush.
Test the mechanism’s smoothness by manually rotating the upper burr assembly. It should turn freely with minimal resistance—if you feel grinding or catching, continue cleaning until rotation is smooth. Never force rotation, as this can damage burr alignment. Reassemble all components in reverse order, ensuring the upper assembly clicks securely into place before testing.
Warning: Never operate your grinder without the grinding chamber properly attached. This can cause the motor to spin uncontrollably and damage internal components.
Fix Corroded Electrical Contacts Without Special Tools
Corroded electrical contacts create intermittent operation that mimics dying batteries—your grinder might work when held at a specific angle but fail in others. This problem frequently develops in kitchens with high humidity or when batteries leak during storage. The good news is that contact cleaning requires only household items and takes less than 10 minutes.
Step-by-Step Contact Restoration:
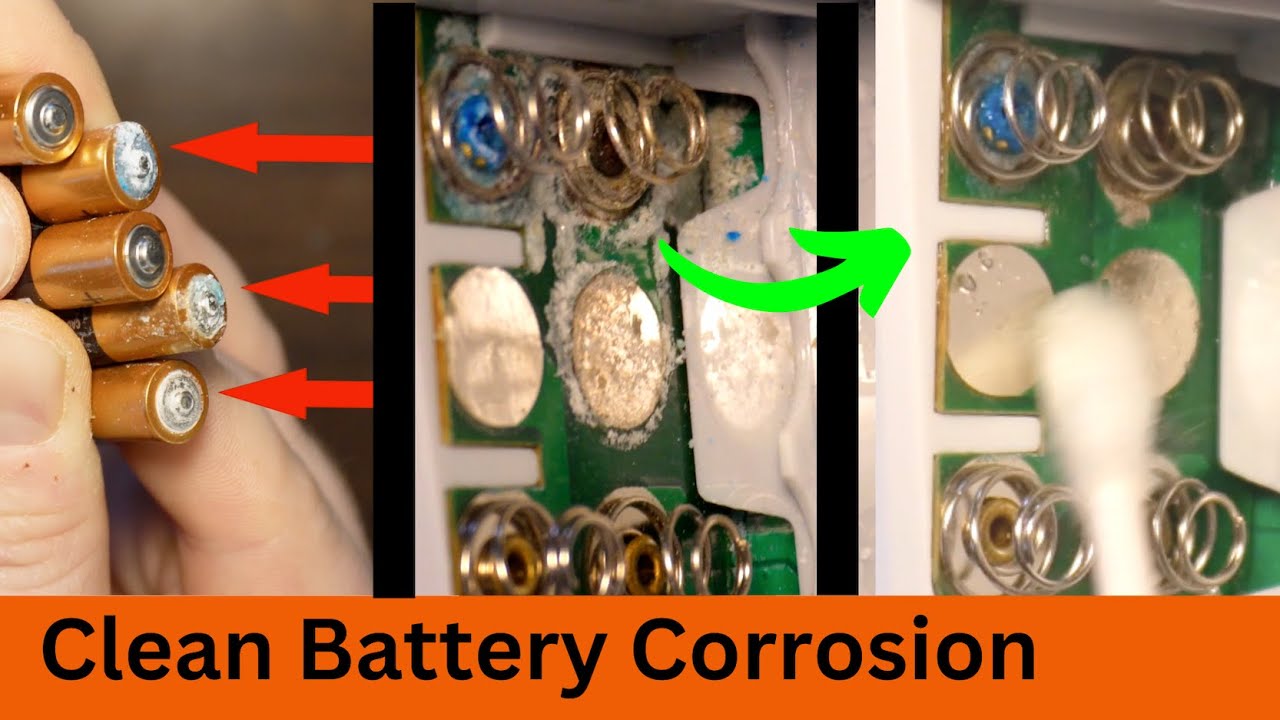
Remove both batteries and examine the contact points inside the compartment and on the motor terminals. Corrosion appears as white powder (zinc buildup) or blue-green crystals (copper corrosion). Even contacts that look clean may have microscopic oxidation affecting conductivity, so always clean as a preventive measure.
Dampen a cotton swab with white vinegar or lemon juice and rub firmly against each contact point. The mild acid dissolves corrosion without damaging metal surfaces. For persistent buildup, use a soft-bristled toothbrush dipped in vinegar to scrub gently. Avoid steel wool or abrasive pads that remove protective plating.
Pay special attention to spring-loaded contacts that provide pressure against battery terminals. These often lose tension over time, causing poor connection. Carefully bend compressed springs outward slightly using plastic tweezers—just enough to increase terminal pressure without breaking the metal. Test contact tension by pressing a battery against each terminal; you should feel definite resistance.
Dry all components thoroughly with a microfiber cloth before reinserting batteries. Moisture left behind creates electrical shorts that damage motors. Wait 15 minutes after cleaning before testing to ensure complete evaporation, especially in humid environments.
Diagnose Motor Failure Without Technical Skills
When batteries are fresh, contacts are clean, and the mechanism is clear, motor or circuit failure becomes the likely culprit. Unlike mechanical issues, motor problems require systematic testing to confirm before replacement. Most electric pepper grinders use simple DC motors that either work perfectly or fail completely—partial motor failure is extremely rare.
Practical Motor Testing Method:
Listen carefully when pressing the activation button. A completely silent grinder indicates an open circuit—either broken wiring, failed motor, or disconnected switch. A faint clicking sound suggests the circuit is completing but the motor can’t rotate due to internal binding. A humming noise without rotation points to either motor seizure or an electrical short.
Test motor functionality by bypassing the activation switch. Remove the batteries and use two short wires to connect the motor terminals directly to fresh batteries, matching positive and negative connections. If the motor spins during this test, the problem lies with the switch or wiring rather than the motor itself.
For grinders with electronic controls (variable grind settings, LED indicators), circuit board failure typically presents as erratic behavior—settings changing spontaneously or partial functionality. These components are rarely repairable; replacement of the entire motor assembly is usually more cost-effective than attempting circuit board repair.
Expert Note: Motor replacement requires disassembling the entire grinder housing, which often voids warranties. If your grinder is under warranty, contact the manufacturer before attempting motor replacement.
Prevent Recurring Issues With Smart Maintenance Habits
Proper maintenance prevents 80% of common electric pepper grinder failures before they occur. Most consumers only address problems when they become critical, but simple preventive measures extend your grinder’s lifespan significantly. The key is establishing a maintenance routine that takes less than two minutes per week.
Essential Maintenance Routine:
Clean the grinding chamber every 2-3 weeks by emptying remaining peppercorns and wiping interior surfaces with a dry microfiber cloth. Pay special attention to the area around the burrs where fine pepper dust accumulates. Never submerge the motor housing in water—only removable grinding components can safely get wet.
Store your grinder with the activation button covered or locked if your model includes this feature. Unintentional activation in drawers drains batteries and can cause internal damage from continuous operation. Remove batteries if storing the grinder for more than 30 days to prevent potential leakage.
Use only whole, high-quality peppercorns in your grinder. Broken pieces or foreign objects accelerate burr wear and cause frequent jams. Fill the chamber only two-thirds full to prevent compression against the grinding mechanism. Avoid storing your grinder near heat sources or in direct sunlight, as temperature fluctuations accelerate battery degradation.
Pro Tip: Keep a spare set of batteries specifically for your electric grinder. Label them clearly and store them with your kitchen tools so replacements are always available when needed.
When Replacement Is More Cost-Effective Than Repair
Despite thorough troubleshooting, some grinders reach the end of their service life. Knowing when to replace rather than repair saves both time and money. If you’ve confirmed motor failure in a grinder costing under $35, replacement is usually the smarter option—repair parts often exceed 50% of a new unit’s cost.
Grinders with integrated circuit boards for electronic features (digital displays, Bluetooth connectivity) rarely justify repair attempts when core components fail. Similarly, models with sealed motor housings that require specialized tools for disassembly present significant repair challenges for home users.
Before purchasing a replacement, consider upgrading to a model with improved features that address common failure points. Look for grinders with corrosion-resistant contacts, easy-access battery compartments, and removable grinding mechanisms designed for simple cleaning. Many premium brands now offer lifetime warranties on grinding mechanisms, making them more cost-effective long-term investments.
Final Note: With these troubleshooting steps, you’ve gained the knowledge to diagnose and fix nearly every common issue affecting battery-operated pepper grinders. By implementing the maintenance practices outlined here, you’ll significantly extend the life of your current grinder and make smarter purchasing decisions for future replacements. Remember that most “broken” grinders simply need fresh batteries or a thorough cleaning—don’t replace what you can restore with these simple techniques.


