Picture this: you’re making creamy butternut squash soup, and instead of ladling hot liquid into a countertop blender in batches, you simply plunge a handheld device directly into the pot. In seconds, your soup transforms from chunky to silky smooth. This kitchen magic happens through an immersion blender—a tool that brings professional-grade blending power right to your ingredients. Understanding how does an immersion blender work reveals why it’s become a kitchen essential for home cooks and professionals alike.
Unlike traditional blenders that require transferring food to a separate container, immersion blenders work wherever your food already sits. Whether you’re whipping cream in a mixing bowl, puréeing tomatoes in a Dutch oven, or making single-serve smoothies in a mason jar, this versatile tool adapts to your needs rather than forcing you to adapt to it. You’ll discover the mechanical genius that makes direct blending possible while saving cleanup time and eliminating dangerous hot liquid transfers.
Motor Powers the Heart of Your Blending Action
Your immersion blender’s electric motor, concealed within the handle’s upper section, serves as the powerhouse driving the entire operation. When you press the power button, this motor spins a drive shaft that extends through the blender’s elongated body, transmitting rotation directly to the cutting blades at the bottom. The blades rotate at high RPMs—creating powerful mechanical shearing forces that break down ingredients without requiring transfer to another container.
Power Rating Differences Matter for Your Tasks
Home models typically range from 120W to 600W, sufficient for soups, sauces, and soft fruits, while commercial units exceed 600W to handle 20-liter batches in restaurant kitchens. Critical insight: motor power determines not just speed but torque—the rotational force that prevents stalling when processing dense ingredients like frozen fruit or thick purées. Cordless variants now deliver impressive performance with lithium-ion batteries providing 20-25 bowls of soup per charge.
Blade Assembly Creates Precision Cutting Forces

The blade assembly resides within a protective metal or plastic guard at the shaft’s tip—a design element that serves dual purposes. This guard prevents accidental finger contact while simultaneously creating optimal flow patterns that pull ingredients toward the blades for consistent processing. Without this carefully engineered component, your immersion blender couldn’t safely deliver those smooth purées.
Blade Mechanics Generate Powerful Vortex Action
Sharp, angled blades mounted on a central spindle create three essential fluid dynamics when spinning: downward suction pulling ingredients into the cutting zone, radial flow pushing processed food outward, and shearing action between blade edges and guard walls. This mechanical action breaks cell walls in fruits and vegetables, releases starches for thickening, and incorporates air for lighter textures when whipping cream or eggs—exactly why understanding how does an immersion blender work matters for perfect texture control.
Shaft Design Transfers Power While Ensuring Safety
The baton-like shaft—measuring 16 cm (6.3 inches) for home use and extending up to 53 cm (21 inches) for commercial models—functions as both power transmission conduit and critical safety barrier. This elongated design keeps electrical components safely distant from hot liquids while allowing deep reach into stockpots and tall containers. Most modern immersion blenders feature stainless steel shafts for durability and heat resistance, with detachable designs enabling thorough cleaning.
Material Choices Impact Long-Term Performance
Sealed construction prevents liquid infiltration into motor housing, a common failure point in lower-quality models. When shopping for your next immersion blender, examine the shaft material closely—stainless steel offers superior corrosion resistance compared to plastic alternatives, especially when working with acidic ingredients like tomato sauces. Pro tip: Always check for tight seals at the shaft-to-motor connection point to prevent future leaks.
Variable Speed Controls Give You Texture Mastery
While immersion blenders don’t match the 10-speed versatility of countertop models, their variable speed settings provide essential texture control for specific tasks. Lower speeds prevent splattering when starting with liquids, while higher speeds create smooth purées or whip cream to stiff peaks—giving you precise control without leaving your cooking station.
Speed Application Guide for Perfect Results
Start with low speeds when incorporating delicate ingredients or beginning with hot liquids to prevent dangerous splatters. Move to medium speeds for general blending and emulsifying tasks like mayonnaise or aioli. Reserve high speeds for achieving ultra-smooth textures in soups or creating whipped cream with perfect peaks. Critical mistake to avoid: never start blending at high speed with liquid ingredients—this creates a messy, potentially dangerous kitchen hazard.
Direct Submersion Eliminates Dangerous Transfers
The defining feature that answers how does an immersion blender work is its ability to process food directly within any container. Unlike countertop blenders requiring specific jar sizes, immersion blenders adapt to your existing cookware—from small smoothie bottles to 20-liter stockpots. This eliminates the dangerous and messy process of transferring hot liquids, a leading cause of kitchen burns.
Container Compatibility Expands Your Culinary Possibilities
You can safely blend directly in stovetop pots while cooking, create single-serve smoothies in narrow bottles without extra dishes, handle commercial quantities with extended shaft models, and even prepare travel-ready meals in portable containers. Safety note: always ensure complete submersion before activation and maintain a 45-degree angle when working with hot liquids to minimize splash risk.
Attachments Transform Your Blending Tool into a Kitchen Multitool
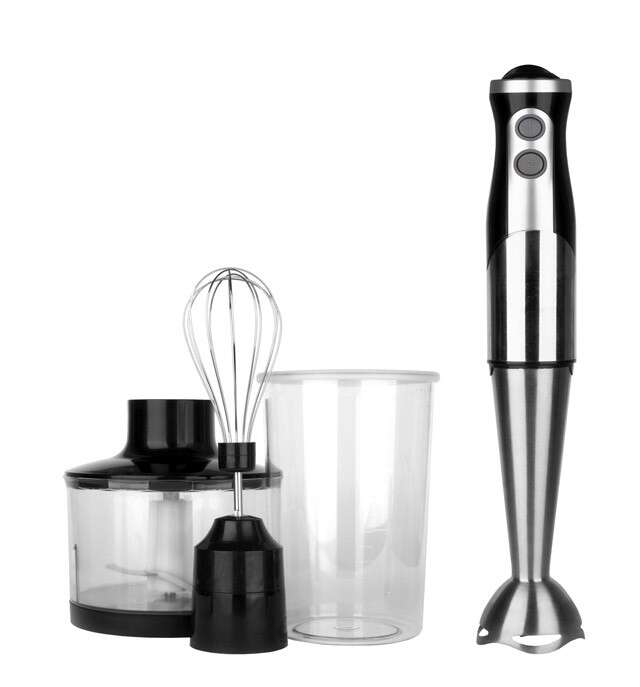
Beyond the standard blade, most immersion blenders accept specialized attachments that dramatically expand functionality without requiring separate appliances. These snap-on accessories convert your immersion blender into multiple kitchen tools with remarkable efficiency.
Essential Attachments Every Cook Should Consider
The whisk attachment proves invaluable for whipping cream, eggs, or creating stable emulsions like aioli. A chopper bowl attachment transforms your unit into a mini food processor for nuts, herbs, or vegetables. Milk frothers create café-quality foam for lattes, while dedicated blending jars (typically 3-cup BPA-free containers) handle small quantities with precision. Pro tip: when shopping, prioritize models with universal attachment systems that accept multiple accessory types.
Safety Features Prevent Kitchen Disasters
Modern immersion blenders incorporate multiple safety mechanisms that address common kitchen hazards. The blade guard prevents direct contact while creating optimal blending vortexes, and most models require continuous pressure on power buttons, automatically stopping when released—a critical feature when working with hot liquids.
Essential Safety Protocol You Must Follow
Always submerge the blade completely before activation to prevent dangerous splattering. Maintain a 30-45 degree angle when working with hot liquids to reduce splash risk. Ensure non-slip grips maintain control during extended use, and respect thermal protection systems that prevent motor burnout during heavy use. Critical warning: never operate your immersion blender while plugged in during cleaning—this causes most electrical failures.
Cleaning Process Takes Minutes, Not Hours
Unlike countertop blenders with multiple parts to disassemble, immersion blenders clean quickly. Most models feature detachable shafts that rinse clean under running water, saving valuable kitchen time. The simplicity of cleaning directly impacts how often you’ll actually use your immersion blender.
Quick Clean Method for Busy Cooks
- Remove blending attachment from motor unit immediately after use
- Rinse blade assembly under warm water while running briefly
- Fill cup with soapy water, blend for 10 seconds to clean internal components
- Rinse thoroughly and air dry completely
- Wipe motor housing with damp cloth (never submerge)
Pro tip: Clean immediately after use—dried food particles become much harder to remove from blade assemblies, potentially damaging seals over time.
Power Systems Determine Your Blending Freedom
Choose between corded reliability and cordless convenience based on your cooking style. Corded models provide unlimited runtime for large batches, while cordless versions offer unmatched portability for travel or outdoor cooking. Understanding how does an immersion blender work with different power systems helps match the tool to your kitchen workflow.
Battery Performance Realities
Leading cordless models deliver approximately 2-hour full charge from empty, with emergency 20-minute quick charge capability. Expect about 25 bowls of soup per full charge before needing recharging, and appreciate the lightweight design that reduces fatigue during extended use. Reality check: cordless models generally offer less power than comparable corded units—consider this if you regularly process dense ingredients.
Maintenance Extends Your Blending Lifespan
Proper care ensures years of reliable service from your immersion blender. Regular cleaning prevents food buildup that can damage seals or bearings. Check attachment connections periodically for wear, and store with blades protected to maintain sharpness. Understanding how does an immersion blender work helps you maintain it properly.
Troubleshooting Quick Reference Guide
- Blades not spinning: Verify attachment is fully clicked into place and check for food wrapped around blade assembly
- Reduced power: Inspect for obstructions in blade guard or check battery charge
- Intermittent operation: Examine cord for damage or test different outlets
- Leaking: Ensure gasket is properly seated and not worn from repeated use
The immersion blender’s genius lies in its elegant simplicity: a motor, a shaft, and sharp blades working directly in your food. This design delivers professional results while saving time, reducing cleanup, and adapting to any container you already own—making it one of the most versatile tools in modern kitchens.