
That viral cloud-like coffee dominating your social feeds isn’t reserved for professional baristas. With just three pantry staples and your immersion blender, you can transform ordinary instant coffee into Instagram-worthy dalgona coffee in under two minutes. Forget the 15-minute arm workout of manual whisking—this blender method delivers perfect stiff peaks with minimal effort. In this guide, you’ll master the exact technique to create café-quality whipped coffee at home, whether you’re craving an iced summer refresher or a cozy hot beverage.
The magic happens through rapid aeration: your blender’s spinning blades incorporate air exponentially faster than hand-whisking, building volume while maintaining that signature meringue-like texture. Best of all, this method eliminates the frustration of inconsistent results—you’ll get uniform foam every single time without sore wrists. By the end of this guide, you’ll know precisely why your previous attempts failed (if they did) and how to achieve flawless whipped coffee in 90 seconds or less.
Why Your Blender Beats Manual Whipping Every Time
Stop wasting 15 minutes on wrist-cramping whisking. While TikTok tutorials show people vigorously hand-whisking for 8-20 minutes, an immersion blender whips equal parts instant coffee, sugar, and water into stiff peaks in just 60-90 seconds. The key is mechanical efficiency—blenders create consistent vortex action that incorporates air uniformly throughout the mixture, eliminating weak spots where liquid pools.
You’ll never get grainy, uneven foam again. Hand-whisking often leaves undissolved sugar crystals or thin liquid patches, but blenders ensure complete emulsification. This mechanical precision means your whipped coffee achieves that essential “peanut butter-like” texture where peaks hold firmly when lifted. For caffeine lovers, this method also preserves the intense coffee flavor without bitterness—critical since this concentrate packs 2-3 espresso shots’ worth of caffeine per serving.
Critical Temperature Check Before Blending
Your water must be hot but not violently boiling—aim for 195-205°F (steaming but no bubbles). Boiling water scalds the coffee proteins needed for foam formation, while lukewarm water won’t dissolve sugar properly. Test by letting boiled water sit 30 seconds off-heat before use.
Essential Ingredients & Non-Negotiable Ratios

The 1:1:1 Formula (Zero Exceptions)
- 2 tablespoons instant coffee (Nescafé Classic works best; avoid 3-in-1 mixes)
- 2 tablespoons granulated sugar (white, cane, or coconut sugar)
- 2 tablespoons hot water (195-205°F)
- 1 cup milk (dairy or plant-based) for serving
- Ice (optional, for iced version)
Why instant coffee is mandatory: Regular ground coffee lacks the freeze-dried proteins required for foam stability. Decaf instant works perfectly, but 3-in-1 mixes contain creamers that prevent proper whipping.
Scaling Secrets for Perfect Batches
Double or triple ingredients while maintaining exact ratios:
– 4 tbsp each for two servings
– 6 tbsp each for three servings
Never deviate—extra coffee creates bitter sludge, while extra water yields runny foam. For caffeine-sensitive drinkers, reduce coffee to 1.5 tbsp but keep sugar/water at 2 tbsp.
Blender Setup & Container Hacks
Best Equipment Order (Tested)
- Immersion blender (60-90 seconds; ideal control)
- Countertop blender (30-45 seconds with pulse function)
- Single-serve cups (for solo servings)
Critical container rule: Use a wide, shallow bowl—not a tall mug or jar. Sloped sides (like a 2-cup glass measuring cup) allow air circulation for proper aeration. Tall containers trap mixture at the bottom, preventing volume expansion.
Pro Technique for Maximum Fluff
- Angle blender at 45 degrees with head just below the surface
- Start on low speed for 10 seconds to combine ingredients
- Gradually increase to high for 45-60 seconds
- Stop immediately when peaks hold shape (over-blending causes collapse)
Step-by-Step Blender Method
Phase 1: Precision Mixing (30 Seconds)
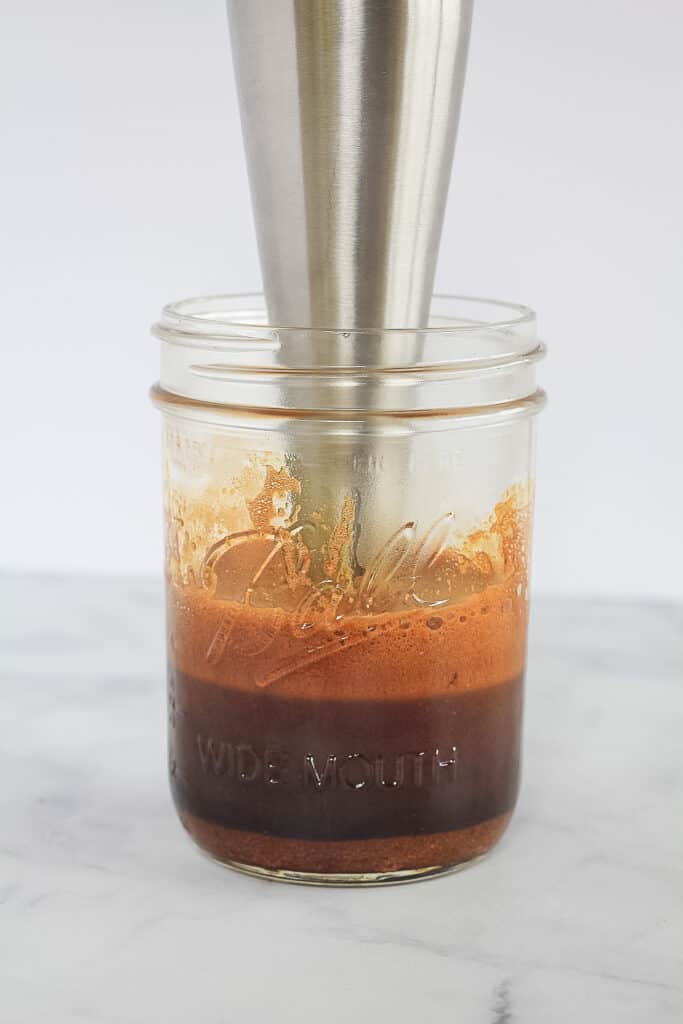
Combine coffee, sugar, and hot water in your bowl. Let sit 30 seconds—the heat begins dissolving sugar while activating coffee proteins. Stir gently once to ensure no dry pockets remain.
Phase 2: The 90-Second Transformation
- 0-15 seconds: Blend on low until mixture turns light tan and frothy
- 15-45 seconds: Increase to high—watch foam thicken to caramel color
- 45-60 seconds: Stop when peaks stand straight (like meringue)
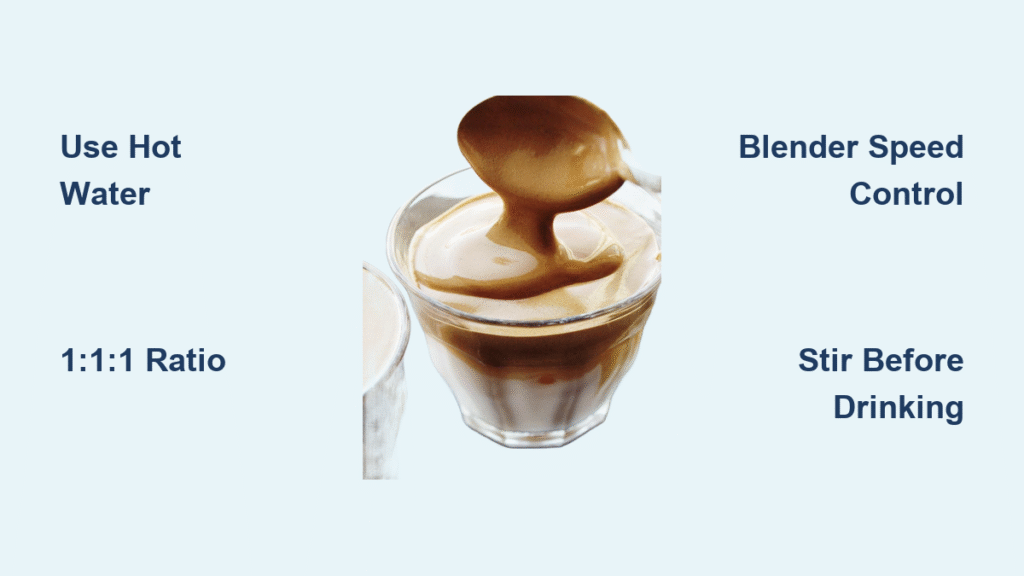
Visual cue: Volume should triple, with texture resembling thick peanut butter.
Phase 3: Perfect Assembly
Pour milk over ice (for iced) or heat milk to 140-160°F (for hot). Spoon whipped coffee on top. Crucial step: Stir thoroughly before drinking—this blends the intense coffee concentrate with milk for balanced flavor.
Common Blender Failures & Instant Fixes

Foam Won’t Form? Check These
- Cold water culprit: Restart with 195-205°F water
- Wrong coffee type: Switch to pure instant (not ground or 3-in-1)
- Insufficient sugar: Add ½ tbsp more granulated sugar
Over-Blended Disaster?
If mixture turns liquid after initial peaks, it’s over-whipped. Sadly, it can’t be saved—start fresh. Prevent this by stopping at the “peanut butter” stage (45-60 seconds).
Grainy Texture Solution
Undissolved sugar means water wasn’t hot enough. Next time, use steaming (not boiling) water and blend 10 seconds longer during Phase 2.
Sweetener Swaps That Actually Work
Granulated Winners
- White sugar: Creates rock-stable peaks lasting hours
- Coconut sugar: Adds earthy notes with 90% foam stability
- Brown sugar: Softer peaks but delicious caramel undertones
Sugar-Free Reality Check
Stevia or monkfruit works but deflates in 2-5 minutes. Only use if serving immediately—never for make-ahead batches. Zero-sweetener versions collapse within minutes.
Milk Mastery & Flavor Twists
Temperature Matters Most
- Iced version: Cold milk + ice + whipped coffee (summer essential)
- Hot version: Steamed milk (140-160°F) + whipped coffee (winter comfort)
- Room-temp shortcut: Mix with milk straight from the fridge
Plant-Based Milk Guide
- Oat milk: Creamiest texture (closest to dairy)
- Almond milk: Light, nutty complement
- Soy milk: Best foam retention (high protein)
- Coconut milk: Tropical richness (shake carton first)
Flavor Boosters (Add AFTER Whipping)
- ¼ tsp vanilla extract
- Pinch of cinnamon
- Caramel drizzle
- Pro tip: Never add flavors during blending—they destabilize foam.
Storage & Make-Ahead Hacks
Whipped coffee base stores perfectly in a sealed container for up to 5 days. When ready to serve, spoon 2-3 tbsp over fresh milk and re-whip deflated foam for 5 seconds with your blender. For parties, prep large batches Sunday night—this cuts daily prep to 30 seconds.
Troubleshooting Quick Reference
| Problem | Cause | Solution |
|---|---|---|
| Bitter taste | Too much coffee | Use 1.5 tbsp coffee |
| Won’t whip | Wrong coffee type | Switch to pure instant |
| Deflates fast | Insufficient sugar | Add ½ tbsp more sugar |
| Grainy texture | Sugar not dissolved | Use hotter water, blend longer |
Advanced Blender Techniques
Double-Foam Method
Whip 30 seconds beyond peak formation for ultra-stable foam that lasts hours. Ideal for events where drinks sit out.
Flavor-Infused Base
Add ¼ tsp vanilla or almond extract to water before blending—your immersion blender incorporates flavor evenly without deflating foam.
Nutrition & Caffeine Reality Check
A standard serving (2 tbsp coffee base + 1 cup milk) contains 98 calories and high caffeine (equivalent to 2-3 espressos). For sensitive drinkers:
– Reduce coffee to 1 tbsp
– Use half-caff (mix regular/decaf instant)
– Skip sugar (but expect rapid deflation)
Final Pro Tips
Temperature is everything: Cold bowls slow aeration—rinse with hot water first (dry thoroughly). Clean-up hack: Fill blender cup with soapy water and pulse 10 seconds to dissolve coffee residue. Most importantly: never skip the stir before drinking—this blends the intense coffee concentrate for perfect flavor balance.
Your blender just became the secret to café-quality coffee at home. Master this 90-second technique, and you’ll never overpay for dalgona coffee again. For best results, start with Nescafé Classic, steaming water, and a wide bowl—then watch ordinary ingredients transform into cloud-like perfection.


