
Nothing ruins the joy of fresh, nutrient-packed juice faster than a poorly maintained cold press juicer. When pulp residue builds up in your MOD cold press juicer, it not only affects the taste of your juice but can also damage the machine over time. Most users make the critical mistake of waiting until problems arise before addressing cleaning—by then, stubborn buildup has already compromised performance. This guide reveals exactly how to clean your MOD cold press juicer properly after every use, prevent common maintenance issues, and extend your machine’s lifespan by years. You’ll discover professional cleaning techniques that take less than 10 minutes yet keep your juicer functioning like new, even with daily use.
Why Your MOD Cold Press Juicer Requires Specific Cleaning Methods
Cold press juicers operate fundamentally different from centrifugal models, making their cleaning requirements unique. The slow-pressing auger extracts maximum nutrients but traps more fiber and pulp in the juicing screen’s microscopic channels. When this residue dries, it creates a cement-like barrier that blocks juice flow and harbors bacteria. Unlike centrifugal juicers that spin at high speeds, cold press models work with gentle pressure—meaning even minor buildup significantly reduces extraction efficiency.
The MOD cold press juicer’s precision-engineered components demand special attention during cleaning. The stainless steel juicing screen features microscopic pores that easily clog with fibrous material from kale, wheatgrass, or celery. The twin-gear system (in some MOD models) has interlocking teeth that collect fine particles, causing premature wear if not cleaned properly. Most users damage their juicers by using harsh brushes on the screen or forcing components during disassembly—techniques that seem effective but gradually degrade performance. Proper cleaning preserves the delicate balance between the auger and screen, maintaining optimal pressure for maximum juice yield and nutrient retention with every use.
Essential Cleaning Supplies for Your MOD Juicer
Gathering the right tools before disassembly prevents accidental damage and ensures thorough cleaning. Skip the generic kitchen sponge and reach for these specialized items that protect your investment while delivering superior results:
- MOD-approved cleaning brush: Features soft, food-grade bristles designed specifically for the screen’s delicate mesh
- Auger cleaning tool: A narrow, flexible brush that reaches deep into the spiral grooves without scratching
- Non-abrasive microfiber cloths: For drying components without leaving lint or fibers
- Small container for soaking: Glass or stainless steel to prevent chemical reactions
- White vinegar: Natural disinfectant that dissolves mineral deposits without damaging components
- Baking soda: Gentle abrasive for stubborn stains (never use on stainless steel parts)
Avoid these common cleaning mistakes that void warranties and damage components:
– ❌ Steel wool or abrasive pads that scratch the juicing screen
– ❌ Dishwasher cleaning (most MOD components aren’t dishwasher-safe)
– ❌ Bleach or harsh chemicals that degrade plastic and leave toxic residues
– ❌ Letting parts air dry on paper towels (lint contaminates the next juice batch)
Step-by-Step Disassembly for Safe Cleaning
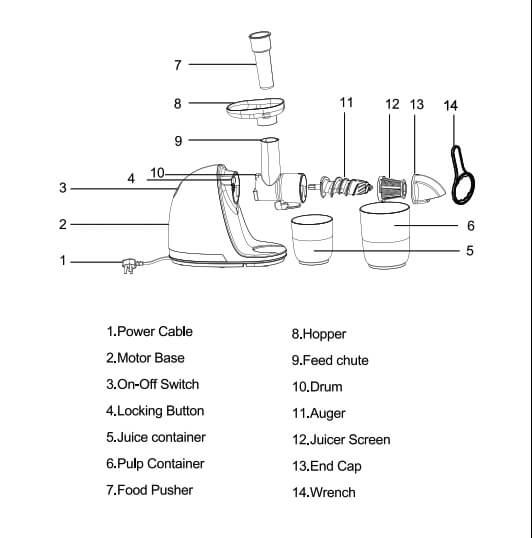
Improper disassembly causes 70% of MOD juicer damage during cleaning. Follow this sequence to avoid breaking tabs or stripping threads:
- Unplug the unit and remove the juice and pulp containers
- Press the release button while lifting the top housing straight up (don’t twist)
- Slide out the juicing screen by grasping the outer rim—never pull from the center
- Lift the auger assembly straight up, wiggling gently if stuck (don’t force it)
- Remove the rubber seal from the motor shaft by pinching opposite sides
Critical Warning: Never submerge the motor base in water. Moisture intrusion causes immediate electrical failure. Instead, wipe it with a slightly damp cloth, focusing on the shaft opening where pulp accumulates.
Immediate Post-Juicing Rinse Technique
This 90-second routine prevents 95% of cleaning headaches. Perform it while ingredients are still moist:
- Run cold water through the feeding chute for 15 seconds to flush loose pulp
- Rinse the auger under running water while rotating it to clean all spiral grooves
- Hold the juicing screen under water and gently brush from the inside outward
- Wipe the motor shaft connection point with a damp cloth before residue dries
Pro Tip: For fibrous ingredients like wheatgrass, run a peeled cucumber through after juicing—it acts as a natural cleaner for the auger and screen.
Deep Cleaning the Juicing Screen Without Damage
The screen is your MOD juicer’s most vulnerable component. Follow this foolproof method:
- Soak the screen in warm water with 2 tablespoons white vinegar for 20 minutes
- Use the MOD cleaning brush with light pressure, working from the center outward
- For stubborn spots, dip a cotton swab in baking soda paste and gently rub
- Rinse under running water while holding the screen vertically—pulp flows downward
- Inspect against light to ensure all pores are clear before drying
Warning: Never use toothpicks or metal tools on the screen—they bend the microscopic channels, reducing juice yield by up to 30%.
Cleaning the Auger Assembly Properly

Most users miss these critical auger cleaning steps:
- Remove the rubber stopper at the base by gently prying with a plastic utensil
- Soak the entire auger in warm soapy water for 10 minutes
- Use the auger cleaning tool to work through every groove from top to bottom
- Pay special attention to the rubber shaft connection point where pulp hides
- Rinse thoroughly while rotating the auger to flush all channels
Expert Note: If fiber remains trapped, soak overnight in enzyme-based cleaner (like OxiClean) diluted in water—never use full strength.
Tackling Hard-to-Reach Areas Most Owners Miss
These overlooked spots cause mysterious performance issues:
- Motor shaft housing: Dip a cotton swab in vinegar solution and clean the groove where the auger connects
- Lid sealing surface: Wipe with damp microfiber cloth to prevent leaks during operation
- Pulp ejection port: Use a pipe cleaner to remove buildup that causes clogs
- Juice outlet channel: Run a damp cloth through the tube to prevent bacterial growth
Weekly Maintenance Schedule That Prevents Problems
Follow this scientifically timed routine for effortless maintenance:
| Frequency | Task | Time Required |
|---|---|---|
| After every use | Quick rinse & basic cleaning | 2-3 minutes |
| Every 3 uses | Deep clean screen & auger | 8-10 minutes |
| Monthly | Full disassembly & inspection | 15 minutes |
| Every 6 months | Replace rubber seals | 5 minutes |
Critical Insight: Cleaning immediately after juicing reduces your total weekly maintenance time by 75% compared to waiting until residue dries.
Troubleshooting Common Cleaning Problems

White residue on screen after cleaning
This mineral buildup from hard water requires:
1. Soak screen in equal parts water and white vinegar for 1 hour
2. Gently brush with soft-bristled MOD cleaning brush
3. Rinse thoroughly—never use citric acid which damages stainless steel
Persistent odors after cleaning
Follow this three-step elimination process:
1. Run baking soda solution (1 tbsp in 2 cups water) through juicer
2. Follow with white vinegar solution (1:1 ratio with water)
3. Finish with plain water rinse—never mix baking soda and vinegar directly
Screen clogs during juicing
This indicates incomplete cleaning:
1. Disassemble and soak screen overnight in enzymatic cleaner
2. Use a toothpick to clear individual pores (only if necessary)
3. Check for screen damage—if bent, replacement is required
Proper Storage Techniques That Prevent Damage
Most MOD juicer failures occur during storage, not use. Protect your investment:
- Store components separated on a clean microfiber towel—not stacked
- Never store the juicing screen compressed against other parts
- Keep the auger in an upright position to maintain shaft alignment
- Store in a cool, dark place—direct sunlight degrades plastic components
- Place silica gel packets near stored components to absorb moisture
When to Replace Critical Components
Your MOD juicer’s performance declines gradually—watch for these replacement indicators:
- Juicing screen: Replace when juice yield drops 20% or screen shows visible bends
- Auger: Replace if rubber components crack or lose grip on produce
- Seals: Replace when juice leaks from connections or motor base
- Motor: If unusual noises persist after thorough cleaning, contact MOD support
Cost-Saving Tip: Register your MOD juicer online—many models include one free screen replacement during the warranty period.
Final Expert Cleaning Tips for Maximum Performance
Implement these professional techniques for perfect results every time:
- Always juice harder ingredients (carrots, beets) before leafy greens to naturally clean the screen
- Keep your MOD cleaning kit in a dedicated container next to the juicer
- For citrus juicing, run a peeled orange through afterward to neutralize acids
- Never skip drying components completely—moisture causes mold in 48 hours
- Run a test batch of cucumber juice after deep cleaning to verify performance
Consistent, proper cleaning transforms your MOD cold press juicer from a high-maintenance appliance into a reliable daily tool for optimal health. By spending just 5-10 minutes after each use, you’ll extend your machine’s lifespan by 3-5 years while ensuring every glass of juice delivers maximum nutrition. Start implementing these techniques today, and you’ll notice improved juice yield, better taste, and the peace of mind that comes with knowing your investment is protected. Your future self will thank you when your MOD juicer continues delivering perfect juice years after others have failed.


