
You’ve just unboxed your new Breville Juice Fountain Plus Juicer and now face the critical first step: proper assembly. Getting this right isn’t just about putting pieces together—it’s the foundation for safe operation, optimal juice extraction, and years of reliable service. Many new juicer owners make the mistake of rushing through assembly only to encounter splashing, poor extraction, or even damage during their first use. This comprehensive guide walks you through every precise step to assemble your Breville juicer correctly the first time, saving you frustration and protecting your investment.
The difference between a perfectly assembled Breville juicer and one with even minor assembly errors shows immediately in performance. When components align perfectly, you’ll experience smooth operation, maximum juice yield, and minimal pulp in your final product. This guide covers the entire assembly process from unboxing to first juice, with specific visual cues to confirm each step is complete. By following these instructions carefully, you’ll transform your box of parts into a fully operational juicing powerhouse ready to extract every drop of nutrition from your favorite fruits and vegetables.
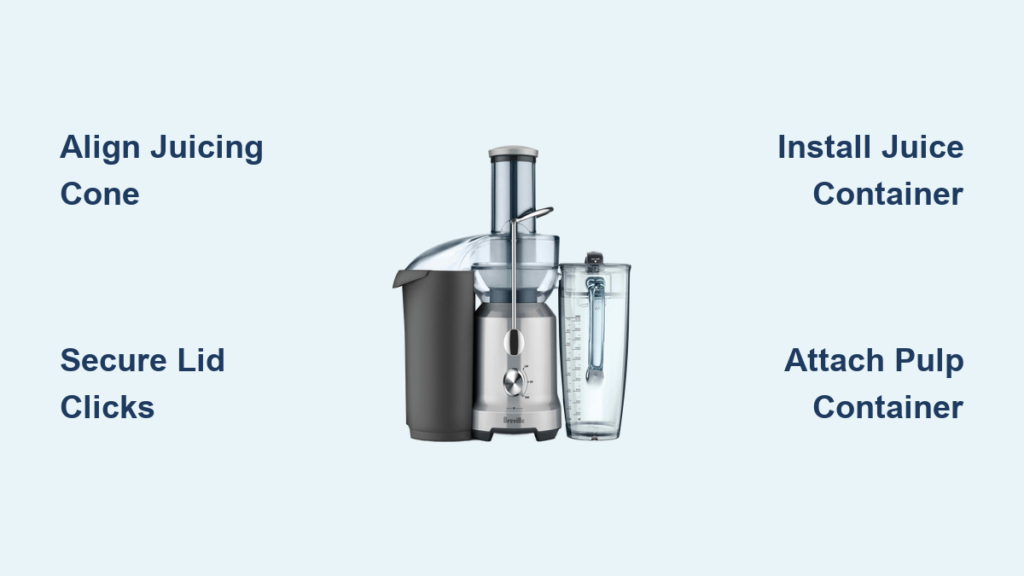
Unbox and Identify Every Breville Juicer Component
Begin your assembly journey by carefully unpacking all components and organizing them for identification—this critical first step prevents missing parts and helps you understand each piece’s function. Lay out a clean towel on your counter to protect delicate components as you remove them from packaging, and work in a well-lit area where you can clearly see all parts. Take your time with this stage; rushing through unpacking often leads to overlooked damage or misplaced components that derail the entire assembly process.
As you unpack, inspect each component for shipping damage such as cracks, dents, or rough edges that could affect performance. The Breville Juice Fountain Plus contains seven essential components that must all be present and undamaged:
- Main juicer body (the motor housing unit with control buttons)
- Juicing cone (the stainless steel component with sharp ridges)
- Juice container (clear container with measurement markings)
- Pulp container (larger container for fiber collection)
- Lid (with safety interlock mechanism)
- Pusher (for safely feeding ingredients)
- Power cord (with strain relief connector)
Verify that all parts match the descriptions in your manual, paying special attention to the juicing cone’s sharp edges and the lid’s alignment tabs. If any components appear damaged or missing, contact Breville customer support immediately before proceeding—attempting assembly with damaged parts risks safety hazards and poor performance.
Set Up the Motor Base with Precision Alignment
The motor base forms your juicer’s stable foundation, and improper installation causes excessive vibration that damages components over time. Start by placing the main juicer body on a completely level, non-slip surface—granite countertops work well, but avoid glass or wobbly tables that amplify vibration. Position the unit at least 6 inches from the counter edge to prevent accidental tipping during operation, and ensure you have ample space on both sides for container access.
Attach the motor base by aligning the three precision pins with their corresponding slots on the main body. You’ll feel subtle resistance as the pins enter the slots—this is normal—but never force components together. Apply firm, even downward pressure while maintaining perfect alignment until you hear a distinct double-click confirming secure attachment. Properly connected, the base should show zero movement when you gently attempt to twist it; any play indicates incomplete connection requiring reassembly.
Before plugging in, inspect the entire power cord length for shipping damage like kinks, cuts, or exposed wires. The cord should feed cleanly from its strain relief point without tension, and the plug should insert into your outlet with moderate resistance—not so loose it falls out, nor so tight it damages the outlet. A properly connected power system ensures consistent motor performance and prevents electrical hazards during operation.
Install the Juicing Cone with Clockwise Rotation

The juicing cone is your Breville’s functional heart, and improper installation causes 80% of first-time juicer problems from poor extraction to motor strain. Begin by holding the juicing cone with both hands, aligning its central hole directly over the motor shaft protruding from the base. The shaft has a distinctive D-shaped cross-section that must match the cone’s keyed opening—this alignment prevents slippage during high-speed operation.
Gently twist the cone clockwise while applying slight downward pressure until you feel it seat fully. You should hear a soft click when properly engaged, and the cone should sit perfectly level with no wobble. Test stability by pressing down on opposite sides of the cone—if it rocks or tilts, remove and repeat the installation process. A properly installed cone rotates freely by hand with smooth, consistent resistance throughout its rotation.
Critical mistake to avoid: Never force the cone downward without rotation, as this can damage the motor shaft’s splines. If you encounter significant resistance during clockwise turning, lift the cone slightly while maintaining alignment and try again—forcing it can strip the cone’s internal mechanism.
Position Juice and Pulp Containers for Optimal Flow

Correct container placement ensures efficient juice collection and prevents messy counter spills that frustrate new juicer owners. Start with the juice container: slide it into the front receptacle until it clicks into position with the spout perfectly centered beneath the juice outlet. When properly installed, the container should sit completely level with no tilting, and you should feel subtle resistance as it seats fully into the molded slot.
For the pulp container, align the guide rails with the side chute and slide it in with firm, steady pressure until flush with the juicer body. Properly seated, the container should show no gaps around the edges and slide out easily when you grasp the handle. Test both containers by gently tugging upward—they should remain securely in place during operation but release smoothly when you need to empty them.
Visual confirmation: With both containers installed, look for the juice spout to align precisely over the container’s center. Misalignment by even 1/4 inch causes splashing that wastes precious juice and creates cleanup work. The pulp container should sit close enough to the juicing mechanism that you hear a soft “thump” when pulp ejects—excessive distance causes pulp to scatter outside the container.
Secure the Lid and Test Pusher Operation
The lid and pusher complete your Breville juicer’s assembly and provide essential safety features that prevent accidents during operation. Start by aligning the lid’s three tabs with the matching slots on the juicer body—these tabs ensure proper orientation and prevent incorrect installation. Press down firmly at all four corners until you hear three distinct clicks confirming full engagement. A properly secured lid sits perfectly flush with no visible gaps and won’t budge when you attempt to lift it.
Insert the pusher into the feed tube opening and verify it moves smoothly through its full range of motion. The pusher should descend easily under its own weight but not fall freely—ideal resistance allows controlled ingredient feeding without excessive hand strain. Test this by pressing down gently; the pusher should return to its starting position when released, indicating proper spring tension.
Safety check: With the lid secured, attempt to start the juicer without the lid fully locked—modern Breville models have safety interlocks that prevent operation without proper lid engagement. If your unit starts without the lid locked, unplug immediately and contact customer support, as this indicates a serious safety defect.
Verify Complete Assembly Before First Use
Perform this final 30-second verification sequence before processing your first ingredients to prevent common assembly-related failures. First, plug in the unit and briefly activate the motor (without ingredients) to check for unusual noises—smooth operation should produce a consistent whirring sound, not grinding or clicking. Next, visually confirm all containers remain stable during operation with no shifting or vibration.
Examine the juice flow pattern during a water test run: properly assembled, water should flow in a steady, narrow stream into the center of the juice container. Splashing or irregular flow indicates misaligned components requiring reassembly. Finally, verify the pulp ejection path by watching how water carries pulp into the container—direct, consistent movement confirms proper alignment of internal channels.
Pro tip: Keep your smartphone camera recording during this verification step. If issues arise, the video provides valuable evidence for warranty claims and helps customer support diagnose problems more efficiently.
Prepare for Your First Successful Juicing Session
Maximize your first juicing experience by following these professional setup recommendations that most manuals overlook. Start with a water test run for 30 seconds to flush manufacturing residues and verify optimal component alignment—watch for consistent flow patterns that confirm proper assembly. Then, process soft ingredients like cucumber or celery before progressing to harder items like carrots, allowing you to develop proper pusher technique without risking jams.
Always cut ingredients to match the feed tube diameter (approximately 2.5 inches for most Breville models) to prevent jamming. Feed ingredients steadily but don’t force them—let the juicer’s rotation do the work. Maintain consistent pressure with the pusher, applying just enough force to keep ingredients moving through the cone without stopping the motor.
Expert insight: The first three juice batches may yield slightly less juice as internal components seat fully—this is normal. Don’t mistake this expected break-in period for assembly problems. Within 5-7 uses, your Breville will reach peak extraction efficiency when properly assembled.
Maintain Assembly Integrity Through Regular Cleaning
Proper disassembly and reassembly during cleaning preserves your Breville’s performance and extends its lifespan significantly. After each use, unplug the unit and disassemble components in reverse order of assembly: pusher first, then lid, followed by containers and juicing cone. Clean the juicing cone thoroughly with the included brush, paying special attention to the fine mesh screen where pulp buildup most commonly occurs.
When reassembling after cleaning, follow the same precise steps as initial assembly, particularly regarding the juicing cone’s clockwise rotation and the lid’s three-point locking mechanism. Components that become difficult to install often indicate residual pulp buildup requiring additional cleaning—never force components together, as this damages precision alignment features.
Maintenance schedule: Perform a deep cleaning of all components every 10-15 uses, focusing on the juicing cone’s internal channels and the motor shaft connection point. This routine prevents performance degradation and ensures your Breville continues extracting maximum juice with minimal effort—just as it did on day one when you first mastered how to assemble a Breville juicer correctly.


