
Your Breville juicer’s performance depends on regular deep cleaning, but many owners struggle with the disassembly process. When pulp residue builds up between components, your BJE510XL may leak, vibrate excessively, or produce inconsistent juice quality. Knowing exactly how to take apart Breville juicer components properly saves you from costly damage while ensuring thorough cleaning. This guide reveals the precise disassembly sequence that protects your investment and maintains optimal juicing performance.
Attempting to force components apart without understanding the locking mechanisms can strip threads, crack plastic housings, or damage the motor assembly. The Breville BJE510XL’s modular design requires specific techniques at each stage to prevent damage to the filter bowl surround, base connection points, and sealing surfaces. By following these proven steps, you’ll transform what many consider a frustrating chore into a quick, reliable maintenance routine that extends your juicer’s lifespan.
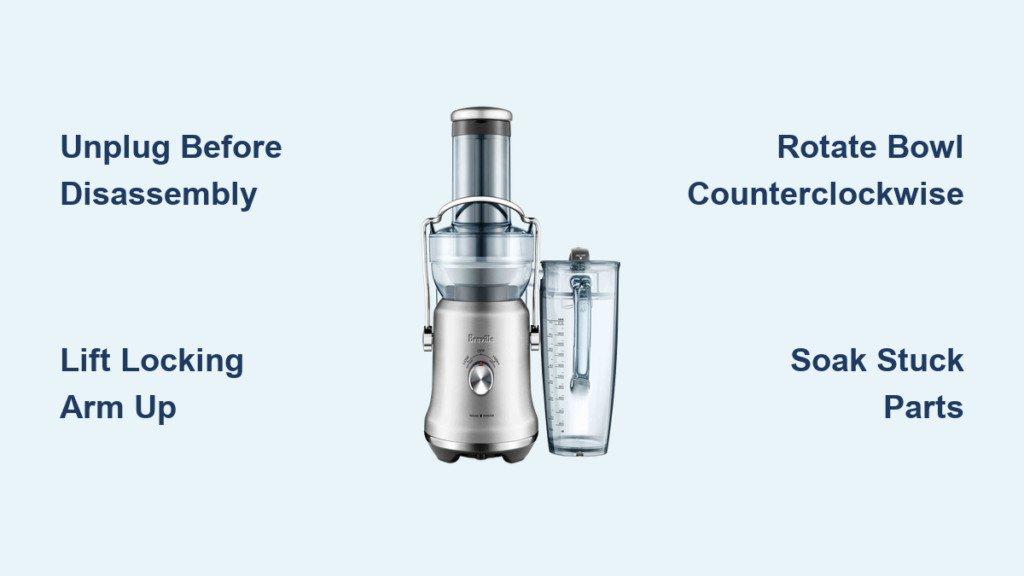
Disconnect Power and Prepare Your Workspace
Before touching any component, unplug your Breville juicer from all power sources—this non-negotiable safety step prevents accidental activation that could cause serious injury or permanent motor damage. Locate both ends of the power cord and verify complete disconnection, as partially inserted cords can still energize the unit when bumped during disassembly.
Set up your disassembly station on a clean, well-lit surface protected by a soft towel or cutting board to prevent scratches. Gather these essential supplies before beginning:
– Warm water (not hot, to avoid warping plastic)
– Mild dish soap
– Soft sponge or non-abrasive cloth
– Small bowl for soaking stubborn parts
– Dry microfiber towel for drying components
Allow your juicer to cool for 10-15 minutes if recently used, as hot plastic becomes more brittle and susceptible to cracking when manipulated. This cooling period also prevents burns from warm juice residue trapped between components—a common oversight that leads to rushed, unsafe disassembly attempts.
Lift the Locking Arm to Release Filter Bowl Surround
The locking arm mechanism is your gateway to accessing the filter bowl, but many users apply incorrect pressure that damages the pivot point. Locate the locking arm on the side of your Breville juicer body—it’s the curved metal piece that connects to the filter bowl surround when engaged. This component must move upward (not sideways) to disengage properly.
Apply firm, upward pressure with your thumb while stabilizing the juicer body with your other hand. You should feel a distinct click as the mechanism releases—this tactile feedback confirms successful disengagement. If the arm resists movement, residue buildup likely binds the mechanism; don’t force it. Instead, wipe around the pivot point with a damp cloth to remove surface debris before retrying.
Critical warning: Never twist or pull the locking arm sideways—this common mistake bends the metal connector or cracks the plastic housing. If the arm moves freely but the bowl remains stuck, residue has likely bonded the components together, requiring the soaking technique explained in the next section.
Rotate Filter Bowl Counterclockwise for Safe Removal

With the locking arm fully raised, grasp the filter bowl firmly while stabilizing the base unit with your other hand. Initiate a smooth counterclockwise rotation—the only direction that properly disengages the threading without damaging components. Apply gradual pressure while maintaining even alignment; the bowl should begin turning within 10-15 degrees of rotation.
If you encounter significant resistance:
– Stop immediately—forcing rotation strips internal threads
– Verify the locking arm is fully engaged upward
– Check for visible pulp residue around the seam
– Never use tools to gain leverage—they mar plastic surfaces
The filter bowl should separate cleanly after 1/4 to 1/2 turn. Set it aside carefully, as residual pulp may shift during movement. As you remove the bowl, notice the motor shaft connection point—this delicate component requires gentle cleaning to prevent damage during future reassembly.
Soak Stuck Components Instead of Forcing Separation
When residue has dried between mating surfaces, your Breville juicer components may resist separation despite proper technique. Rather than risking damage with excessive force, employ this professional soaking method:
- Fill a container with warm water (not exceeding 120°F/49°C)
- Add 1-2 drops of mild dish soap to break down oils
- Submerge stuck components for 15-30 minutes
- Remove and dry thoroughly before attempting separation
This rehydration process works because pulp residue expands when wet, releasing its grip on plastic surfaces. During soaking, the warm soapy water penetrates microscopic cracks where residue hides, making removal effortless. For particularly stubborn buildup, use a soft toothbrush (never metal or abrasive tools) to gently dislodge residue after soaking.
Pro tip: After soaking, wipe components with a vinegar-water solution (1:3 ratio) to dissolve mineral deposits from hard water that contribute to sticking issues. Rinse thoroughly before proceeding with disassembly.
Clean All Components Thoroughly for Optimal Performance

The disassembly process reveals critical areas that impact your juicer’s performance—neglecting these during cleaning leads to premature wear and performance issues. Focus your cleaning efforts on these high-impact zones:
Filter bowl mesh screen:
– Soak in warm soapy water for 5 minutes
– Use provided cleaning brush at a 45-degree angle
– Work from inside out to prevent mesh damage
– Rinse under running water until clear
Sealing surfaces:
– Inspect rubber gaskets for cracks or hardening
– Clean grooves with soft-bristled toothbrush
– Replace damaged seals immediately (Breville part #4381007)
– Apply food-grade silicone lubricant to new seals
Motor base connection points:
– Wipe with damp microfiber cloth only (never submerge)
– Remove any pulp debris from shaft housing
– Verify shaft spins freely before reassembly
– Never use abrasive cleaners near motor components
Allow all parts to air dry completely for at least 30 minutes before reassembly—trapped moisture causes mold growth and electrical hazards. Place components on a clean towel with mesh screens facing down to facilitate drainage.
Establish Maintenance Habits That Prevent Future Issues
The key to effortless disassembly lies in what you do after each juicing session. Implement these immediate post-juicing habits to prevent residue buildup:
- Disassemble filter bowl within 5 minutes of finishing
- Rinse all components under warm running water
- Soak mesh screen in citrus-based cleaner for tough stains
- Store components separately until completely dry
Critical mistake to avoid: Never let juice residue dry on components—this transforms soft pulp into concrete-like buildup that requires aggressive cleaning methods. If immediate cleaning isn’t possible, at least rinse components thoroughly and store them submerged in water until you can complete proper cleaning.
For heavy daily users, perform this weekly deep cleaning routine:
1. Disassemble all components
2. Soak mesh screen in baking soda solution (1 tbsp per cup water)
3. Clean motor shaft housing with cotton swab
4. Inspect all gaskets for wear
5. Lubricate moving parts with food-grade silicone
Use Visual Guides for Complex Disassembly Steps
While written instructions provide essential details, visual demonstrations clarify the precise hand positioning and motion required for successful Breville juicer disassembly. When struggling with the locking arm mechanism or filter bowl rotation, refer to video resources showing the exact technique for your BJE510XL model.
Pay special attention to these visual cues during disassembly:
– The angle at which to lift the locking arm
– Hand placement for optimal leverage
– The specific rotation direction for your model
– Visual indicators of proper component alignment
Pause and replay video segments showing resistance points—these moments often reveal subtle techniques that prevent damage. Many users discover they’ve been applying pressure in the wrong location after watching professional demonstrations, instantly transforming their disassembly success rate.
Reassemble and Test Before Full Operation
Reassembly requires equal precision to disassembly—improper seating causes leaks, vibration, and performance issues. Follow these critical steps when putting your Breville juicer back together:
- Align the filter bowl with base threading marks
- Apply gentle clockwise rotation while pressing down
- Listen for the distinct “click” as the locking arm engages
- Verify no gaps exist between bowl and base unit
Test your reassembly before juicing:
– Run with water only for 30 seconds
– Check for leaks around all connections
– Listen for abnormal motor sounds
– Confirm smooth pulp ejection
If issues arise during testing, disassemble immediately and check component alignment—forcing operation with misaligned parts causes cumulative damage. Properly reassembled, your Breville juicer should operate quietly with consistent juice flow and dry pulp ejection.
Mastering how to take apart Breville juicer components properly transforms maintenance from a chore into a quick, reliable process that extends your appliance’s lifespan. By following these precise disassembly techniques and implementing the recommended cleaning habits, you’ll maintain optimal performance while avoiding the most common pitfalls that lead to costly repairs or premature replacement. The time invested in proper disassembly pays dividends through years of reliable, high-quality juicing performance.


