
If your NutriBullet juicer has stopped working properly or needs a deep clean, knowing how to safely open and disassemble it is essential. Many users find themselves stuck with a clogged or malfunctioning appliance but hesitate to take it apart for fear of causing damage or voiding their warranty. The good news is that most NutriBullet juicer models can be opened with just a few simple tools and the right technique. In this guide, you’ll learn exactly how to access the internal components of your NutriBullet juicer without causing damage, whether you’re troubleshooting a performance issue or performing routine maintenance.
Why You Might Need to Open Your NutriBullet Juicer
Addressing Common Performance Issues
When your NutriBullet juicer suddenly stops extracting juice efficiently or makes unusual noises during operation, internal components may be clogged or damaged. Food particles often get trapped in hard-to-reach areas between the blade assembly and the container, reducing performance over time. Opening your juicer allows you to thoroughly inspect and clean these critical areas that regular washing can’t reach. Many users don’t realize that persistent “weak juice extraction” is frequently caused by buildup around the blade housing that only becomes visible after disassembly.
Performing Necessary Maintenance
Regular maintenance extends your NutriBullet juicer’s lifespan significantly. Unlike standard blenders, juicers have specialized components that require periodic inspection. The mesh filter screen, in particular, needs careful attention as tiny pulp particles can embed themselves in the microscopic holes, gradually reducing efficiency. Opening your juicer every few months allows you to check for wear on the O-rings and gaskets that maintain proper pressure during operation. Neglecting this maintenance leads to leaks and decreased performance that many users mistakenly attribute to “the appliance wearing out.”
Essential Safety Precautions Before Opening
Power Disconnection and Cooling Period
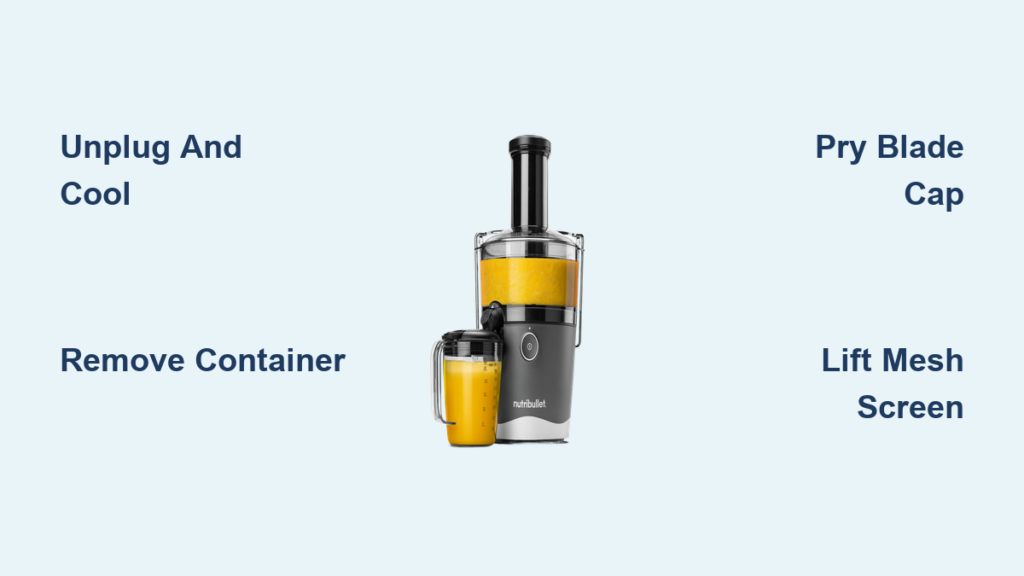
Always unplug your NutriBullet juicer from the electrical outlet and allow it to cool completely before attempting any disassembly. The motor housing retains heat after use, and working with warm components increases the risk of accidental burns. Wait at least 30 minutes after your last use before beginning the disassembly process. This cooling period also allows any residual moisture to evaporate, reducing the chance of electrical issues when you eventually reconnect the appliance.
Workspace Preparation
Create a dedicated workspace with adequate lighting and a clean, flat surface. Lay down a soft towel to protect components as you remove them. Organize small containers to hold screws and other tiny parts to prevent loss. Having your tools within easy reach prevents having to move around with disassembled components in hand. Proper workspace setup reduces the risk of dropping parts or damaging delicate components during the disassembly process.
Step-by-Step Disassembly Instructions
Removing the Container and Lid Assembly
Begin by turning your NutriBullet juicer upside down on your workspace. Firmly grasp the container and twist it counterclockwise to release it from the base unit. Some models require pressing a release button while twisting. Set the container aside on your towel. Next, remove the lid by pressing the center button and lifting straight up. If your model has a feeding chute, remove any additional caps or accessories. Check the container base for any visible debris caught around the blade housing before proceeding.
Accessing the Blade Assembly
With the container removed, locate the blade assembly attached to the bottom. Most NutriBullet juicers secure this with a central locking mechanism. Place your container upside down and use a flat-head screwdriver to gently pry up the center cap covering the locking screw. Some models have a rubber plug instead that you can remove with your fingernail. Underneath, you’ll find either a standard screw or a specialized locking mechanism that requires the included wrench tool. Turn this counterclockwise to release the blade assembly.
Removing the Mesh Filter Screen
After removing the blade assembly, you’ll see the mesh filter screen positioned above it. This component is crucial for proper juice separation but is prone to clogging. Carefully lift the screen straight up and out of the container. Some models have tabs that need to be pressed while lifting. Inspect the screen for any embedded pulp particles, especially around the edges where buildup is common. This screen requires delicate handling as the fine mesh can tear if bent or mishandled.
Troubleshooting Common Disassembly Challenges
Stuck Blade Assembly Solutions
If the blade assembly refuses to budge, don’t force it. Apply a few drops of food-safe lubricant around the base where the blade meets the container. Let it sit for 5-10 minutes to penetrate any stuck particles. Try tapping the container’s side gently with a rubber mallet while applying steady twisting pressure. For persistent cases, place the container in the freezer for 15-20 minutes—the temperature change often helps release stuck components. Never use excessive force that could crack the container or damage internal threads.
Dealing with Stripped Screws
If you encounter a stripped screw head during disassembly, stop immediately to prevent further damage. Use a rubber band placed over the screw head before reinserting your screwdriver—the added friction often provides enough grip to remove a problematic screw. For severely stripped screws, consider using a specialized screw extractor tool designed for small appliance repair. As a last resort, carefully drill a small pilot hole in the center of the screw head to insert an extraction bit. Damaged screws should always be replaced with the correct replacement part before reassembly.
Cleaning and Maintenance Tips After Opening

Deep Cleaning the Components
With your NutriBullet juicer fully disassembled, soak the removable parts in warm, soapy water for 10-15 minutes. Use a soft-bristled brush (an old toothbrush works well) to gently scrub the mesh filter screen, paying special attention to the edges where buildup accumulates. For stubborn residue on the blade assembly, create a paste of baking soda and water and apply it with a cotton swab. Never place any components in the dishwasher unless explicitly stated in your model’s manual, as high heat can warp plastic parts.
Inspecting for Wear and Damage
While your juicer is apart, conduct a thorough inspection of all components. Check the O-rings and gaskets for cracks, tears, or compression set (permanent flattening). Examine the blade for nicks or dulling that affects cutting performance. Look for signs of corrosion on metal components, especially around electrical contacts. Pay special attention to the container threads for any chips or deformities that could prevent proper sealing. Document any damaged parts that need replacement before proceeding with reassembly.
Proper Reassembly Techniques
Aligning Components Correctly
Reassembly requires precise alignment to ensure proper function. Start by positioning the mesh filter screen exactly as it was originally installed—most models have specific orientation requirements. When reinstalling the blade assembly, ensure it sits flush against the container base before securing it. Apply gentle downward pressure while twisting to verify proper seating. The central screw or locking mechanism should turn smoothly without resistance—if you feel binding, disassemble and check for misalignment before proceeding.
Achieving Proper Tightness
When securing components, use “finger tight” as your baseline—not so loose that parts wobble, but not so tight that you risk stripping threads. For the central locking screw, give it a quarter-turn past finger tight with your tool, but never force it. Over-tightening is a common mistake that leads to cracked containers and stripped threads. After reassembly, perform a dry run without ingredients to verify everything operates smoothly before using your NutriBullet juicer for actual juicing.
Preventing Future Disassembly Needs
Establishing a Maintenance Routine
Create a simple maintenance schedule to minimize the need for frequent disassembly. After each use, rinse components immediately while pulp is still moist. Once weekly, perform a deeper clean with warm, soapy water and a soft brush. Monthly, inspect the mesh screen for buildup and address minor issues before they become major problems. This routine prevents the stubborn residue that necessitates full disassembly and extends the time between deep maintenance sessions.
Using Proper Ingredients and Techniques
Many disassembly needs stem from improper usage. Always cut hard ingredients into small pieces before juicing to reduce strain on the blade. Alternate soft and hard ingredients during operation to help clear the mesh naturally. Never exceed the maximum fill line, as overflow can force pulp into hard-to-clean areas. Following these usage guidelines significantly reduces internal buildup and extends the time between necessary disassembly sessions.
Final Note
Successfully opening and maintaining your NutriBullet juicer doesn’t require specialized skills—just the right knowledge and approach. By following these precise disassembly steps and maintenance practices, you’ll keep your appliance performing like new for years. Remember that regular, proper cleaning prevents 90% of performance issues that lead users to disassemble their juicers in the first place. If you encounter persistent problems after following this guide, consult NutriBullet’s official support for model-specific assistance rather than continuing to disassemble the unit unnecessarily.


