
Your digital donut creation journey begins with a simple truth: making a photorealistic donut in Blender doesn’t require advanced skills, just the right approach. Whether you’re a complete beginner or returning to 3D modeling after a break, this guide shows you exactly how to make a donut in Blender from scratch. The entire process takes about 45 minutes, and you’ll build essential modeling skills that apply to countless other projects.
Imagine presenting a mouthwatering digital donut that looks good enough to eat—complete with realistic icing drips and organic imperfections. This isn’t just about creating a simple torus shape; it’s about transforming basic geometry into something that captures the irregular, delicious nature of real baked goods. By the time you finish this tutorial, you’ll have a professional-looking donut model ready for texturing and rendering.
Create Your Donut Base with Perfect Torus Settings
Blender’s torus primitive provides the ideal starting point for your donut model, but getting those initial settings right makes all the difference between a mechanical-looking ring and something that resembles real pastry.
Configure Precise Torus Dimensions for Realistic Proportions
Press Shift + A → Mesh → Torus to add your foundation shape, then immediately adjust these critical settings in the bottom-left “Add Torus” panel before clicking elsewhere:
- Major Radius: Set to 5 cm for proper real-world scale
- Minor Radius: Adjust to 1.5 cm for classic donut thickness
- Major Segments: 28 segments create natural curvature
- Minor Segments: 12 segments balance detail and editability
Pro Tip: If you accidentally click away before adjusting settings, undo with Ctrl + Z and try again—those segment counts are crucial for later editing.
Shape Organic Imperfections Using Proportional Editing
Switch to Edit Mode (Tab key) and enable Proportional Editing (press O or click the magnet icon). Adjust the influence circle size with your mouse wheel until it covers about half your donut. Now select individual vertices and gently pull them outward or inward to create natural lumps and irregularities.
Real donuts never have perfect symmetry, so deliberately create subtle variations across your model. Rotate your viewport frequently to check your progress from all angles—this prevents accidental flat spots that only appear from certain views.
Build Realistic Icing with Proper Thickness and Flow

Creating convincing icing separates amateur models from professional-looking donuts. The key lies in proper geometry separation and modifier application—don’t just paint on icing in texture mode.
Separate Icing Geometry Without Losing Position
Activate X-Ray mode (Alt + Z) to see through your donut base, then carefully select the entire top half using Box Select (B key). With all upper vertices selected, press Shift + D to duplicate, then immediately press Escape to keep the copy in place.
Press P → Selection to separate this as a new object, then rename it “Icing” in the Outliner by pressing F2. This separation is critical—you must work with actual geometry, not just a texture overlay, for realistic lighting effects later.
Apply Correct Solidify Modifier Settings for Icing Depth
Select your newly created icing object and add a Solidify modifier. Configure these essential settings:
– Thickness: 0.3-0.5 cm (creates substantial but realistic icing)
– Offset: Set to 1.0 for outward expansion
– Crease Inner: Set to 1.0 for sharp edge definition
Warning: If your icing appears jagged, reorder your modifiers by moving Solidify above Subdivision Surface using the up arrow icon—this simple fix dramatically improves surface quality.
Create Authentic Icing Drips That Defy Gravity
The difference between a basic donut model and something that looks professionally crafted comes down to those irregular icing drips. Randomness is key—real icing doesn’t drip in perfect patterns.
Configure Snapping for Natural Drip Placement
Enable snapping (magnet icon in the top menu bar) and set it to Face mode with Project Individual Elements active. This ensures your icing edges conform perfectly to the donut’s curved surface rather than floating unnaturally above it.
Craft Organic Drips with Vertex Manipulation
In Edit Mode, select 2-3 adjacent vertices along your icing edge and press E to extrude. Drag these downward to form your first drip, then repeat this process 5-8 times around the donut’s perimeter. Vary both the length and vertex count of each drip—some should be simple two-vertex drips while others have 3-4 vertices for more complex shapes.
Pro Tip: Enable Proportional Editing with Random falloff mode to create subtle variations in drip thickness as you pull vertices downward—this mimics how real icing flows under gravity.
Refine Your Donut Model for Professional Results
The final touches transform your basic geometry into something that will hold up under close scrutiny in renders. These refinements make the difference between a passable model and one that looks genuinely appetizing.
Smooth Critical Transitions Without Losing Definition
Select all icing vertices (A) and right-click → Subdivide. In the subdivide menu that appears, set Smoothness to 1 to maintain flowing edges while adding necessary geometry. Now select just the outer edge loop (Alt + Click on any edge), then Select → Invert and press H to hide interior faces.
This isolation allows you to focus exclusively on the visible icing edge where your attention matters most. Use Proportional Editing with a small radius to gently smooth transitions between drips and the main icing layer.
Optimize Performance While Maintaining Quality
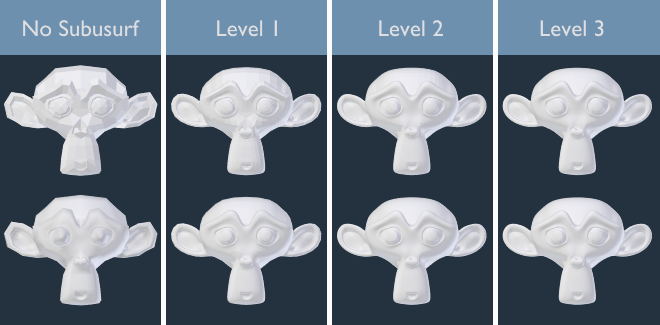
Keep your Subdivision Surface modifier at Viewport Level 1 during modeling—this provides enough smoothness for visual feedback while keeping Blender responsive. Higher levels will slow down your workflow unnecessarily at this stage.
Critical Shortcut: Press Alt + H to unhide all geometry when you’re ready to check your overall progress. This reveals any hidden sections so you can verify seamless transitions between visible and previously hidden areas.
Essential Blender Shortcuts for Donut Modeling Efficiency
Mastering these keyboard shortcuts will dramatically speed up your donut creation process—memorize them before starting so you can maintain workflow momentum.
Critical Modeling Shortcuts You Must Know
- Shift + A: Instantly add new objects without navigating menus
- Alt + Z: Toggle X-Ray mode to select through solid objects
- Shift + D: Duplicate selected elements (press Escape immediately to keep in place)
- P: Separate geometry into new objects during Edit Mode
- H / Alt + H: Hide/unhide selected elements for focused work
- E: Extrude geometry to create new shapes and features
- F2: Rename objects for clear scene organization
Pro Tip: Create a sticky note with these shortcuts next to your monitor until they become second nature—this simple habit saves minutes during every modeling session.
Troubleshoot Common Donut Modeling Mistakes

Even experienced Blender users encounter specific pitfalls when creating donuts. Recognizing and fixing these issues early prevents wasted time and frustration.
Fix Floating Icing That Doesn’t Conform to Surface
If your icing appears to hover above the donut instead of sitting naturally on the surface, check your snap settings. Ensure Project Individual Elements is active in the snapping menu and reposition problem areas while snapping is enabled.
Resolve Jagged Edges on Icing Drips
Jagged drips typically result from incorrect modifier order. Move your Solidify modifier above Subdivision Surface in the modifier stack—this sequence ensures thickness is added before smoothing, creating cleaner edges.
Final Quality Check Before Texturing
Before moving to materials and lighting, perform this quick verification to ensure your model is ready for the next stage.
Rotate Through All Viewing Angles
Slowly rotate your donut 360 degrees while zooming in on critical areas like drip connections and the icing-donut seam. Look specifically for:
– Consistent icing thickness across the entire surface
– Natural drip variations (no repeating patterns)
– Smooth transitions between major geometry sections
– Proper vertex density where details matter most
Pro Tip: Press Z and select Rendered view to get a quick preview of how your lighting will interact with the geometry—this reveals issues that aren’t obvious in solid view.
Next Steps After Completing Your Donut Model
With your foundation geometry complete, you’re now ready to transform this basic model into something truly photorealistic. The modeling stage represents just the beginning of creating a mouthwatering digital donut—next you’ll add:
- Realistic icing materials with proper subsurface scattering
- Chocolate or colorful sprinkles with displacement details
- Proper lighting that highlights texture and depth
- Background elements that enhance the food photography effect
Final Note: Save incremental versions of your work using Ctrl + Shift + S—this creates numbered backups so you can experiment freely with different icing styles without risking your progress. Your perfectly modeled donut base will serve as the foundation for countless creative variations as you advance your Blender skills.


