
Your Breville grinder suddenly starts making that familiar grinding sound, but no coffee grounds appear in the portafilter or catch cup. The motor clearly has power—the noise proves that—but something inside has stopped the actual grinding process. This frustrating scenario affects Breville Barista Express, Smart Grinder Pro, Barista Pro, and Dose Control Pro owners alike, and it typically points to one of several mechanical issues that can be diagnosed and often resolved without professional repair.
Understanding why your grinder runs without grinding requires knowing how these machines actually work. Breville grinders use a motor connected through a coupler to a conical burr set, with beans fed through an auger system into the grinding zone. When any part of this chain breaks—whether the burrs seize up, the coupler strips, or beans never reach the grinding zone—you get the telltale noise without any output. The solution depends entirely on identifying which component has failed, and that’s where systematic diagnosis becomes essential before spending money on parts you don’t need.
Identify the Root Cause
Before touching any tools, you need to pinpoint exactly why your Breville grinder is making noise without grinding. The diagnostic process takes just a few minutes and can save significant time and money by directing your efforts toward the actual problem rather than guessing at solutions.
Start by removing the bean hopper completely and looking directly into the grinding chamber where the burrs sit. With the machine unplugged for safety, shine a flashlight into this space to check for obvious obstructions like stones, hardened coffee clumps, or plastic fragments from damaged components. Many grinding failures stem from foreign objects lodging between burr teeth, immediately halting rotation while the motor continues running at full speed.
Listen carefully to the specific sound your grinder produces during operation. A consistent, high-pitched whirring that sounds like the motor is running but under no load suggests either no beans are reaching the grinding zone or the grinding mechanism has become disconnected from the motor entirely. A grinding, scraping, or crunching sound indicates material is caught between burrs or severe residue accumulation is causing metal-on-metal contact. These distinct sounds point toward very different solutions, so pay attention to what you’re hearing.
Test Burr Rotation Manually
Finally, attempt to rotate the lower burr manually. Reach through the bean hopper opening and try spinning the burr assembly—it should rotate freely with minimal resistance. If the burr won’t budge or moves only with significant effort, you’ve found your problem: either accumulated coffee oil has seized the burrs or a foreign object is blocking rotation. If the burr spins freely but grinding still doesn’t occur, the issue lies in the power transmission system rather than the grinding mechanism itself.
Pro Tip: While testing burr rotation, listen for clicking sounds that might indicate small debris trapped between burr teeth. Even a single coffee bean fragment can prevent proper grinding.
Clear Jammed Burrs

Coffee oil accumulation represents the most frequent cause of grinders running without producing grounds. These oils create a paste-like residue that hardens over time, eventually bonding the rotating and stationary burr components together. When this happens, the motor continues attempting to turn the assembly, generating noise while the actual grinding mechanism remains completely immobilized.
The hardening process accelerates when using oily beans (particularly dark roasts), in high-humidity environments, and when the grinder goes extended periods between cleanings. What starts as a minor film progresses to a stubborn cement-like substance that requires more than a quick wipe to address. Breville recommends dedicated grinder cleaning tablets followed by thorough burr brushing, but severe cases demand complete burr removal and deep soaking.
Step-by-Step Burr Cleaning Process
To address jammed burrs, unplug your machine and remove the bean hopper completely. Access the upper burr retaining screw—typically found in the center of the upper burr carrier—and carefully remove it along with the carrier assembly. The lower burr can then be lifted out using needle-nose pliers applied carefully to avoid damaging the teeth. Once both burrs are removed, inspect them for accumulated residue and check the burr housing interior for oil buildup on the walls and around the drive mechanism.
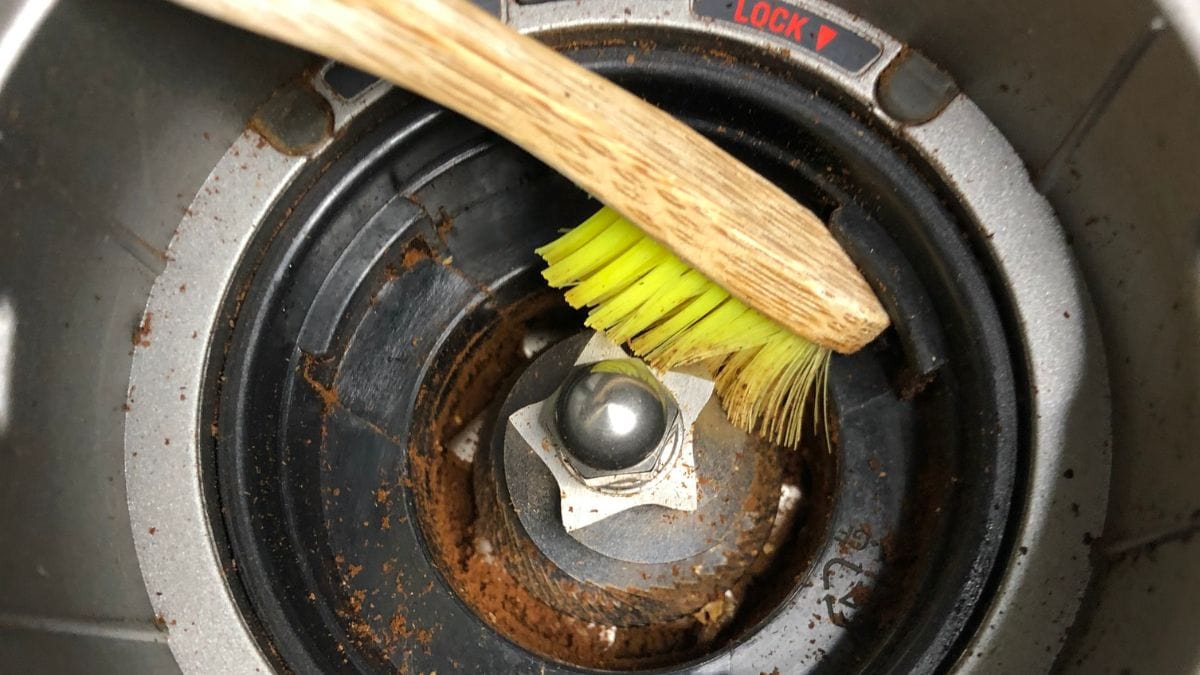
Soak both burrs in warm water mixed with dedicated coffee equipment cleaner for at least 30 minutes. For stubborn accumulation, allow extended soaking of several hours or overnight. After soaking, scrub burrs thoroughly with a soft-bristled brush designed specifically for grinder cleaning—standard household brushes may shed bristles that contaminate your grinding zone. Rinse completely and allow all components to dry fully before reassembly, as any moisture remaining in the mechanism can cause electrical problems or rust.
Warning: Never use abrasive cleaners or metal scouring pads on burrs—they’ll damage the precision grinding surfaces and permanently affect your coffee quality.
Test Motor and Drive Components
When burrs rotate freely but no grinding occurs, the problem lies in the power transmission system rather than the grinding mechanism itself. The motor coupler, which connects the motor shaft to the grinding assembly, frequently fails by stripping, shearing, or degrading over time. This component functions as a mechanical fuse, sacrificing itself to protect the motor from damage when excessive resistance occurs.
Motor coupler failure typically happens when grinders process overly hard objects like unpopped popcorn kernels or small stones, or when machines operate continuously beyond recommended duty cycles. The coupler shows visible wear, cracking, or complete separation when examined, and its failure produces a characteristic symptom: the motor runs normally (making grinding sounds) while the grinding mechanism remains completely stationary.
Diagnose Feed Mechanism Issues
The bean feed mechanism also deserves examination during this diagnostic phase. Breville grinders use an auger-style delivery system that gravity-feeds beans into the grinding zone at a controlled rate. When this mechanism fails, beans either accumulate above the burrs without advancing or never reach the grinding assembly at all. The motor runs without beans to process, producing a high-pitched whining sound that may be mistaken for grinding. Feed mechanism failure commonly results from dried coffee oil residue solidifying around the auger shaft, preventing its rotation even though the motor continues driving it.
Time Estimate: Testing the motor and drive components takes approximately 10-15 minutes for most users familiar with their Breville model.
Deep Clean the Burr Assembly
Routine maintenance prevents most noise-without-grinding issues, but when problems have already developed, thorough deep cleaning often restores full function without requiring parts replacement. This process goes significantly beyond daily maintenance and addresses the accumulated residue that casual cleaning cannot remove.
Begin by gathering your materials: dedicated grinder cleaning solution (not standard household cleaners), a quality burr cleaning brush, compressed air in a can, and clean microfiber cloths. Work in a well-lit area with good ventilation, and take photographs at each disassembly step so you can reference the original configuration during reassembly.
After removing both burrs as described previously, set aside the upper burr carrier and focus on the lower burr housing. This area collects significant residue over time, as gravity causes coffee oils to pool rather than fall away from the grinding zone. Clean all accessible surfaces with a damp cloth, ensuring no cleaning residue remains before reassembly. Pay particular attention to the drive mechanism interface where the motor coupler connects, as residue here can prevent proper power transmission.
Replace Worn Components
Sometimes cleaning proves insufficient, and component replacement becomes necessary to restore your Breville grinder’s function. Knowing when replacement is appropriate—and which parts actually need changing—prevents unnecessary expense while ensuring your machine returns to proper operation.
Determine When to Replace Burrs
Burr replacement becomes necessary when cleaning fails to restore grinding function, when visible damage exists to the burr teeth, or when the grinder has processed more than 500-1000 pounds of coffee (typical lifespan for consumer-grade burrs). Signs indicating burr replacement include inconsistent particle size distribution despite proper adjustment, noticeably increased motor noise during grinding, and visible damage such as chips, worn teeth, or warping when inspected. Breville offers model-specific replacement burrs—generic alternatives may fit physically but often produce different particle size distributions and can void warranty coverage.
Difficulty Level: Burrs replacement requires basic technical skills and takes about 20-30 minutes. More complex repairs like motor coupler replacement should only be attempted by mechanically inclined users comfortable with electrical components.
Prevent Future Problems
Once you’ve restored your grinder to proper working order, establishing appropriate maintenance habits prevents recurrence of noise-without-grinding issues. Prevention always proves easier and less expensive than repair, and a few simple habits can significantly extend your grinder’s trouble-free operation.
Bean selection and storage directly impact how quickly oil accumulates in your grinding mechanism. Extremely oily beans, while producing rich crema in espresso, accelerate burr contamination in Breville grinders. Consider alternating between oily and drier bean types, or selecting medium roasts for daily use with darker roasts reserved for occasional variety. Store beans in airtight containers away from heat and moisture—humid environments cause beans to absorb moisture, becoming more difficult to grind and more likely to clump in the mechanism.
Follow appropriate duty cycle limitations for your specific Breville model. Home-use grinders require rest periods between grinding sessions; continuous operation exceeding 30-60 seconds should be followed by equivalent cooling time. Extended grinding without rest causes motor overheating, coupler stress, and accelerated bearing wear that eventually leads to the noise-without-grinding symptom.
Model-Specific Solutions
Different Breville grinder models present unique considerations when diagnosing and resolving noise-without-grinding issues. Understanding your specific model’s configuration guides more effective troubleshooting and prevents frustration from applying inappropriate solutions.
The Barista Express uses a vertically configured conical burr set that makes it particularly susceptible to bean fragment accumulation when grind settings are too fine. Users often report a distinctive hollow grinding sound accompanying the no-grounds condition, as the motor runs without resistance from actual grinding. The grind size adjustment dial on the machine’s right side can become misaligned with actual burr positioning, so completely removing beans, accessing the adjustment mechanism through the hopper port, and manually rotating the adjustment while feeling for burr movement often restores function when the issue stems from mechanical binding.
The Smart Grinder Pro’s 40mm conical burr set with 60 grind settings provides exceptional adjustment precision, but this same precision makes the grinder more susceptible to setting-related failures. Small amounts of debris in the adjustment mechanism produce significant changes in burr positioning, and the LCD display may show normal operation while actual grinding fails—particularly after cleaning and reassembly.
When to Seek Professional Help
Some noise-without-grinding situations require professional service or indicate that replacement makes more sense than repair. Knowing when to involve a Breville-authorized technician prevents wasted effort and expense on repairs beyond safe DIY scope.
Warranty coverage typically applies to manufacturing defects and premature component failure for 1-2 years from purchase. Problems resulting from manufacturing defects like faulty motor couplers, defective burr bearings, or assembly errors usually qualify for warranty service. Normal wear, lack of cleaning, or foreign object damage typically falls outside coverage. Document your purchase date and retain receipts to facilitate any warranty claims.
For out-of-warranty machines with major component failures, calculate whether repair costs justify themselves against replacement—motor replacements or main board failures in integrated machines often approach or exceed the cost of new equipment.
By following this systematic approach—identifying symptoms, testing components, cleaning or replacing as needed, and establishing preventive maintenance habits—you can resolve most Breville grinder noise-without-grinding issues and keep your machine producing consistent, quality grounds for years to come.


