
Your Makita angle grinder suddenly stops mid-job, leaving you staring at a half-finished cut with a tool that won’t power up. You’re not alone—thousands of professionals face this frustrating situation each year when their reliable Makita grinders develop unexpected issues. Whether it’s a corded GA5030 that won’t start or a cordless XAG03Z experiencing excessive vibration, understanding how to diagnose and fix common problems can get you back to work faster than waiting for service. This guide delivers precise troubleshooting steps and repair solutions for the most frequent Makita grinder failures, saving you costly downtime and unnecessary replacement expenses.
Safety must come first when repairing any power tool. Always disconnect your Makita grinder from its power source before inspection—remove the battery from cordless models and unplug corded units completely. Wait at least five minutes for internal capacitors to discharge, especially on larger 9-inch models. Wear safety glasses to protect against metal shavings and work gloves to prevent cuts from sharp housing edges. Working in a clean, well-lit area with all necessary tools organized prevents rushed mistakes during critical repair stages.
Why Your Makita Grinder Suddenly Stops Working
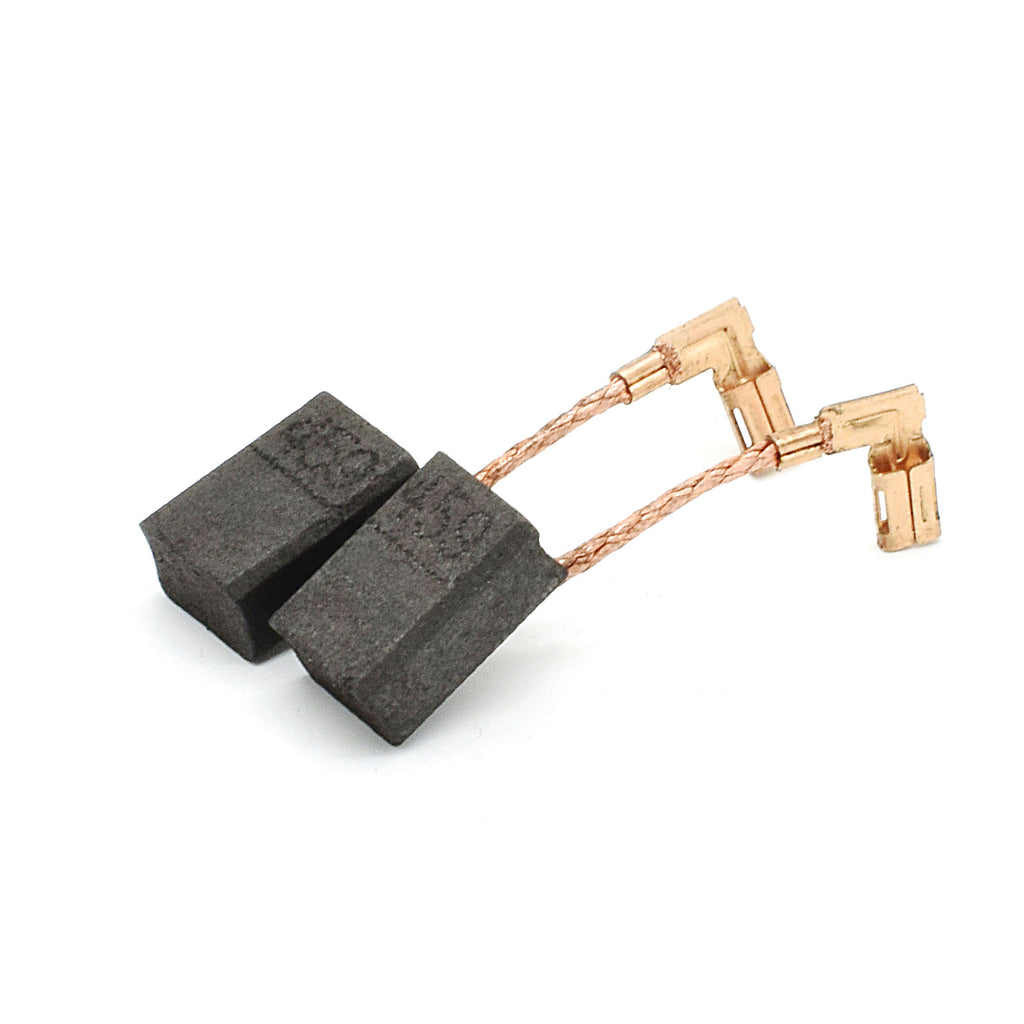
Electrical failures account for nearly 60% of Makita grinder breakdowns according to service center data. When your grinder cuts out unexpectedly during operation, carbon brush wear is the most likely culprit. These small components transfer electricity to the motor’s commutator and naturally degrade with use. As brushes wear down, they lose contact with the commutator, causing intermittent operation or complete failure.
How to Identify Worn Carbon Brushes
Remove the brush caps typically located at the rear of the motor housing using a small flathead screwdriver. Healthy brushes measure at least 1/2 inch in length with smooth contact surfaces. Brushes worn below 1/4 inch or showing deep pitting require immediate replacement. While inspecting, check the commutator for blue discoloration or scoring—these indicate overheating that may require professional armature servicing.
Testing Power Cord Integrity
Cord damage often occurs at stress points near the plug or tool housing. With the grinder unplugged, perform a cord continuity test using a multimeter. Set the meter to resistance mode and insert probes into the plug prongs. Flex the cord along its entire length while watching the meter; any fluctuation in resistance indicates internal wire damage requiring cord replacement. For cordless models, test battery contacts for corrosion and ensure proper seating in the tool.
Essential Tools for Makita Grinder Repairs

Having the right tools organized before starting prevents mid-repair frustration and potential damage to your grinder. Professional technicians recommend these specific items for successful Makita repairs.
Specialized Fastener Removal Tools
Makita grinders use security Torx and Phillips screws that require exact bit sizes. A high-quality bit set with #15 Torx (TR15) and #2 Phillips bits prevents stripped screw heads. For stubborn fasteners, apply penetrating oil and allow 10 minutes for it to work before attempting removal—forcing screws damages housing threads. Keep a magnetic parts tray nearby to prevent losing small components during disassembly.
Electrical Diagnostic Equipment
A digital multimeter with continuity testing capability proves invaluable for diagnosing electrical issues. Test switch functionality by checking for continuity when activated—if no signal passes through the switch, replacement is necessary. For motor testing, check for short circuits between windings and the motor housing; any reading below 1 megaohm indicates internal damage requiring professional repair.
Diagnosing Unusual Noises and Vibrations
That grinding noise or excessive vibration isn’t just annoying—it signals serious mechanical problems developing inside your Makita grinder. Identifying the source prevents catastrophic failure during operation.
Spindle Bearing Failure Symptoms
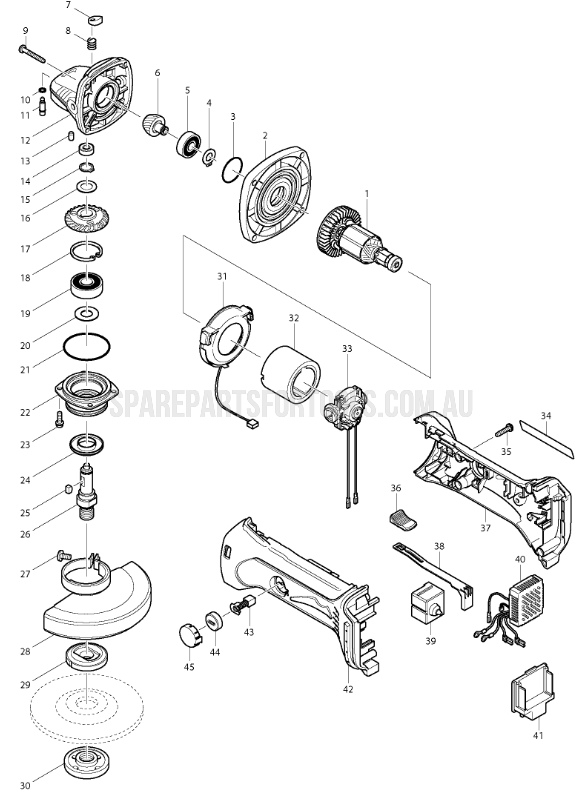
Worn spindle bearings create distinctive high-pitched whining that increases with speed. Check bearing condition by removing the grinding wheel and flange, then manually rotating the spindle shaft. Smooth rotation should occur with no grinding sensation or play. If you detect roughness or side-to-side movement, bearing replacement is required immediately—continued use damages the entire gear assembly.
Gear Train Damage Indicators
Damaged gears produce rhythmic clicking or grinding sounds that correspond with rotation speed. Disassemble the gear housing and inspect teeth for chipping, pitting, or uneven wear patterns. Healthy Makita gears show uniform tooth profiles without visible damage. When replacing gears, always install complete sets—mixing new and worn gears accelerates failure of the new components.
Step-by-Step Brush Replacement Procedure
Replacing carbon brushes ranks among the most common Makita grinder repairs and can be completed in under 20 minutes with basic tools. This critical maintenance task restores electrical contact and prevents motor damage.
Accessing the Brush Assembly
Locate the brush caps at the rear of the motor housing—typically two small covers secured with Phillips screws. Remove the screws using a precision screwdriver and set them aside in a labeled container. Gently pry the caps from the housing using a plastic opening tool to avoid damaging the plastic retaining clips.
Installing New Brushes
Remove the old brushes while noting their orientation—most Makita models position brushes at 90-degree angles to each other. Clean the brush channels with compressed air to remove carbon dust buildup. Insert new brushes ensuring the copper leads face outward and the carbon tips seat against the commutator. Reinstall the brush caps with proper alignment to prevent binding during operation.
Preventing Costly Gear Assembly Failures
Gear damage represents one of the most expensive Makita grinder repairs, often exceeding the cost of a new tool. Understanding preventive maintenance saves hundreds in replacement parts and labor.
Proper Lubrication Techniques
Makita specifies high-temperature gear grease for their grinders—never substitute automotive grease which breaks down under high-speed operation. Apply a pea-sized amount to each gear mesh point during reassembly—excessive grease attracts dust and creates operating resistance. Re-lubricate gears every 50 hours of operation or immediately if you notice unusual noise during use.
Correct Disc Installation Methods
Improper grinding disc installation causes 30% of premature gear failures. Always position the disc between the inner and outer flanges with the logo facing outward. Hand-tighten the retaining nut before using the spindle lock to secure it—never overtighten as this stresses the spindle bearings. Check disc alignment before each use; any wobble indicates improper installation that damages gears over time.
Critical Safety Checks Before Resuming Use
Returning a repaired Makita grinder to service without proper testing risks serious injury and additional damage. Professional technicians follow these verification steps before declaring a repair complete.
No-Load Operation Test
Reassemble the grinder without installing a grinding disc. Connect to power and operate at low speed for two minutes while monitoring for unusual noises, vibration, or overheating. Gradually increase speed while checking for smooth acceleration—any hesitation indicates electrical issues requiring further diagnosis. Verify the lock-on switch functions properly and disengages immediately when released.
Guard and Safety Feature Verification
Confirm the adjustable guard moves freely through its full range and locks securely at multiple positions. Test the spindle lock mechanism to ensure it engages positively when activated. Check all housing components for proper alignment and secure fastening—any gaps or misalignment indicates improper reassembly that could compromise safety during operation.
Extending Your Makita Grinder’s Service Life
Regular maintenance prevents 80% of common Makita grinder failures according to manufacturer data. Implement these simple practices to maximize your tool’s operational lifespan.
Post-Use Cleaning Protocol
After each job, remove the grinding wheel and clean air vents with compressed air to prevent overheating. Wipe the housing with a dry cloth to remove abrasive dust that accelerates component wear. Store the grinder in a dry location with the power cord loosely coiled—never wrap cords tightly around the tool as this damages internal wiring over time.
Monthly Maintenance Routine
Check carbon brush length monthly and replace when worn below 1/2 inch. Inspect the power cord for cuts or kinks that compromise electrical safety. Clean the spindle shaft with a light machine oil to prevent corrosion and ensure smooth wheel installation. Verify all fasteners remain tight but avoid overtightening which strips housing threads.
When to Seek Professional Service
While many Makita grinder repairs can be completed DIY, certain issues require specialized tools and expertise. Armature rewinding, commutator resurfacing, and complex electrical diagnostics should be handled by Makita-authorized service centers. If you’ve replaced brushes and the motor still fails to start, or if gear noise persists after bearing replacement, professional intervention becomes necessary. The cost of professional repair typically ranges from $75-$150, often less than replacing a quality grinder.
By following these precise troubleshooting steps and repair procedures, you’ll restore your Makita grinder to reliable operation while extending its service life through proper maintenance. Remember that safety always comes first—never operate a damaged grinder or attempt repairs without proper precautions. With regular care and attention to developing issues, your Makita angle grinder will deliver professional results for years of demanding jobsite use.


