
Angle grinders transform tough cutting jobs into manageable tasks, but improper use turns this versatile tool into a serious hazard. Knowing how to cut with a grinder properly separates DIY enthusiasts from those who end up in emergency rooms with preventable injuries. Every year, thousands suffer severe lacerations, eye damage, and burns from grinder accidents that could have been avoided with proper technique. Whether you’re slicing through steel pipes, trimming concrete blocks, or resizing metal brackets, mastering these cutting fundamentals ensures clean results while keeping you safe.
The difference between a professional-quality cut and a dangerous, frustrating experience comes down to three critical factors: selecting the right disc for your material, establishing proper body mechanics, and maintaining absolute control throughout the cut. Many beginners make the fatal mistake of treating grinders like saws—forcing them through materials instead of letting the disc do the work. This guide reveals the exact techniques professionals use to achieve precise cuts while minimizing risks. By the end, you’ll understand how to cut with a grinder on any common material with confidence and control.
Essential Safety Gear for Grinder Cutting Operations
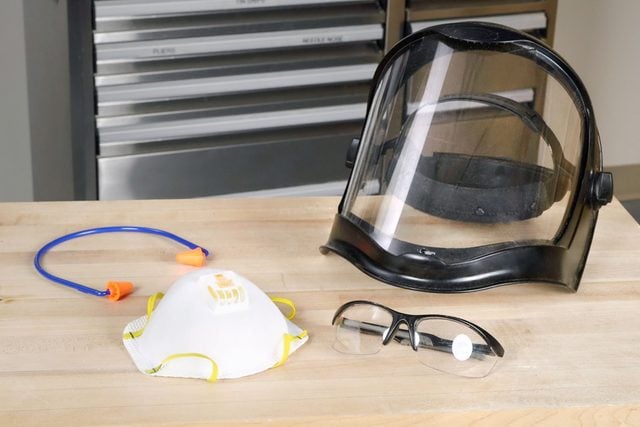
Before touching your grinder’s power switch, you must equip yourself with proper protective gear—no exceptions. Cutting generates high-velocity debris traveling at dangerous speeds, intense heat, harmful particulates, and deafening noise levels that can cause permanent damage in seconds.
Why Standard Safety Glasses Aren’t Enough for Grinder Work
Always wear a full-face shield in addition to ANSI Z87.1-rated safety glasses with side shields when operating a grinder. The face shield protects against catastrophic disc failures that can propel fragments at bullet-like speeds. Standard prescription glasses provide zero meaningful protection against these hazards. I’ve seen multiple cases where workers suffered severe facial lacerations because they skipped the face shield for “quick” cuts—don’t become the next statistic.
Critical Respiratory Protection for Different Cutting Applications
Your respiratory protection must match the material you’re cutting. For metal work, a basic N95 respirator suffices for short jobs, but for masonry, concrete, or tile cutting, you need a half-face respirator with P100 filters to capture hazardous silica dust. Cutting concrete without proper respiratory protection exposes you to crystalline silica, which causes incurable lung disease with just a few exposures. Remember: you can’t smell dangerous dust particles, so never assume the air is safe.
Hearing Protection That Actually Works for Grinder Noise
Angle grinders typically produce 95-110 decibels of noise—enough to cause permanent hearing damage after just 15 minutes of exposure. Foam earplugs with an NRR (Noise Reduction Rating) of 29-33 dB provide adequate protection for most cutting jobs. For extended work sessions, combine earplugs with over-ear muffs for maximum protection. Ignoring hearing protection might seem harmless today, but years of unprotected grinder use guarantees permanent tinnitus or hearing loss.
Choosing the Perfect Cutting Disc for Your Material
Using the wrong disc creates poor results, excessive wear, and dangerous situations. The disc you select determines whether you’ll achieve clean cuts or struggle with binding, overheating, and potential disc failure.
Metal Cutting Disc Selection Guide
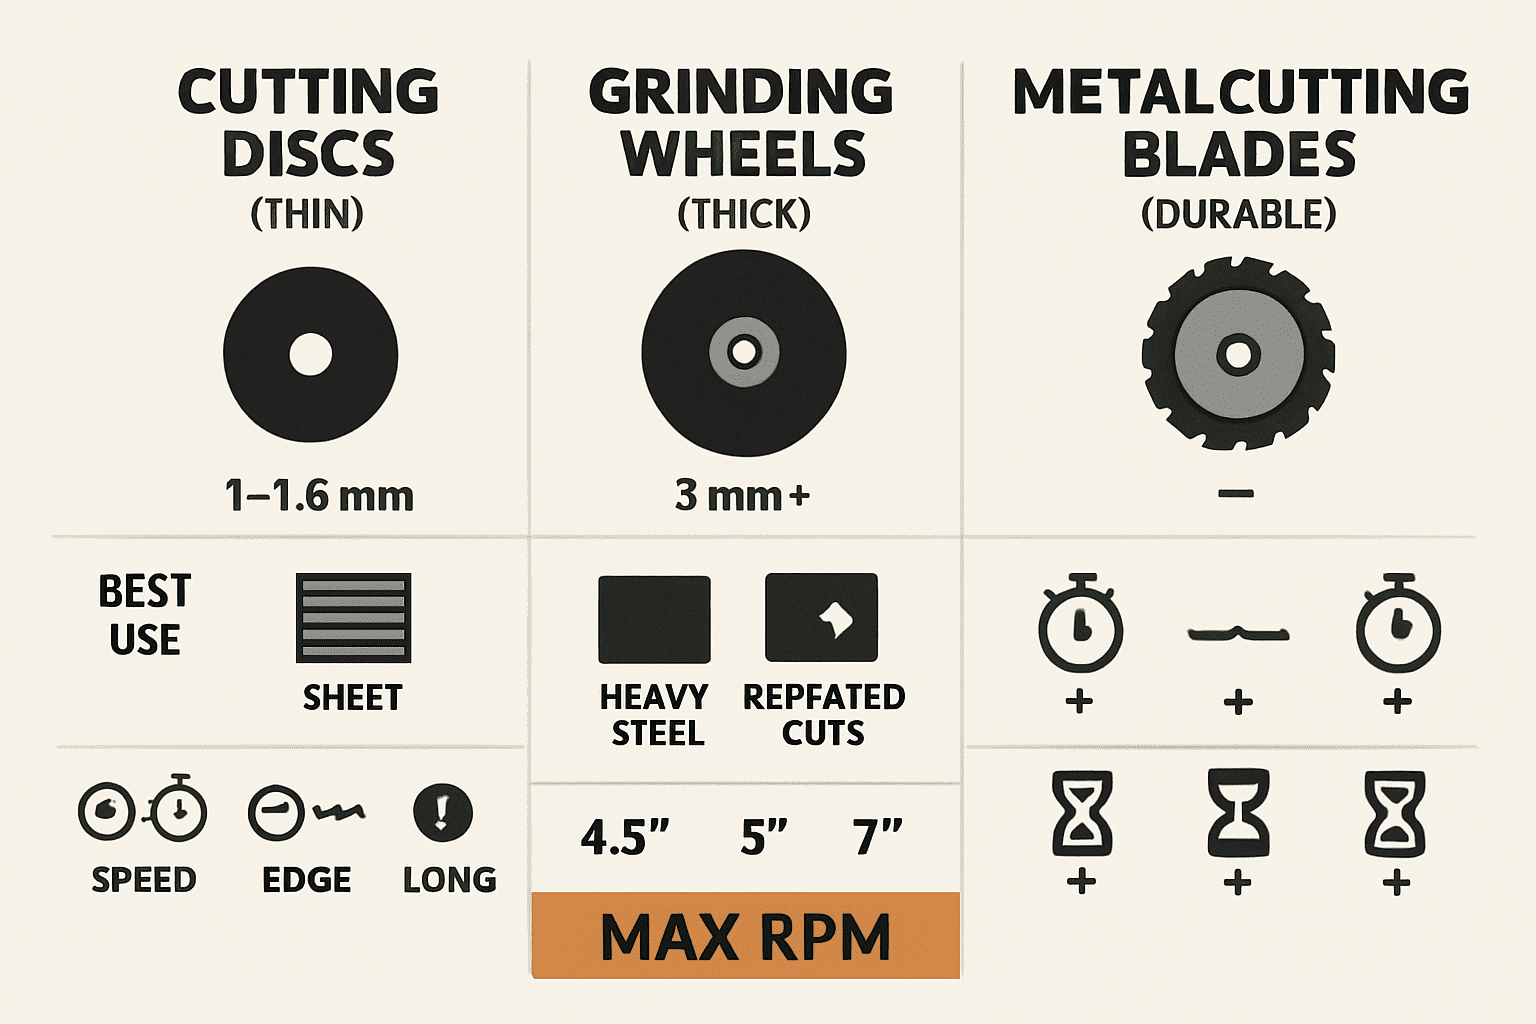
For steel and iron, use aluminum oxide abrasive discs rated for ferrous metals. When cutting stainless steel, select discs specifically designed for stainless to prevent chromium contamination that compromises corrosion resistance. Thin-kerf metal cutting discs (0.045-0.060 inches thick) remove less material, generate less heat, and last longer than standard discs. Never use a standard metal disc on stainless steel—it introduces carbon into the cut edge, creating rust spots later.
Masonry and Concrete Cutting Disc Requirements
Diamond-tipped blades are mandatory for cutting concrete, brick, or stone. For dry cutting, use segmented rim diamond blades that allow heat dissipation. When cutting tile or precision masonry work, opt for continuous-rim diamond blades with water cooling to prevent cracking and minimize dust. The diamond grit size matters too—fine grit (100-200) works best for hard, dense materials like granite, while coarse grit (30-60) cuts faster through softer materials like concrete block.
Critical Disc Safety Checks Before Installation
Always inspect discs for damage before mounting. Hold the disc up to light and rotate it slowly, checking for cracks, chips, or uneven wear. Tap the disc gently with a non-metallic object—it should produce a clear, ringing sound. A dull thud indicates internal damage that could cause catastrophic failure during use. Verify the disc’s maximum RPM rating exceeds your grinder’s speed (typically 10,000-12,000 RPM for 4.5-inch grinders). Never use a disc rated below your tool’s operating speed.
Proper Grinder Setup for Maximum Control
Your grinder’s setup directly impacts cutting precision and safety. Skipping these critical steps invites dangerous kickback and poor results.
Correct Disc Mounting Technique for Vibration-Free Operation
With the grinder unplugged, place the backing flange on the spindle, then the disc, followed by the front flange. Tighten the nut just enough to eliminate play—over-tightening warps discs and damages bearings. For optimal control, position the side handle at 90 degrees to the grinding plane when cutting. This configuration gives you maximum leverage to counteract kickback forces. Always rotate the guard to protect your body from sparks and potential disc fragments—never remove or modify the guard.
Establishing the Perfect Cutting Stance
Stand with feet shoulder-width apart, your dominant foot slightly forward. Bend your knees slightly and keep your back straight—never lean over the workpiece. Position your body to the side of the cutting path, never directly behind it. This stance gives you stability if kickback occurs and allows smooth, controlled movement. Keep both hands firmly on the tool at all times—never operate a grinder with one hand. Your grip should be firm but relaxed; white-knuckled tension fatigues you quickly and reduces control.
Material-Specific Cutting Techniques That Deliver Professional Results
Each material requires unique cutting approaches to maximize efficiency while maintaining safety. Applying the wrong technique creates poor results and increases risks.
Cutting Steel Pipe Without Distortion
Mark your cut line completely around the pipe with a scribe or permanent marker. Secure the pipe in a vise with the cut line just above the jaws to prevent vibration. Start the cut at the top of the pipe and work downward, rotating the pipe as needed. Apply light, consistent pressure—forcing the cut causes binding and distortion. For thin-walled pipe, pause every 90 degrees to allow heat dissipation. After cutting, use a deburring tool to remove sharp edges before handling.
Concrete Cutting Without Excessive Dust
When cutting concrete, use a diamond blade with water cooling whenever possible. If dry cutting is necessary, attach a dust shroud with vacuum collection. Score the cut line with a shallow initial pass, then gradually deepen the cut in multiple passes. Let the blade work at its natural pace—pressing harder creates excessive heat that damages the diamond segments. Keep the blade moving steadily through the material; stopping in one spot causes localized overheating and potential cracking.
Tile Cutting Without Cracks or Chips
For ceramic or porcelain tile, use a continuous-rim diamond blade with water cooling. Clamp a straightedge guide along your cut line to maintain perfect alignment. Start with a light scoring pass, then gradually deepen the cut while keeping the tile fully supported on both sides of the cut line. Apply slightly more pressure than with metal but maintain smooth, consistent movement. If cutting near the tile edge, support the waste piece to prevent cracking as you complete the cut.
Troubleshooting Common Grinder Cutting Problems
When cuts go wrong, identifying the cause quickly prevents wasted materials and dangerous situations.
Why Your Grinder Keeps Binding During Cuts
Binding occurs when the disc catches in the material, causing sudden kickback. This usually happens when you’re cutting too aggressively or the disc isn’t appropriate for the material. Reduce your feed pressure significantly and let the disc cut at its natural pace. Verify you’re using the correct disc type—metal cutting discs on masonry or vice versa causes immediate binding. Check that your material is properly secured; movement during cutting creates binding points.
Fixing Uneven or Jagged Cut Edges
Jagged cuts typically result from disc wobble, incorrect cutting direction, or improper technique. First, verify your disc is mounted correctly and not damaged. Ensure you’re cutting with the disc rotation (downcutting) rather than against it. Maintain consistent pressure and speed throughout the cut—varying your feed rate creates uneven edges. For straight cuts, use a guide clamped to your material rather than relying on freehand control.
Grinder Maintenance Practices That Extend Tool Life
Proper maintenance keeps your grinder running smoothly and prevents dangerous failures during critical cuts.
Cleaning Disc Buildup Between Projects
Metal cutting discs develop glazing from material buildup that reduces cutting efficiency. Remove this with a wire brush while wearing eye protection. For diamond blades, use a dedicated blade cleaner or soak in mineral spirits to remove resin buildup. Never use a damaged or heavily glazed disc—replace it immediately. Store discs flat in their original packaging to prevent warping that causes vibration during use.
Recognizing When to Replace Worn Components
Check your grinder’s power cord regularly for cuts or fraying that could cause electrical hazards. Inspect the spindle for excessive play that indicates worn bearings. Replace the guard if it shows cracks or deformation. Discs should be replaced when the cutting edge wears to within 1/8 inch of the mounting flange or when they no longer cut efficiently. Continuing to use worn components risks dangerous failures during operation.
Mastering how to cut with a grinder transforms this powerful tool from a potential hazard into your most versatile workshop asset. By selecting the right disc, establishing proper safety protocols, and applying material-specific techniques, you’ll achieve clean, precise cuts while minimizing risks. Remember that patience and proper technique always outperform brute force—let the disc do the work, maintain consistent control, and never compromise on safety gear. Start with simple projects to build your confidence, and soon you’ll tackle complex cutting jobs with professional results. Your future self will thank you for taking the time to learn these techniques correctly from the beginning.


