
Your basement floor is wet with sewage, fixtures are backing up, and that unmistakable odor tells you: your grinder pump is overflowing. This emergency requires immediate action to prevent property damage and health hazards. When your grinder pump system fails, wastewater can’t move to your septic tank or sewer line as designed, creating unsanitary conditions throughout your home. Understanding why your grinder pump is overflowing—and knowing how to diagnose and fix the problem—can save you from costly emergency repairs and the unpleasant experience of sewage in your home.
Grinder pump overflowing rarely has a single cause. A blockage in the discharge pipe might trigger the overflow, while a failing float switch prevents proper activation, and a malfunctioning check valve allows water to flow back into the basin. Each of these problems requires a different solution, yet they all result in the same frustrating symptom: water backing up where it shouldn’t. This guide walks you through the most common causes of grinder pump overflow, provides systematic troubleshooting procedures, and helps you determine whether you can resolve the issue yourself or need professional assistance.
Why Your Grinder Pump Suddenly Starts Overflowing
Recognizing these warning signs early can prevent a full-blown sewage emergency in your home. Sewage backing up into low-lying fixtures like basement showers, floor drains, or toilets indicates your system can’t move wastewater properly. Don’t wait until you see this obvious sign—by then, the overflow condition has been developing for some time.
Water pooling around your grinder pump location—often in a basement utility room or outdoor pump pit—suggests immediate leakage or overflow during operation. Check for dampness, puddles, or visible sewage coming up around the pump basin lid. Many systems include alarm indicators that activate when water levels rise too high, providing crucial early warning before backup occurs.
A pump that runs continuously without shutting off is perhaps the most telling sign of developing overflow conditions. Under normal operation, your grinder pump should run for about 30 minutes to empty the basin, then shut off until water levels rise again. If it runs constantly or cycles almost continuously with only brief shutoff periods, water is entering the basin faster than the pump can discharge it. This pattern inevitably leads to overflow if not addressed immediately.
How Clogs Trigger Grinder Pump Overflowing
Blockages represent the most frequent cause of grinder pump overflowing, and you can often resolve them with basic troubleshooting. Begin by turning off electricity at the circuit breaker—this is essential for safety before opening the tank or touching internal components.
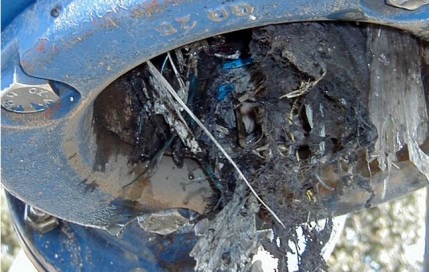
The float switch frequently becomes obstructed by grease, debris, or solid waste that accumulates on and around it. Open the tank lid and visually inspect the float for any buildup. If debris is present, clean the float thoroughly, ensuring it can move freely through its full range of motion. A restricted float cannot trigger the pump correctly, leading directly to overflow conditions.
Inspect the pump intake and grinding mechanism for debris wrapped around the impeller. Remove visible obstructions, but take note of your grinding blades’ condition. Worn or dull blades cannot process waste efficiently, causing the pump to work harder and potentially leading to overheating and failure. If blades appear damaged, professional service may be necessary.
For stubborn clogs, temporarily disconnect the discharge pipe and pump into a 5-gallon bucket for a few seconds—this confirms whether the pump is functioning properly. If the pump works but overflow continues, the blockage likely exists in your discharge system rather than the pump itself.
Fixing Float Switch Problems Causing Overflow
Your float switch controls pump activation based on water level, and when it malfunctions, grinder pump overflowing follows quickly. A stuck float cannot move through its full range of motion, either failing to rise high enough to trigger the pump or failing to fall low enough to stop it.
To test float switch functionality safely, ensure power is off at the breaker, then manually tilt the float in both directions. The pump should activate when you tilt the float up and deactivate when you tilt it down. If the pump stays on or off regardless of float position, the switch is faulty and requires replacement.
Replacing a float switch involves disconnecting the old switch from its mounting bracket and electrical connections, then installing the new switch in the same position. The new switch must be oriented correctly to respond to water level changes as intended. After installation, test the switch manually before restoring power.
Sometimes the float switch is functional but cannot move freely due to accumulated debris or improper positioning. Cleaning the float and ensuring unobstructed movement often resolves activation issues without requiring replacement. Check that nothing in the basin is blocking the float’s path, including accumulated sludge or shifted components.
Solving Check Valve Failures That Cause Overflow

The check valve on your discharge piping prevents wastewater from flowing back into the basin after the pump cycle completes. When this valve malfunctions, water drains back from uphill, causing the pump to run more frequently and eventually leading to overflow conditions.
A broken check valve flapper is a common failure mode. The flapper inside the valve can break off entirely, plugging the discharge pipe, or it can fail to seal properly, allowing water to return to the basin. In either case, the pump struggles to empty the basin completely, triggering repeated cycles that stress the system.
Testing check valve function requires observing pump cycling patterns. If the pump runs for 30 minutes but shuts off for only 5 minutes, the check valve may not be sealing properly. A properly functioning check valve should allow extended off periods between pump activations.
Replacing a faulty check valve typically requires professional service, as the valve is located on the discharge piping and may be difficult to access. The replacement valve must match your system specifications—some installations use traditional flapper-style valves, while others use normally open valves that may provide more reliable long-term performance.
Electrical Issues That Lead to Grinder Pump Overflow
Electrical problems can prevent your grinder pump from operating entirely or cause it to run inappropriately, leading directly to overflow conditions. A systematic approach to electrical troubleshooting helps identify these issues safely.
Begin by checking the circuit breaker serving the pump. If the breaker has tripped, reset it and observe whether the pump restarts normally. If the breaker trips again immediately, do not continue resetting it—this indicates an overload condition, short circuit, or ground fault that requires professional diagnosis.
Inspect the control panel for any alerts, indicators, or error codes that might identify the specific problem. Many grinder pump systems include alarm features that activate when water levels rise too high, providing warning before overflow occurs.
Examine all wiring connections for looseness, corrosion, or damage. Vibrations and temperature changes can cause connections to loosen over time, leading to intermittent operation or complete failure. Look for frayed wires, corroded terminals, or signs of overheating such as discoloration.
Power outages render grinder pump systems completely inoperative, making it essential to minimize water usage during electrical failures. If you experience frequent outages, consider installing a battery backup system to maintain pump operation during power interruptions.
Stopping Continuous Pump Operation That Causes Overflow

A grinder pump that runs continuously or for excessively long cycles without properly shutting off will eventually cause overflow. Identifying and addressing the cause of continuous operation prevents system damage and restores normal function.
A faulty float switch that fails to signal pump shutdown is a common cause of continuous running. Testing the float switch by manually tilting it reveals whether it properly controls pump activation. If the pump continues running regardless of float position, the switch requires replacement.
A check valve that does not seal properly creates a backflow condition where water returns to the basin as soon as the pump stops, immediately triggering another pump cycle. This short-cycle pattern keeps the pump running frequently with minimal off time. The check valve requires replacement to restore normal operation.
Excessive water entering the basin from unexpected sources can overwhelm the pump’s capacity. A leaking toilet can introduce up to 500 gallons per day into the system—enough to keep a pump running almost constantly. Water softener discharge lines that empty into the pump basin add significant volume during regeneration cycles.
Preventing Future Grinder Pump Overflow Emergencies
Proactive maintenance prevents most grinder pump overflowing situations. Establishing regular inspection routines and educating household members about proper drainage practices protects your system from problems.
Monthly visual inspections help identify developing problems before they cause emergency overflow. During inspections, listen for unusual sounds during pump operation, observe cycling patterns and duration, look for signs of leaks, and verify that the float switch moves freely.
Never flush or drain materials that cause clogs, including grease, oil, cat litter, hygiene products, wipes, paper towels, and large food scraps. Post guidelines near drains to ensure all household members understand proper disposal practices.
Proper initial installation prevents many overflow problems. The pump must be buried below the local frost line to prevent freezing issues, and the discharge piping must be properly configured with appropriate slope and check valves.
When to Call a Professional for Grinder Pump Overflow
Certain grinder pump overflowing situations require professional expertise to resolve safely and effectively. Complex electrical issues involving the control panel, wiring, or motor connections should be handled by licensed technicians. Attempting electrical repairs without proper training creates safety hazards.
Persistent overflow problems that do not respond to basic troubleshooting indicate underlying issues requiring professional diagnosis. Specialists have the tools and knowledge to identify root causes that may not be apparent during initial assessment.
Pump replacement is a significant undertaking that typically requires professional installation. Proper sizing, electrical connection, and configuration are essential for reliable operation.
Signs of severe damage, including visible pump damage, significant corrosion, or evidence of long-term neglect, indicate that professional evaluation is necessary. Most grinder pumps have expected service lives of 7 to 15 years depending on usage and maintenance—planning for replacement before failure occurs prevents emergency situations and property damage.


