
Struggling with gritty protein shakes or mysterious leaks from your shaker bottle? You’re not alone. Over 70% of BlenderBottle users never unlock its full potential, wasting money on clumpy disasters and premature replacements. This guide reveals exactly how to use Blender Bottle like a fitness professional—transforming it from a frustrating gadget into your most reliable nutrition tool.
Mastering your BlenderBottle starts with understanding its engineering: that stainless steel BlenderBall creates a vortex that pulverizes lumps when used correctly. But skip one critical step—like adding powder before liquid—and you’ll battle stubborn clumps every time. In the next 12 minutes, you’ll learn pro techniques for flawless shakes, ingredient hacks most miss, and cleaning secrets that make your bottle last years longer.
Pre-Use Safety & Setup Checklist
First-Time Wash Protocol You Can’t Skip
Never skip this step—factory residues cause early odors and affect taste. For standard models (Classic, ProSeries), disassemble all parts and place the BlenderBall in your dishwasher’s silverware bin while other components go on the top rack. Critical exception: The insulated Radian model requires hand-washing only; dishwasher heat warps its double-wall construction. After washing, air-dry every component completely—trapped moisture in lid crevices causes the “protein funk” that ruins bottles.
Damage Inspection Before Every Use
Skipping this 10-second check risks leaks and contamination. Before loading ingredients, verify:
– Cracks near threads (common after drops)
– BlenderBall wire integrity (bent wires won’t create proper vortex)
– Flip cap seal smoothness (nicks cause leaks)
– Measurement line visibility (faded markers lead to over/under-mixing)
Replace immediately if defects exist—using damaged parts voids warranties and creates safety hazards with pressure buildup.
Perfect Shake Assembly Sequence
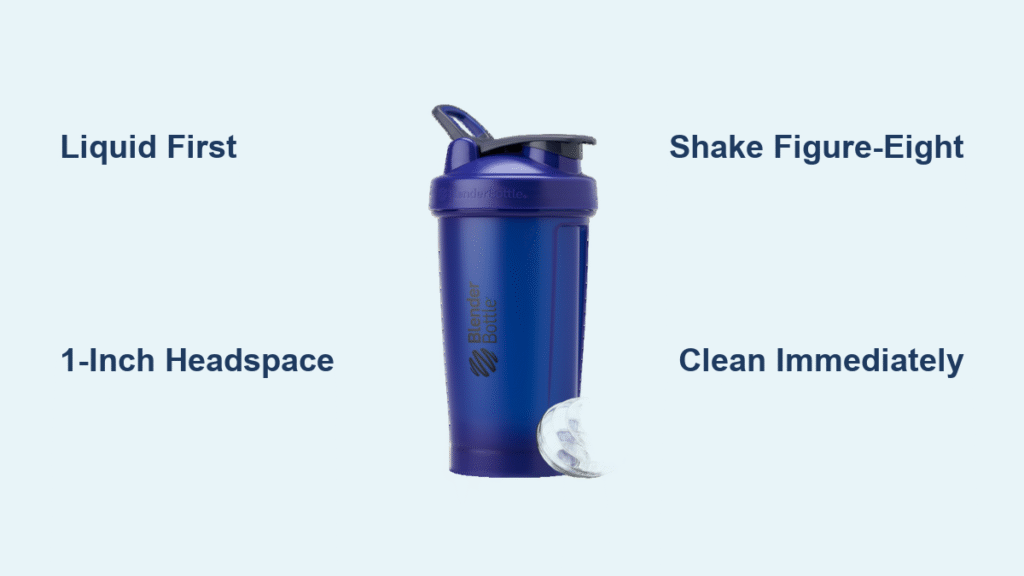
Liquid-First Loading Technique
Adding ingredients in wrong order causes 90% of clumping issues. Follow this exact sequence:
1. Drop BlenderBall into empty bottle
2. Pour base liquid (water, milk, or room-temperature coffee) to 1/3 full
3. Add powders (protein, superfoods)
4. Layer thick ingredients (nut butters, yogurt)
5. Top with liquid to leave 1-inch headspace
6. Screw lid until resistance, then one firm quarter-turn
7. Snap flip cap until audible click
Liquids first create a cushion that prevents powders from sticking to the bottom. That 1-inch headspace is non-negotiable—it prevents explosive leaks from pressure buildup.
Professional Shaking Motion
Grip the bottle’s upper third (never the base) and rotate your wrist in smooth figure-eights for 15 seconds. Jerky shaking forces liquid around the BlenderBall instead of through it. The surgical-grade steel whisk must tumble freely to create the vortex that eliminates lumps. Stop immediately if you hear metal-on-plastic sounds—this means the BlenderBall is stuck, causing ineffective mixing and potential damage.
Ingredient Hacks Most Users Miss
Safe vs. Dangerous Additives
Always use:
– Cold liquids below 175°F (water, almond milk, room-temp coffee)
– Powders (whey, plant-based protein)
– Soft add-ins (chia seeds soaked 5 minutes, yogurt)
Never use:
– Hot coffee/tea (creates scalding pressure explosions)
– Carbonated drinks (forces flip cap open mid-shake)
– Raw egg whites or pancake batter (bacterial growth risk)
Thick ingredients like peanut butter require special handling: add 1 tablespoon after powders, then top with extra liquid. This prevents the “butter plug” that blocks the BlenderBall’s movement.
Overnight Shake Prep System
Pre-mix complete shakes the night before by:
1. Adding all ingredients except ice
2. Storing upright in refrigerator
3. Shaking 5 seconds before drinking
4. Adding ice cubes just before consumption
This method saves 7+ minutes daily but requires precise liquid ratios—use the bottle’s measurement markers to avoid overflow. Never store with ice inside; melting dilutes your shake and promotes bacterial growth in damp crevices.
Critical Safety Rules to Prevent Injuries
Temperature Danger Zones
175°F is your absolute limit—hotter liquids create steam pressure that sprays scalding contents when opening the flip cap. A recent study found bottles with 190°F liquid generated 3x atmospheric pressure, causing violent eruptions. Never:
– Add coffee straight from the brewer
– Microwave the bottle (even “microwave-safe” models)
– Freeze with liquid inside (expansion cracks plastic)
When in doubt, test liquid temperature with your wrist—it should feel cool, not warm.
Pressure Hazard Protocol
If accidentally mixing pressure-causing ingredients (like carbonated protein drinks):
1. Hold index finger firmly over flip cap during shaking
2. Point spout away from your face and others
3. Open cap slowly in a downward motion
4. Never shake >10 seconds with these ingredients
One user reported bottle shattering from shaking coconut water too vigorously—always prioritize safety over convenience.
Cleaning Methods That Erase Odors Forever

30-Second Post-Shake Rinse
Protein residue hardens within minutes. Immediately after drinking:
1. Rinse under warm running water
2. Disassemble flip cap mechanism (remove silicone seal)
3. Scrub BlenderBall with bottle brush
4. Air-dry upside down with lid off
Skipping this step guarantees permanent odors—dried protein bonds to plastic at a molecular level. For white Radian lids, wipe discoloration immediately with vinegar-dampened cloth.
Deep Clean for “Hopeless” Bottles
For neglected bottles with yellow stains and sour smells:
1. Fill with 1:1 white vinegar and warm water
2. Soak overnight with flip cap open
3. Scrub threads with toothbrush
4. Rinse thoroughly and sun-dry 6 hours
The vinegar breaks down protein polymers while sunlight kills odor-causing bacteria. Avoid baking soda alone—it temporarily masks smells but doesn’t remove the source.
Troubleshooting Real User Nightmares
Fixing Permanent Leaks in 60 Seconds
Leaking almost always stems from three issues:
– Torn flip cap seal: Replace with free kit from BlenderBottle.com
– Cross-threaded lid: Unscrew completely, realign threads, and tighten gently
– Overfilling: Leave that 1-inch headspace—measure using the bottle’s markings
If leaks persist, inspect the lid’s internal gasket for hairline cracks under bright light.
Eliminating Unshakeable Clumps
When powder refuses to dissolve:
1. Verify powder freshness (expired protein clumps irreversibly)
2. Increase liquid ratio by 20%
3. Shake for full 15 seconds (time it!)
4. Add powder after liquid in next shake
For stubborn collagen or casein, pre-mix powders with 2 oz liquid in a cup before adding to the bottle.
Pro Longevity Hacks
BlenderBall Replacement Schedule
Surgical steel lasts years but welds weaken after 18 months of daily use. Replace when:
– Wires show visible bends
– It rattles excessively during shaking
– Mixing time increases beyond 20 seconds
A fresh BlenderBall costs $3.99 and restores vortex efficiency—don’t wait for complete failure.
GoStak System Optimization
Pre-measure powders into stackable jars by:
1. Filling jars to the “1 scoop” line
2. Stacking with clockwise turns until click
3. Storing upright in cool, dark place
This prevents pre-clumping from humidity exposure. Never store powders directly in the main bottle—moisture from breath during drinking degrades quality.
Mastering how to use Blender Bottle transforms it from a basic shaker into your nutrition command center. By following these precise techniques—liquid-first loading, pressure-safe practices, and immediate deep cleaning—you’ll eliminate clumps and leaks forever. Remember the golden rule: that stainless steel BlenderBall needs free movement to work, so never overfill or skip the 1-inch headspace. Implement just the overnight prep system and odor-elimination trick this week, and you’ll save hours while getting smoother shakes. Your bottle’s built-in measurements and leak-proof seal make perfect nutrition portable—when you know exactly how to use it.


