
That new Ninja 1100-watt blender sitting on your counter isn’t just another kitchen gadget—it’s a culinary powerhouse that can transform frozen fruit into velvet-smooth smoothies and ice cubes into snow in seconds. But if you’ve ever stared at its blinking red light after carefully following the manual, you’re not alone. How to use Ninja Blender 1100 properly hinges on mastering one critical element: its precision safety alignment system. Most “broken blender” complaints actually stem from misaligned components—not mechanical failure. This guide cuts through the confusion with battle-tested techniques from real user experiences, so you’ll unlock your blender’s full potential from day one.
What separates frustrated users from smoothie masters? Understanding that every click, rotation, and arrow alignment serves a purpose in this 1100-watt machine. When positioned correctly, you’ll feel the satisfying snap of components locking into place—the unmistakable signal your blender is ready to crush ice like a commercial unit. Skip this step, and you’ll waste hours troubleshooting phantom malfunctions. By the end of this guide, you’ll diagnose blinking lights in seconds, blend hot soups safely, and maintain your machine for years of trouble-free use.
Master the Safety Alignment System That Prevents 90% of Failures
Your Ninja 1100’s refusal to power on isn’t a defect—it’s a safety feature working exactly as designed. Three components must align with surgical precision before the motor engages. Get this right, and you’ll avoid the most common user error reported in Ninja support tickets.
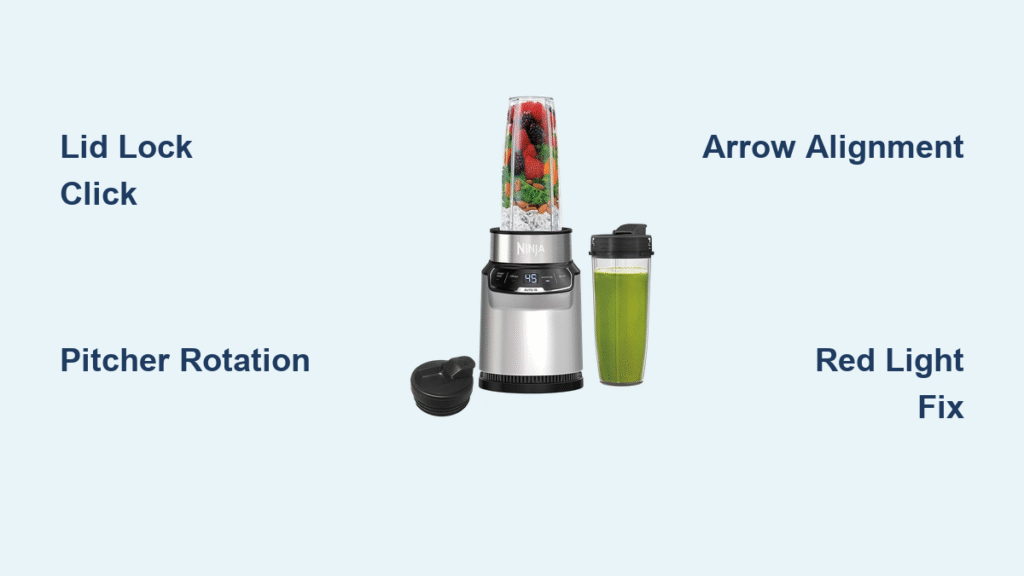
Lid Lock Positioning: The Critical First Click
Position the lid with its spout pointing directly away from the pitcher handle (180 degrees opposite). This alignment exposes a small cut-out in the lid’s rim that must sit precisely over the handle. As you close the lid handle, a hidden pin extends through this cut-out to activate the safety switch. Press down with firm, even pressure until you hear a definitive click—this isn’t gentle seating. Many users stop short of full engagement, causing the infamous “won’t start” scenario. If resistance feels uneven, lift and reposition the lid before trying again.
Container Seating Technique: Rotation Matters
Place the pitcher on the base with the handle in either the front-right or front-left corner—not centered. Rotate clockwise until it clicks into the locked position. You should feel smooth, consistent resistance throughout the rotation. If it grinds or sticks, immediately lift and reposition the pitcher—forcing it can damage the internal safety pin. That slight protrusion on the handle’s underside must engage the base’s micro-switch; when properly seated, the pitcher sits rock-solid with zero wobble. Never position the handle straight back, as this misaligns the critical safety pin.
Arrow Alignment Check: The Final Verification Step
After securing the lid and pitcher, verify the white arrow on the lid aligns perfectly with the arrow on the handle. These markings exist for one reason: to confirm the lid’s cut-out is positioned over the handle’s activation point. Misaligned arrows = no power, even if everything else seems correct. Rotate the lid in 5-degree increments while applying downward pressure until both arrows lock into perfect parallel. When all three elements—lid click, pitcher rotation, and arrow alignment—click into place, the difference is unmistakable: the entire assembly feels immovable and solid.
Power-On Sequence That Actually Works Every Time
Forget confusing manual diagrams. This foolproof startup method prevents the alignment errors causing most “broken blender” panic.
Step-by-Step Startup Protocol
- Test your outlet first—plug in your phone charger to confirm power availability
- Load ingredients in this order: Liquids first (minimum ¼ cup), soft ingredients next, frozen items last
- Lock the lid with firm downward pressure until you hear/feel the definitive click
- Rotate pitcher into front-right or front-left position until resistance disappears with a click
- Verify display shows “0” (not two dashes)—this confirms micro-switches are engaged
Critical mistake to avoid: Never exceed the max fill line. Overfilling creates pressure that prevents proper lid sealing, triggering safety shutdowns during operation. For thick blends like nut butter, use 50% capacity max.
Speed Selection Mastery: When to Use Each Setting
- Speed 1 (Low): Perfect for emulsifying salad dressings or mixing pancake batter without over-processing
- Speed 2 (Medium): Your daily driver for smoothies and soup blending—runs cooler for extended periods
- Speed 3 (High): Only for ice crushing and frozen fruit—never run continuously beyond 60 seconds
- Pulse Function: Essential for chunky salsas or controlled chopping—press firmly for full power bursts
Pro Tip: For frozen ingredients, pulse 5 times for 3 seconds each before continuous blending. This prevents motor strain and creates smoother textures than straight high-speed operation.
Single-Serve Mode: Avoid These Two Critical Errors
The single-serve function operates completely differently than the pitcher—but most users make the same two mistakes that cause leaks and shutdowns.
Remove the large pitcher entirely before attaching the single-serve cup—don’t just set it aside. Fill your 16-24 oz cup directly, remembering the liquid-first rule. Screw the blade assembly lid on clockwise with firm pressure until you hear a second click (most users stop after the first). Now invert the cup and place it directly onto the base. The handle must point front-right—center positioning won’t activate the safety switch. Press the single-serve button; if lights blink red, recheck lid tightness and handle position. Never blend hot liquids in single-serve cups due to pressure buildup risks.
Decoding Red Blinking Lights: Instant Fixes That Work

That red light isn’t a death sentence—it’s your blender’s diagnostic system. Each blink pattern reveals the exact misalignment.
Immediate Red Light Solutions
- Single blink: Lid not fully locked—apply 5 extra pounds of downward pressure
- Double blink: Pitcher handle mispositioned—rotate to front-right corner only
- Continuous blink: Arrow misalignment—rotate lid in 2-degree increments while pressing down
- No blink, just red: Power issue—test outlet with another appliance immediately
When red light means serious trouble: If you see two dashes instead of “0” after alignment checks, micro-switches have failed. Try the “firm reseating” technique: lift pitcher 3 inches and drop it while rotating into position. If unsuccessful, contact Ninja support—this typically requires warranty replacement.
Clean Like a Pro: Prevent Blade Damage and Odors
Improper cleaning causes 30% of Ninja 1100 failures. Follow this protocol to protect your investment.
Immediate Post-Use Protocol
Rinse the lid and blade assembly under hot water within 60 seconds of use—dried residue jams safety mechanisms. Fill the pitcher with hot, soapy water and pulse for 3 seconds maximum; never submerge blades in standing water. Never hand-scrub blades—their surgical sharpness makes them dangerous when wet. Air-dry components separately on a rack; storing damp parts creates mold in gasket crevices.
Deep Cleaning Without Damage
Hand-washing extends part lifespan by 2+ years. Use a bottle brush to clean the pitcher’s interior, focusing on the gasket groove where food particles hide. For stubborn residue, soak components in warm vinegar solution for 10 minutes before rinsing. Never put the base unit in water—clean buttons with cotton swabs dipped in isopropyl alcohol. Dishwasher use is acceptable but accelerates plastic degradation; always place parts on the top rack only.
Performance Optimization: Unlock Commercial Results at Home
Maximize your 1100 watts with pro techniques that prevent overheating and motor strain.
Ingredient Loading Strategy That Prevents Air Pockets
Start with ½ cup liquid minimum to create the vortex that pulls ingredients downward. Add soft fruits like bananas next, then frozen items last. For ice crushing, pulse 10 times for 2 seconds each before continuous blending—this prevents ice chunks from jamming blades. Never blend hot liquids above 120°F; cool soups to room temperature first to avoid dangerous pressure buildup.
Critical Processing Limits to Avoid Burnout
- Maximum runtime: 60 seconds at Speed 3, then 60-second cool-down
- Fibrous vegetables: Cut kale or celery into 1-inch pieces to prevent motor strain
- Thick mixtures: Use pulse function for nut butters—continuous blending overheats the motor
- Ice capacity: Never exceed 2 cups of standard ice cubes per blend
Expert Note: If the motor shuts off during heavy use, let it rest 5 minutes before retrying. Forcing continuous operation past safety limits can permanently damage the circuit board.
Monthly Maintenance That Doubles Lifespan
Implement this 5-minute routine to prevent 80% of Ninja 1100 failures:
- Deep clean all components with vinegar solution to remove mineral deposits
- Inspect power cord for kinks or fraying near the base connection
- Check blade sharpness—dull blades strain the motor (replace every 18 months)
- Listen for abnormal noises during test blends—grinding sounds indicate worn bearings
- Store with lid off to prevent odor retention in the gasket
When alignment fixes fail and blinking lights persist, contact Ninja support with your model number. They typically provide expedited replacements for micro-switch failures without requiring defective unit returns. Keep your receipt—most issues within 2 years qualify for warranty coverage.
Master these precise techniques, and your Ninja Blender 1100 transforms from a frustrating puzzle into your most reliable kitchen tool. Within days, you’ll blend frozen ingredients into restaurant-quality textures while avoiding the alignment pitfalls that plague new users. Remember: that satisfying click isn’t just noise—it’s the sound of 1100 watts of power waiting for your command. Now go make that perfect smoothie—you’ve earned it.


