

That unmistakable Dairy Queen Blizzard texture—thick enough for the cup to flip upside down without spilling, packed with evenly distributed mix-ins—is pure magic. But if you’re staring at your regular Ninja blender instead of a Ninja Creami, you’ve probably ended up with a melted milkshake more times than you’d like to admit. Here’s the hard truth: Standard Ninja blenders struggle with Blizzard texture because their high-speed blades heat and aerate ice cream too quickly. But with ice-cold prep, precise timing, and a clever thickener trick, you can create a respectable spoon-standing dessert. This guide reveals the exact blender method that works—and why the Creami remains the gold standard—so you skip the drive-thru forever.
Why Your Regular Ninja Blender Fails at Blizzard Texture
Ninja blenders pulverize ice cream into soup because their motors spin blades at 20,000+ RPM, generating heat that melts frozen dairy within seconds. Unlike the Ninja Creami’s patented spinning paddle (which gently folds mix-ins without warming ingredients), blenders create friction that turns your carefully chosen Oreos or Reese’s into a sad, liquid swirl. Critical reality check: You won’t achieve perfect DQ thickness in a blender, but these steps get you 80% there with zero freezer time.
Essential Setup for Blender Success
- Chill every component: Freeze your Ninja pitcher and blade assembly 15 minutes before starting (condensation ruins texture)
- Ice cream must be rock-hard: Use premium vanilla ice cream straight from the freezer at -10°F (soft serve melts instantly)
- Load in reverse order: Place 4 cups ice cream first, then sprinkle ⅓ cup mix-ins on top (prevents crushing)
Pulse Technique That Actually Works
- Use 2-second bursts only—never continuous blend
- Plunge continuously with the tamper stick while pulsing
- Stop at 6 pulses—mix-ins should be visible but not fully incorporated
- Add the secret thickener: Blend ½ teaspoon xanthan gum with ice cream before adding mix-ins (this prevents melting)
Pro Tip: If your mixture looks too thin after pulsing, immediately transfer it to a pre-frozen metal bowl and freeze 10 minutes. Re-pulse 2–3 times—this mimics the Creami’s re-spin cycle.
Ninja Creami Method: The Real Blizzard Replicator
If you own a Ninja Creami (NC300/NC501 series), you’ll nail authentic texture every time. This isn’t just blending—it’s controlled spinning that preserves frozen integrity. Skip this section only if you’re committed to the blender workaround.
Freeze Base Ingredients Properly
Pour your base mixture (1 cup milk + ¾ cup Cool Whip + 1 Tbsp Junket mix) into the pre-chilled pint container. Level the surface with a spoon—no dome formation—and freeze lid-off for 24 hours on a flat shelf. Lid-on freezing creates air pockets that ruin texture.
First Spin Cycle: Embrace the “Snow”
Lock the frozen pint into the Creami and press Ice-Cream. Expect coarse, powdery “snow”—this is normal! The machine is breaking up the solid block without melting it. Do not skip this step; rushing to Mix-in mode causes motor strain.
Fix Common Spin Problems
- Powdery texture after spinning? Add 1 tsp half-and-half and run Re-spin for silkiness
- Mix-ins sinking to bottom? Re-freeze 15 minutes, then re-spin for 3 seconds
- Loud grinding noise? This is normal motor stress (85–90 dB)—not a malfunction
Clone DQ’s Best Flavors with Exact Ratios
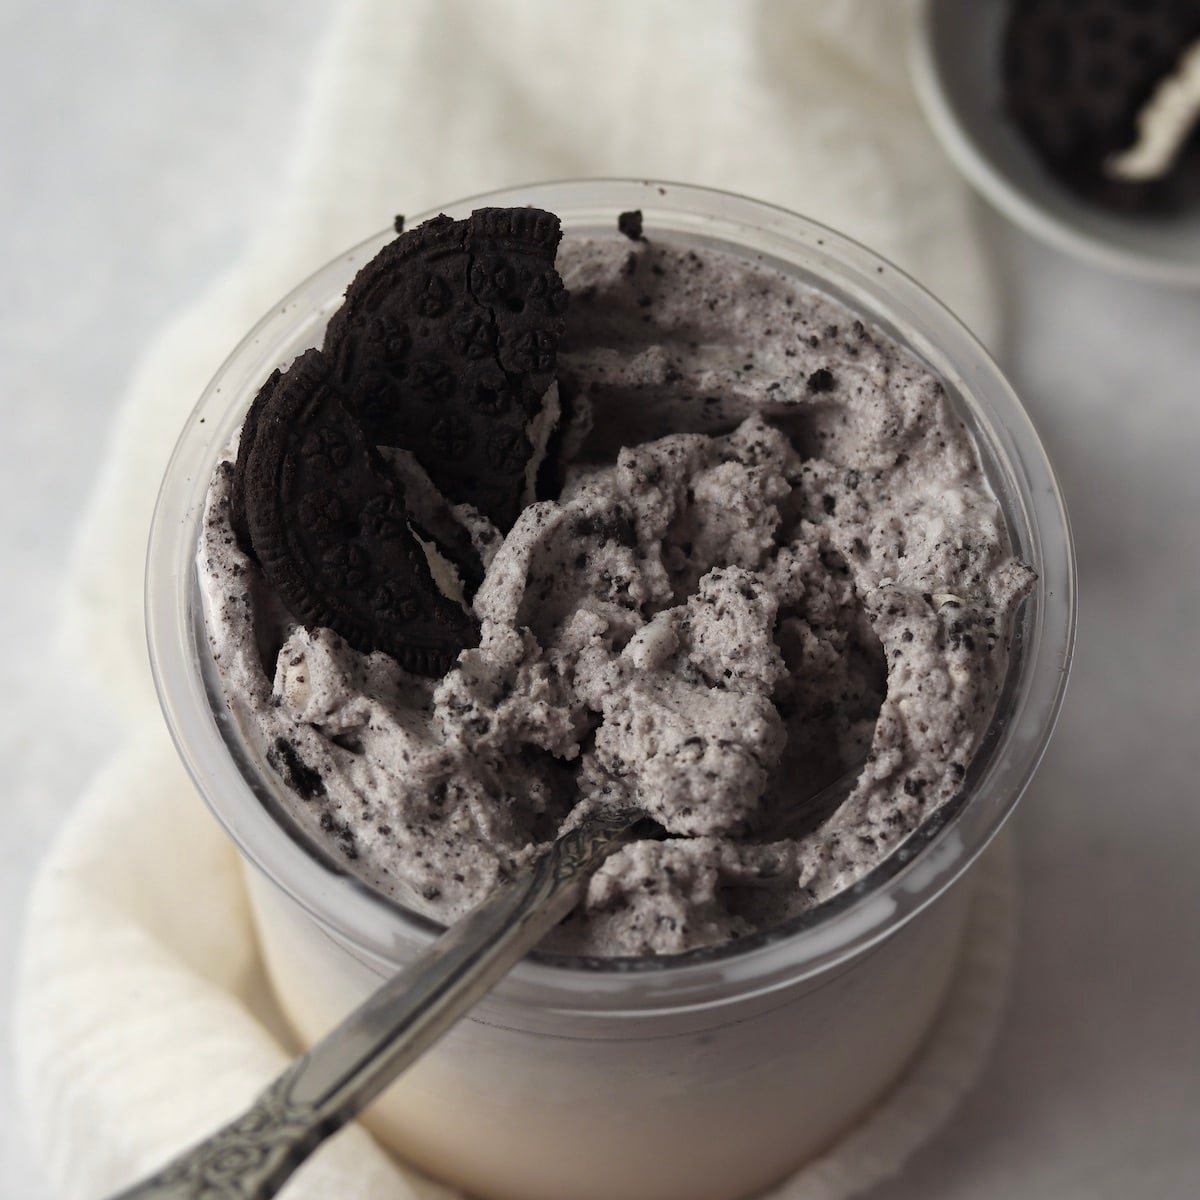
Oreo Blizzard (Creami Method)
- Base: Vanilla Creami Classic (1 cup milk, ¾ cup Cool Whip, 1 Tbsp Junket)
- Mix-ins: 6 crushed Oreos + 2 tsp scraped filling (pulse Oreos 2x in food processor)
- Garnish: Crumble 1 whole Oreo on top post-spin
Blender Shortcut for Reese’s Lovers
- Base: 4 cups chocolate ice cream (hard-frozen)
- Mix-ins: ¼ cup mini Reese’s cups (chopped + frozen 10 minutes)
- Pro move: Drizzle 1 tsp melted peanut butter after pulsing (never blend PB—it turns oily)
Fix Texture Disasters in Under 5 Minutes

Your Blender Made Soup? Here’s the Cure
Cause: Ice cream was too soft or you pulsed longer than 8 times.
Emergency fix: Immediately add 2 ice cubes and pulse 3x. The ice absorbs heat and re-thickens the mixture. Transfer to a chilled bowl and freeze 5 minutes before serving.
Mix-Ins Disappearing? Prevent the Sinking
Blenders can’t suspend heavy mix-ins like cookie dough. Solution: Toss mix-ins in 1 tsp cornstarch before adding to ice cream—this creates a light coating that helps them “float.”
Creami Base Too Crumbly? The Re-Spin Hack
After the first spin, if your base resembles dry snow:
1. Add 1–2 tsp cold milk or half-and-half
2. Press Re-spin button
3. Stop when it looks like soft-serve (5–7 seconds)
Never add liquid during the Mix-in cycle—that causes icy patches.
Cost & Nutrition Wins Over Dairy Queen
| Metric | Homemade (Creami) | DQ Medium Oreo Blizzard |
|---|---|---|
| Cost per serving | $1.25 | $5.29 |
| Calories | 254 | 790 |
| Sugar | 14g | 93g |
| Customization | Unlimited | Limited to DQ menu |
Making your own saves $4+ per serving while slashing sugar by 85%. Plus, you control ingredients—use lactose-free milk or sugar-free Cool Whip for dietary needs.
Storage Secrets for Leftover Bliss
Creami Leftovers: The Re-Spin Advantage
Smooth the top of unused Blizzard in the pint container, cover with lid, and freeze. To revive:
– Press Ice-Cream button for 15 seconds
– Do not add liquid—this dilutes flavor
– Texture recovers 95% of original thickness
Blender Leftovers: Damage Control
Blender-made Blizzards can’t be re-spun. Store in an airtight container:
1. Press plastic wrap directly on the surface
2. Freeze for ≤5 days
3. Thaw 5 minutes at room temperature before eating (microwaving ruins texture)
Scaling for Parties Without Meltdowns
Hosting 4 people? Avoid a freezer traffic jam with this timing hack:
– Stagger freeze times: Make 2 pints first, freeze for 23 hours
– Add next 2 pints 30 minutes later
– Spin sequentially as guests arrive
Critical: Reduce mix-ins to ½ cup per pint for batches—overloading causes uneven distribution.
Safety & Machine Care Non-Negotiables

Dairy Danger Zones
- Never use raw eggs in homemade bases (DQ uses pasteurized custard)
- Discard base if left above 40°F for over 2 hours (bacteria grows fast)
- Rinse between allergens: Wash pint and blade immediately after peanut butter recipes before making other flavors
Blender Blade Longevity
- Never blend rock-hard ice cream without xanthan gum—it strains motors
- Hand-wash pitcher and tamper (dishwashers warp plastic)
- Air-dry completely before storage to prevent mold in crevices
Mastering Ninja blender Blizzards means embracing its limits—use hard-frozen ice cream, pulse like your dessert depends on it (it does), and add xanthan gum as your secret weapon. But for true Dairy Queen magic, the Creami’s spinning action creates texture no blender can match. Start with the Oreo recipe (it’s the most forgiving), and you’ll never pay $5 for a medium cup again. Your first spoonful of homemade Blizzard should stand upright for 10 seconds—that’s your victory signal. Now freeze that pitcher and get spinning.


