

That stubborn gunk trapped under your Ninja blender blades isn’t just unsightly—it’s a breeding ground for bacteria that can taint your morning smoothie with foul odors and off-flavors. When dried fruit fibers, nut butter residues, or leafy greens bake onto the blade assembly and threading, standard rinsing won’t cut it. This complete guide delivers battle-tested methods to dismantle, deep-clean, and maintain every nook of your blender’s bottom components. You’ll learn exactly how to clean bottom of Ninja blender safely while extending its lifespan and guaranteeing food-safe results.
Most users make the critical mistake of leaving residues to harden overnight, turning simple maintenance into a scrubbing nightmare. But with our targeted techniques—which leverage everyday kitchen items like baking soda and vinegar—you’ll eliminate hidden grime in under 15 minutes. Whether you’re battling turmeric stains, garlic odors, or mineral buildup from hard water, this guide solves it all. Let’s transform your grimy blender base into a spotless, odor-free powerhouse.
Quick Daily Rinse Method
Skipping this 30-second step causes 90% of deep-cleaning emergencies. Residues like spinach fibers or protein powder harden rapidly around blade crevices and threading grooves, creating stubborn colonies of bacteria. Performing this immediate rinse while ingredients are still wet prevents permanent bonding to plastic surfaces.
Essential Rinse Steps
- Remove pitcher immediately after blending—never let it sit with residue inside
- Blast warm water through blade assembly for 15–20 seconds while rotating the jar
- Shake vigorously to dislodge trapped particles from threading grooves
- Air-dry upside down on a rack to prevent moisture pooling
Pro tip: If you can’t clean right away, fill the jar with warm soapy water. Never let residues dry—this creates a cement-like barrier that requires aggressive scrubbing.
Deep Clean Blade Assembly
Your Ninja’s stacked blade system traps microscopic food particles in six critical zones: blade edges, central spindle, undersides, plastic housing, threading grooves, and the gasket channel. Ignoring these areas causes cross-contamination between blends and eventual motor strain.
Disassembly Safety Steps
- Unplug motor base—never clean while connected to power
- Grip plastic center hub only—metal blades stay razor-sharp even when dirty
- Twist clockwise (opposite normal direction) to release assembly
- Lift straight up to avoid nicking blades on jar threads
Blade Cleaning Process
Soak the assembly in hot, soapy water for 10 minutes to soften residues. Use a bottle brush with a long handle to scrub:
– Each blade level in tight circular motions (focus on where fibers wrap around bases)
– Central spindle where spinach or kale shreds accumulate
– Underside grooves with a toothpick for stubborn seeds
– Plastic housing around blade base to prevent gasket contamination
Warning: Never use steel wool—it scratches plastic, creating bacteria traps that worsen with each use.
Clean Gasket Seal Thoroughly

That rubber ring is your leak defense, but its hidden groove collects moisture and food particles, becoming a mold factory within 48 hours. A compromised gasket causes leaks during high-speed blending and introduces mildew into your drinks.
Removal and Inspection
Pry the gasket gently using a fork tine. Check for:
– Black spots (mold colonies requiring immediate replacement)
– Cracks or tears (even hairline fractures cause leaks)
– Permanent discoloration (indicates deep-set stains)
– Loss of elasticity (won’t seal properly when stretched)
Deep Gasket Cleaning
Soak in warm, soapy water for 15 minutes, then use a soft toothbrush to scrub:
– Both flat surfaces where it contacts the jar and blade assembly
– Inner groove where mold hides (scrub at 45-degree angles)
– Edges that slide into threading channels
Replace immediately if damaged—gaskets cost $5–10 but prevent $50 motor base repairs from leaks.
Remove Stubborn Stains and Odors
Turmeric leaves permanent yellow stains? Garlic lingers for days? Standard soap fails because pigments and sulfur compounds bond to plastic at a molecular level. These solutions break those bonds without damaging components.
Stain Removal Formula
Make a paste with 2 tbsp baking soda and 1 tsp water. Apply directly to stained areas around blade bases and threading. Wait 15 minutes (letting abrasives lift pigments), then scrub with a soft brush. The mild exfoliation removes discoloration while neutralizing odors.
Odor Elimination Soak
Combine 1 cup warm water, 2 tbsp baking soda, and 1 tbsp lemon juice. Soak disassembled parts for 60 minutes. Baking soda neutralizes odor molecules while lemon’s citric acid dissolves protein-based residues. Rinse thoroughly—this eliminates smells rather than masking them.
Clean Jar Base Threads
The threaded area collects spilled liquids that harden into sticky residue, making assembly difficult and causing cross-threading damage. Unclean threads also trap moisture, accelerating gasket deterioration.
Thread Cleaning Technique
Wrap a vinegar-soaked cloth around your finger and rotate it through each thread groove. For mineral deposits:
– Use white vinegar to dissolve chalky buildup
– Scrub with a soft toothbrush for food debris in crevices
– Check for hairline cracks that worsen with pressure
– Dry completely with a microfiber cloth to prevent mildew
Quick fix: A pipe cleaner reaches deep into thread grooves faster than brushes.
Self-Cleaning Cycle Method
This built-in technique cleans hard-to-reach areas during operation—ideal for post-use maintenance when you’re short on time. It’s ineffective for dried residues but perfect for daily upkeep.
Self-Cleaning Steps
- Reassemble blade unit onto empty jar
- Add 2 cups warm water + 2 drops dish soap
- Secure lid tightly—loose lids cause leaks
- Run on highest speed for 60 seconds
- Disassemble and rinse—never skip final rinse
Best for: Light residues like yogurt or soft fruits. Avoid for nut butters or fibrous greens—they require manual disassembly.
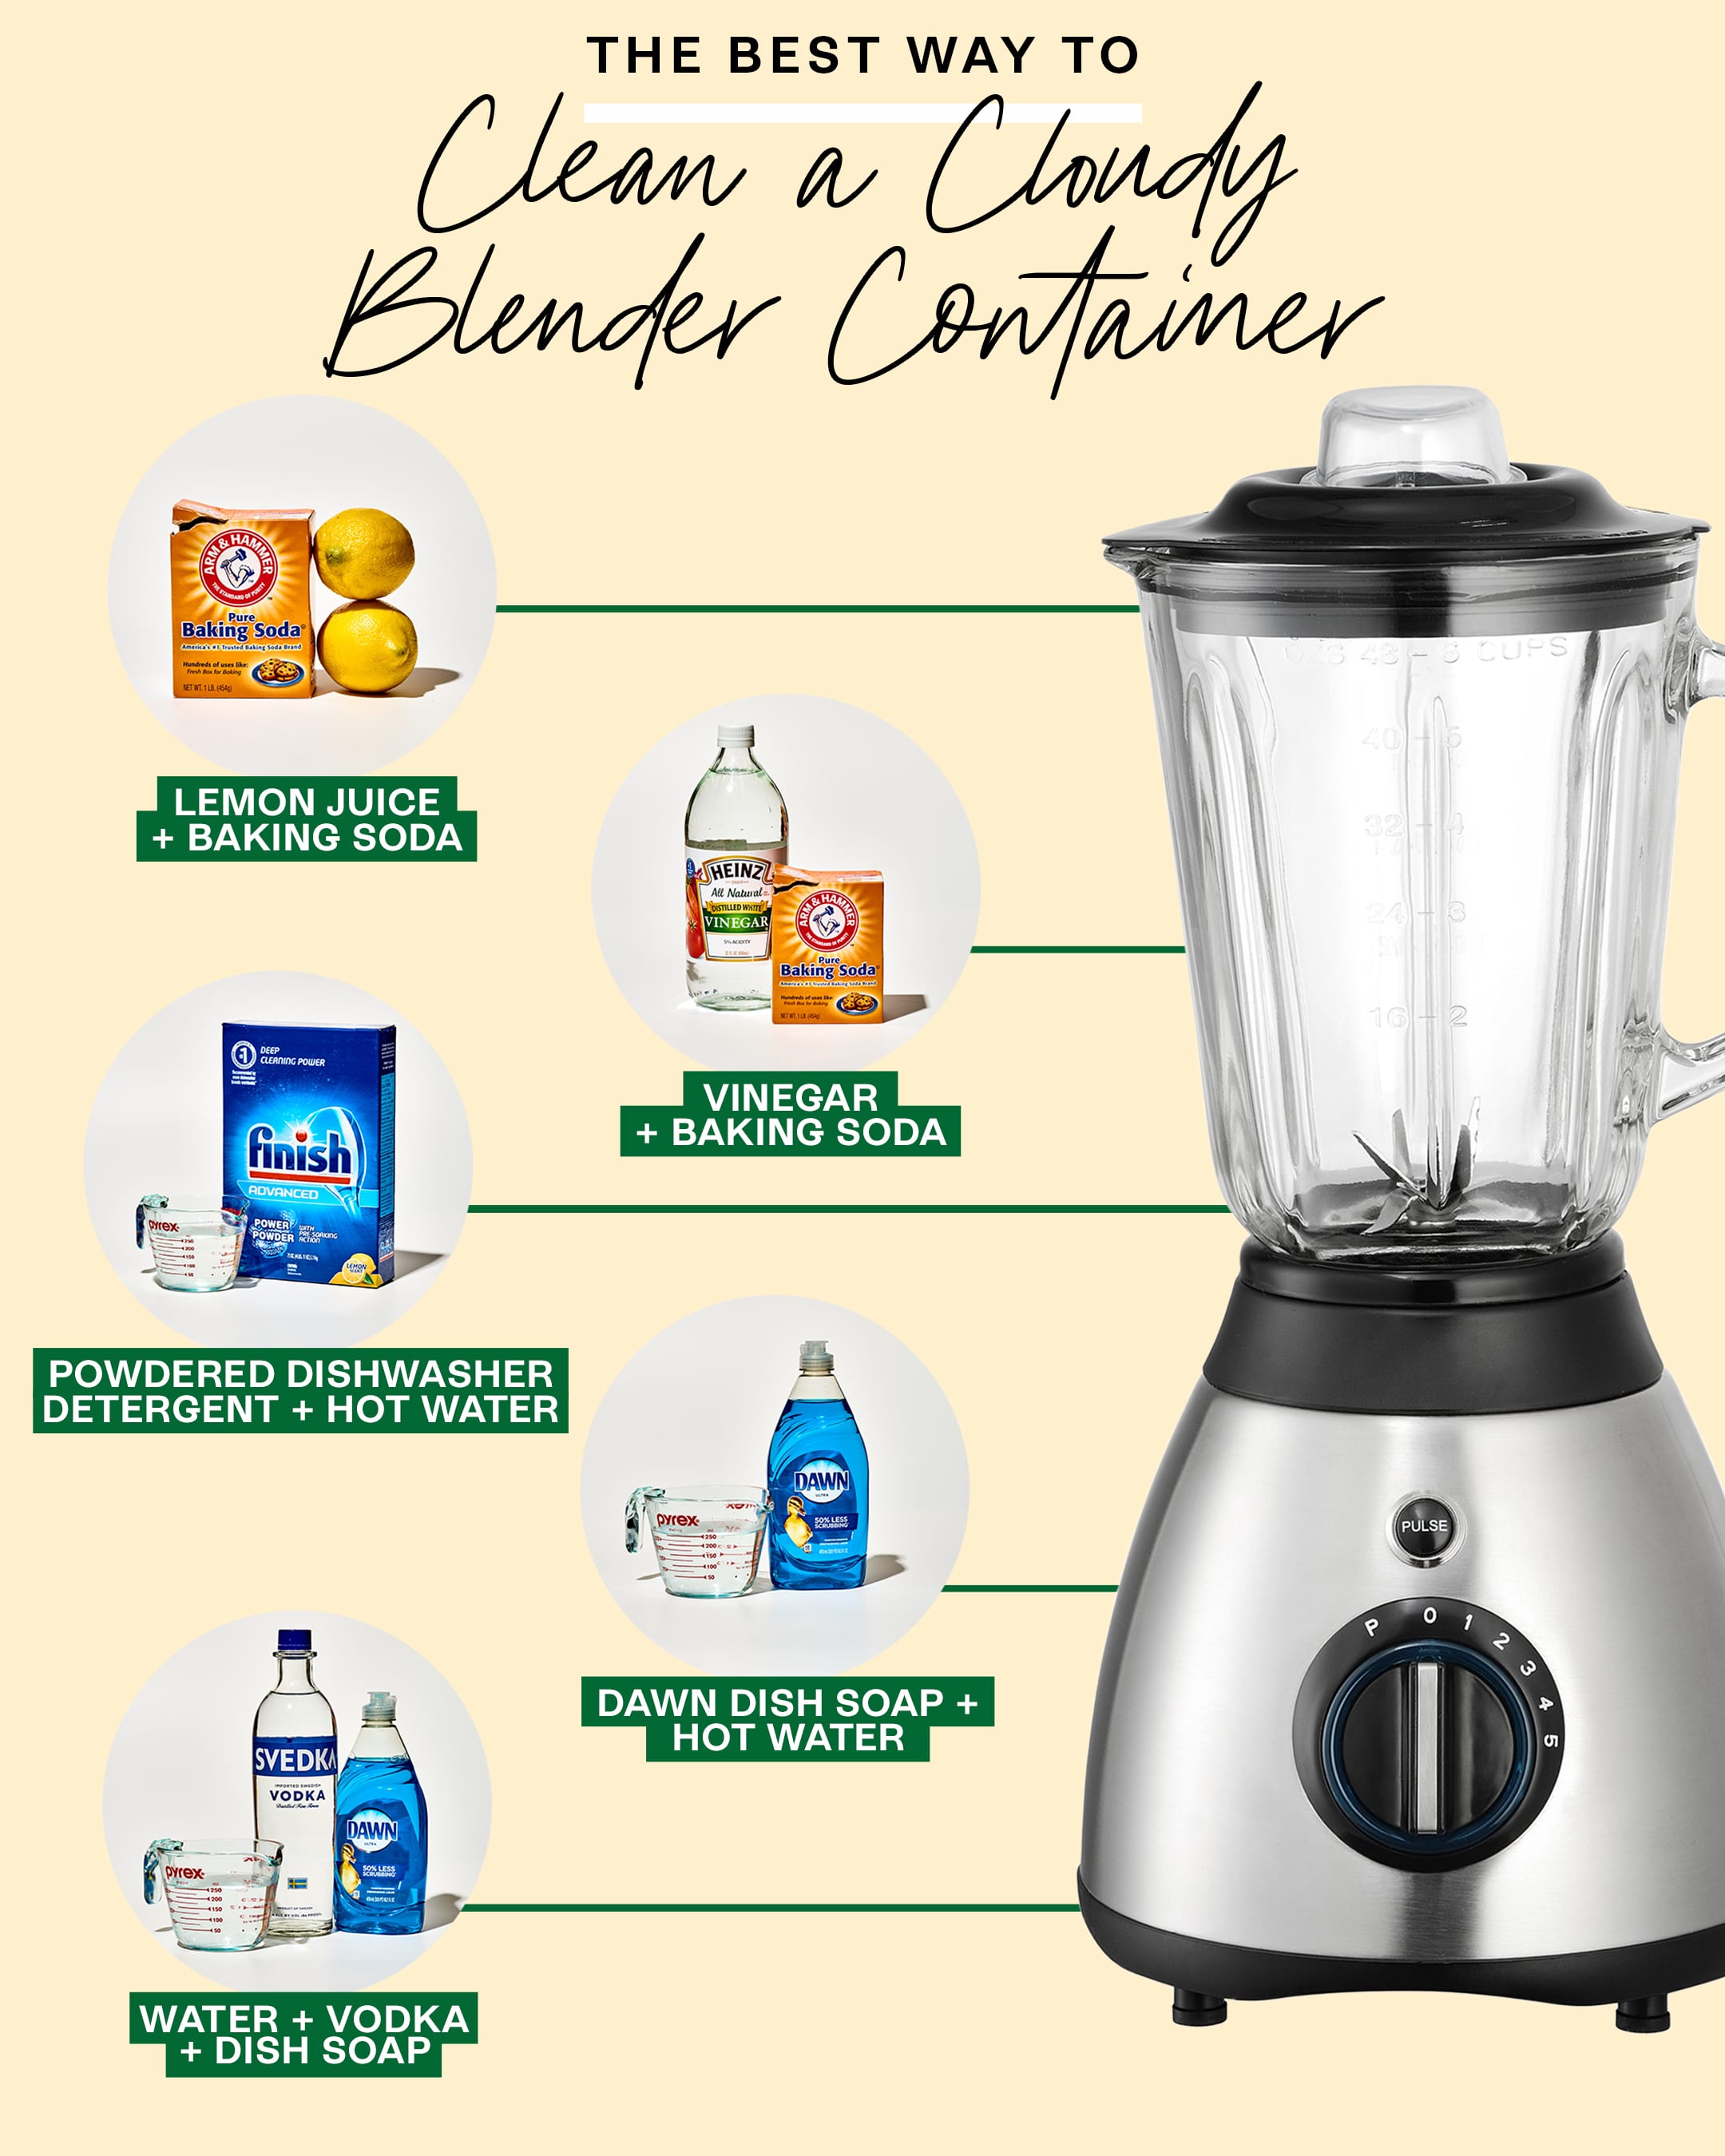
Prevent Mineral Buildup
Hard water leaves cloudy, chalky deposits that make plastic look permanently dirty and create rough surfaces for bacteria growth. Monthly prevention saves hours of scrubbing later.
Monthly Vinegar Treatment
Submerge blade assembly and jar base in undiluted white vinegar for 2–4 hours. Vinegar’s acetic acid dissolves mineral crystals without harsh chemicals. After soaking, sprinkle baking soda on cloudy areas—the fizzing reaction lifts remaining deposits.
Water Softening Hack
Add 1 tbsp white vinegar to your rinse water. This creates a protective barrier that prevents new mineral bonding to plastic surfaces.
Store Components Correctly
Storing your Ninja fully assembled traps moisture between components, causing mold in 72 hours. Proper storage prevents odors and extends gasket life by 50%.
Storage Best Practices
- Separate all components for 100% air circulation
- Store blade assembly in a dry container away from children
- Leave jar base unscrewed from motor base to relieve gasket pressure
- Place gasket loosely—never compressed in storage
- Position motor base upright with ventilation slots unobstructed
Pro tip: Tuck a silica gel packet near stored parts to absorb ambient moisture.
Safety First Always
Blender blades stay dangerously sharp even when dirty, and water near electrical contacts risks shock. These protocols prevent injuries during cleaning.
Blade Safety Rules
- Handle blades by plastic hub only—never touch metal edges
- Wear cut-resistant gloves during scrubbing sessions
- Store assembly out of children’s reach—blades protrude when stored improperly
- Inspect blades monthly for bends or chips that cause imbalance
Electrical Safety
- Unplug before every cleaning session—water conducts electricity through jar bases
- Never submerge motor base—wipe with damp cloth only
- Dry electrical contacts on jar base with compressed air
- Check power cord weekly for fraying near the base
Quick Troubleshooting
When standard methods fail, these targeted fixes solve specific bottom-area problems without damaging components.
Blades Still Dirty After Cleaning
- Overnight soak in hot water + 1 tbsp dishwasher detergent (not liquid soap)
- Dental floss technique: Slide floss between blade layers to dislodge fibers
- Enzyme cleaner soak for 30 minutes to break down protein residues
- Replace assembly if blades are permanently stained (costs less than $20)
Gasket Won’t Come Off
- Hot water flush for 30 seconds to expand rubber slightly
- Silicone spatula lift: Gently slide under edge without tearing
- Never use metal tools—they create permanent gasket tears
- Food-grade oil lubricant: Apply olive oil to gasket edge as release agent
Your Maintenance Schedule
Consistent care prevents 80% of blender failures. This tiered approach matches effort to risk level.
Daily (30 seconds)
- Rinse blade assembly under warm running water
- Wipe jar base threads with vinegar-dampened cloth
Weekly (10 minutes)
- Full disassembly and hand washing of all bottom components
- Gasket inspection for mold or stretching
- Blade sharpness test (should cleanly cut paper)
Monthly (60 minutes)
- Deep vinegar soak for mineral deposits
- Odor elimination treatment with baking soda solution
- Replace gaskets showing wear signs
Remember: Mastering how to clean bottom of Ninja blender isn’t about aesthetics—it’s food safety. Bacteria thrive in hidden crevices, contaminating every blend. By following these methods, you’ll ensure every smoothie tastes fresh while doubling your blender’s lifespan. Start today: disassemble, soak, and scrub to reclaim your machine’s performance. Your future self (and taste buds) will thank you.


