
That new Breville blender on your counter promises restaurant-quality smoothies and soups, but confusing buttons and settings can leave you frustrated with lumpy results or a motor that won’t start. If you’ve ever wondered how to use Breville blender features properly or why your ice crush setting fails, you’re not alone. This guide cuts through the confusion with step-by-step instructions verified by manufacturer specifications. You’ll learn precise assembly techniques, speed settings for perfect textures, and troubleshooting fixes that prevent costly repairs—transforming you from overwhelmed owner to blending expert in under 30 minutes.
Initial Setup and Safety Essentials
Unboxing Your Breville Blender
Immediately remove all packaging materials before assembly—plastic films and cardboard spacers left in place can crack the jar during operation. Wash the blender jar, lid, blade assembly, and accessories in warm, soapy water using a non-abrasive sponge. Rinse thoroughly to eliminate soap residue that affects taste, then air-dry all components completely. Place the motor base on a stable, dry counter away from sinks or stovetops to prevent electrical hazards from water splashes or heat exposure.
Critical mistake to avoid: Never skip the drying step. Moisture trapped between the jar and base prevents proper locking, causing dangerous leaks during blending. Always confirm surfaces are bone-dry before assembly.
Power Requirements and Safety Checks
Plug your Breville directly into a dedicated 110-120V outlet—never use extension cords that cause voltage drops damaging the motor. Inspect the power cord before each use for fraying or cuts near the plug. Never blend liquids hotter than 180°F (82°C); steam pressure can blow the lid off, causing severe burns. For hot soups, cool ingredients for 5-10 minutes first and always remove the center cap while covering the opening with a folded kitchen towel.
Quick Assembly Sequence
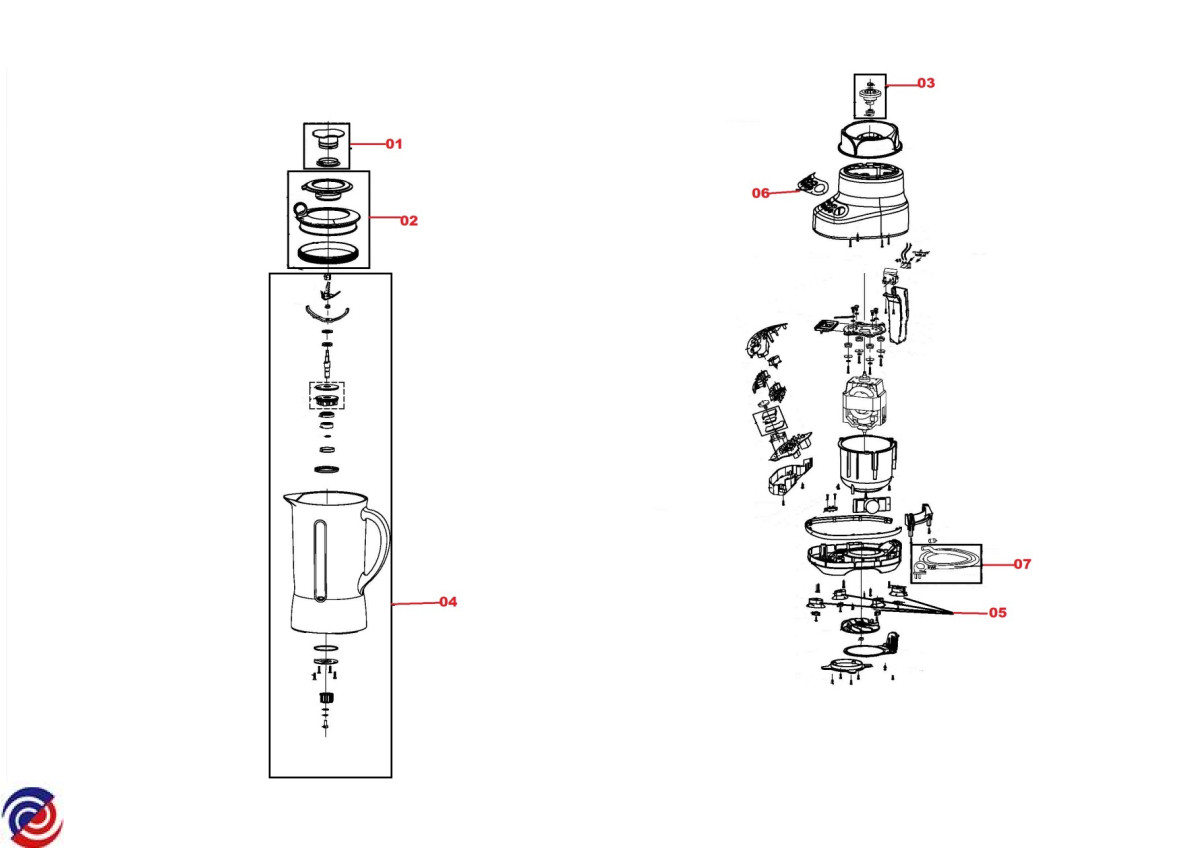
Component Identification
Identify these key parts before starting: the motor base with control panel, blender jar (glass or plastic), blade assembly (fixed or removable), locking lid with feed tube, and tamper tool (included with select models like the Fresh & Furious). The jar’s maximum fill line—typically marked at 48-64 oz—is your safety threshold for hot or expanding ingredients.
Assembly in 6 Simple Steps
- Position the motor base on a level surface
- Insert the blade assembly securely into the jar (if removable)
- Add ingredients following layering rules
- Lock the lid until you hear a distinct click
- Align the jar’s arrow with the base’s indicator mark
- Twist clockwise until firmly seated
Warning: If the blender won’t power on, 90% of cases involve improper jar placement. The safety interlock requires full clockwise rotation—recheck this before assuming electrical faults.
Decode Your Control Panel
Understanding Button Functions
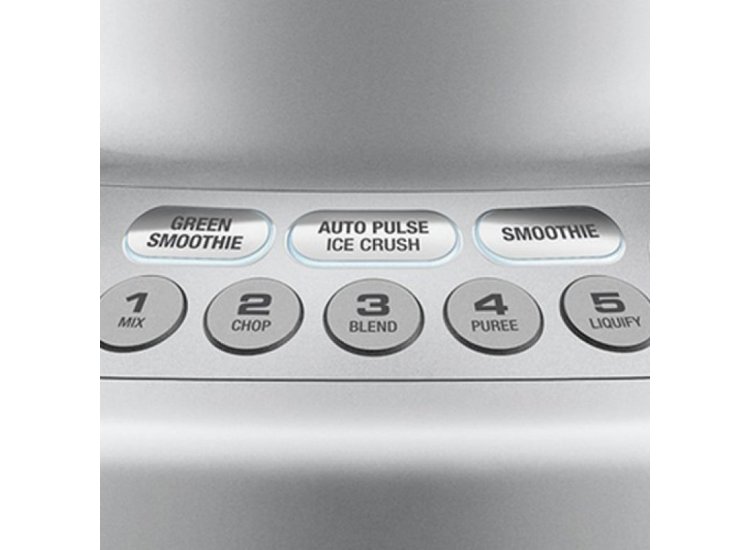
Breville’s control panels vary by model but always include essential elements: a master power button, variable speed dial (1-10), pulse function, and pre-programmed settings like Smoothie, Ice Crush, and Soup. Advanced models feature LCD timers that automatically stop blending after 45-120 seconds. Never skip the power button—models like the Boss Kettle require pressing it before selecting speeds.
Speed Settings Demystified
Use Speeds 1-3 for emulsifying dressings or mixing batters without splashing. Speeds 4-6 puree soft fruits like bananas into silky smoothies. Speeds 7-8 crush ice effectively—run for 30-45 seconds using intermittent pulsing to prevent motor strain. Reserve Speeds 9-10 for nut butters or frozen desserts, limiting use to 60 seconds max to avoid overheating. Always start low and gradually increase speed regardless of ingredient toughness.
Perfect Smoothie Technique
Ingredient Layering Formula
Follow this foolproof sequence:
1. Liquids first (1 cup water/milk/juice) to create a vortex
2. Soft ingredients like yogurt or ripe mango
3. Hard items such as frozen berries or ice cubes
4. Powders like protein or spices last to prevent clumping
Exceeding the 2:1 solid-to-liquid ratio causes lumpy results. For thick smoothies, reduce solids by 25% before adding extra liquid.
Pulse Function Mastery
Press the pulse button in 1-2 second bursts to chop large frozen pieces before continuous blending. Pulse 5-6 times when starting thick mixtures like nut butters to reduce initial motor strain. This technique prevents ingredients from “walking” up the jar and creates even textures impossible with constant speed.
Advanced Features Explained
Pre-Programmed Settings Breakdown
Smoothie Mode runs 45-60 seconds with automatic speed variations—ideal for fibrous kale that leaves stringy bits on manual settings. Ice Crush uses smart pulsing patterns for uniform texture; stopping early guarantees icy chunks. Soup Mode gradually ramps up over 90 seconds to prevent hot splatter, then sustains high speed for velvety results. Green Smoothie alternates speeds specifically for tough greens—use it even with manual models by mimicking the pattern.
Manual Control Techniques
When free-blending, insert the tamper through the feed tube to push ingredients toward blades without stopping. For thick mixtures like hummus, add liquid in 2-tablespoon increments while running at Speed 4. Never overfill—processing large batches in 48-oz jars maxes out at 32 oz to allow vortex formation.
Cleaning Made Simple
30-Second Daily Cleaning
Unplug immediately after use. Fill the jar halfway with warm water and one drop of soap, then blend on Speed 2 for 30 seconds. Rinse thoroughly and air-dry upside down—trapped moisture in the gasket causes mold and leaks. Never soak the motor base; wipe with a damp microfiber cloth only.
Weekly Deep Clean Process
Remove the blade assembly (if model permits) and soak all parts in warm, soapy water for 10 minutes. Use a bottle brush to scrub the jar’s threading and gasket groove where residue hides. Dry completely before reassembly—moisture here breeds bacteria and weakens seals. Replace gaskets every 6 months for leak-proof performance.
Troubleshooting Common Problems
Blender Won’t Start Solutions
First, test the outlet with another device. Next, confirm the jar clicks into locked position—reseat and twist firmly. If the lid isn’t fully secured, the safety switch prevents operation. If thermal protection activated (after extended use), wait 15 minutes before retrying. Persistent issues indicate blade assembly obstruction—disassemble and check for food jams.
Fix Poor Blending Performance
Lumpy smoothies? Add liquid in 2-tablespoon increments while blending. For stubborn nut butters, reduce nuts to 2 cups minimum (below this, blades spin ineffectively). Always cut produce into 1-inch pieces—larger chunks overload the motor. If results remain inconsistent, inspect blades for dullness or damage requiring replacement.
Optimize Performance Daily
Temperature Guidelines
Cool hot soups to 175°F before blending—use an instant-read thermometer. For glass jars, avoid sudden temperature shifts (like adding ice to hot soup) that cause cracking. When processing warm ingredients, remove the center cap and cover with a towel to vent steam safely. Handle hot jars with oven mitts; the base conducts heat surprisingly fast.
Load Management Rules
Never exceed 75% capacity with hot liquids or 100% with cold ingredients. Process large batches in 2-cup increments to prevent motor burnout. Allow 3 minutes between 60-second high-speed sessions for cooling. Critical tip: Thaw frozen fruit for 10 minutes—fully frozen items strain the motor, while room-temperature produce blends unevenly.
Special Applications Guide
Perfect Nut Milk Method
Soak 1 cup almonds overnight, then drain and rinse. Add nuts plus 4 cups fresh water to the jar—never exceed 3:1 water-to-nut ratio. Blend on Speed 10 for 90 seconds, then strain through a nut milk bag. Pro secret: Save leftover pulp for crackers by spreading thin and dehydrating at 150°F.
Frozen Dessert Mastery
For sorbet, use 3 cups perfectly ripe frozen mango and only 2 tablespoons coconut water. Pulse 8-10 times to control texture, then blend 20 seconds on Speed 8. Serve immediately—Breville’s powerful motor melts frozen treats faster than expected. Never exceed 1:3 liquid-to-frozen ratio or you’ll get soup instead of ice cream.
Your Breville blender transforms from intimidating appliance to indispensable kitchen partner when you master these precise techniques. Start with the speed settings chart for your next smoothie, then experiment with soup mode for velvety bisques. Remember the golden rules: never exceed fill lines, always pre-cut ingredients, and clean immediately after use. Within a week, you’ll unlock restaurant-quality results that justify every penny of your investment—proving that knowing how to use Breville blender features correctly turns frustration into culinary triumph.


