
You press the button, and within seconds, ice cubes vanish into silky smoothies, nuts transform into creamy butter, and raw vegetables become steaming soup. But what invisible forces turn your countertop appliance into a culinary powerhouse? How does the blender work to achieve this daily alchemy? The answer lies in a precisely engineered dance between physics and mechanics that begins the moment electricity meets stainless steel. Unlike food processors that chop, blenders create turbulent vortexes spinning up to 30,000 times per minute—shattering cell walls and emulsifying ingredients through sheer mechanical force. In this guide, you’ll discover exactly how each component collaborates to transform solids into liquid perfection, why jar shape matters more than you think, and how to leverage physics for flawless results every time.
Most users never consider the Reynolds number exceeding 10,000 inside their 1-liter jar or how cavitation bubbles pulverize fibers at 68,000 s⁻¹ shear rates. Yet these invisible processes determine whether your smoothie stays chunky or achieves barista-level silkiness. Understanding how a blender works isn’t just technical trivia—it’s the key to avoiding common pitfalls like motor burnout from overloaded ice or cloudy grain mills from improper blade selection. By the end of this guide, you’ll master ingredient layering techniques that harness vortex physics, recognize warning signs of coupler wear, and troubleshoot leaks before they ruin your kitchen counter. Let’s dissect the engineering marvel sitting on your countertop.
Blender Component Functions Revealed
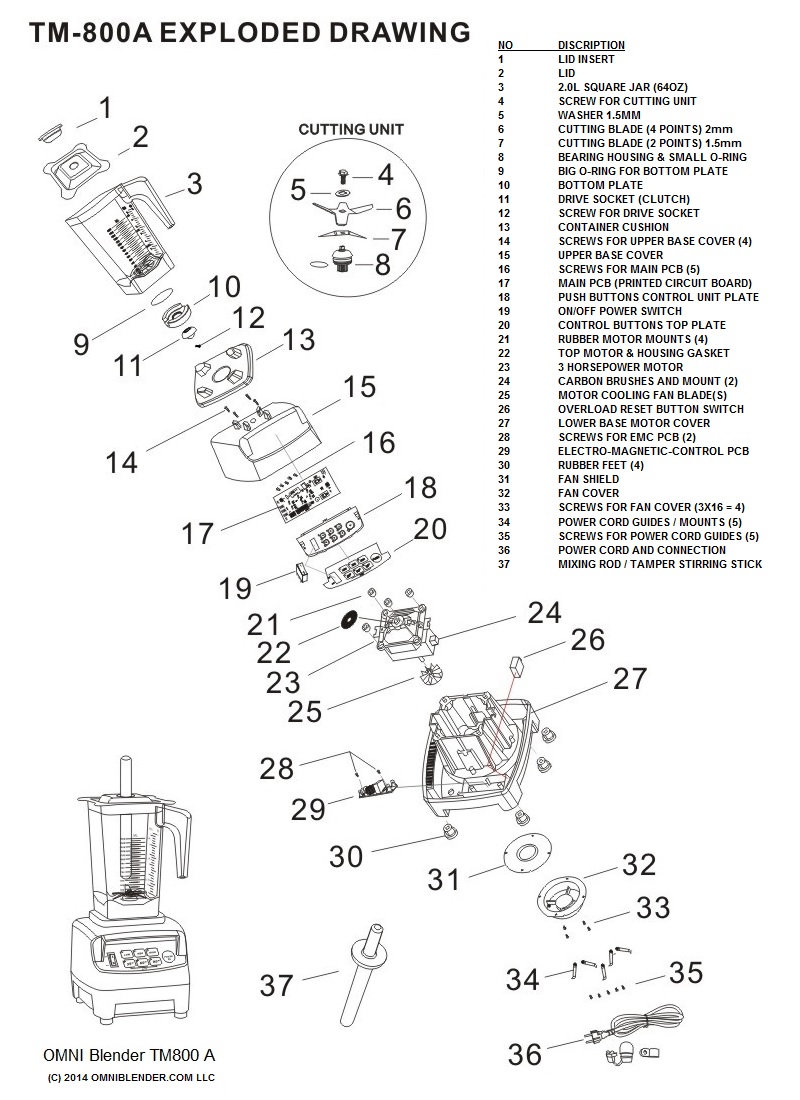
Every blender relies on seven critical parts working in unison. The heavy base housing—weighing 3-5 pounds in quality models—anchors the unit while ventilation slots prevent motor overheating during extended use. Inside, the motor (300-1500W) converts household current into rotation via copper windings, with brushless models lasting 10x longer than universal motors. At the connection point, the metal coupler transfers torque from the motor shaft to the blade assembly; its serrated teeth often wear after 500 blending hours, causing slippage during nut butter prep.
The jar’s tapered walls aren’t accidental—they create downward pressure gradients that feed ingredients into the vortex. Glass jars resist staining but risk shattering with ice, while Tritan plastic handles impacts better but may cloud over time. Crucially, the blade assembly features 4-6 prongs of hardened 420J2 steel (50-55 HRC hardness) with dual angles: upward-curving wings lift solids, while downward-angled blades push material toward the center. A compromised silicone gasket—visible as wobbling during high-speed operation—causes 90% of leaks, so inspect its elasticity monthly. Finally, the lid’s fill cap serves double duty: sealing during blending while doubling as a 30-60mL measuring cup for mid-blend additions.
Why Blade Angle Determines Blend Success
The 30° upward and 10° downward blade angles create vertical circulation impossible with flat blades. During smoothie prep, upward wings lift leafy greens from the top, while downward blades pull frozen fruit toward the vortex center. High-performance models add wingtip extensions that reduce noise by 3dB—critical when blending early morning. If your blender struggles with fibrous ingredients, check for nicks on the 0.25mm precision-ground edges; even minor damage creates turbulence that traps unblended chunks. Titanium-nitride coatings on premium blades resist corrosion from acidic fruits, but avoid abrasive cleaners that strip this protection.
Electrical Path to Vortex Creation

When you select “Smoothie” mode, electricity follows a precise journey: AC power enters the triac-controlled circuit, which modulates voltage to achieve your chosen speed. The control board samples motor load 16,000 times per second in premium units, instantly boosting power when ice bogs the blades. This torque travels through the coupler (a common failure point after heavy nut butter sessions) to spin the blade assembly. Within 3 seconds, liquid ingredients accelerate to create a low-pressure vortex eye—visible as a funnel-shaped depression—that sucks solids downward.
How Continuous Circulation Achieves Uniform Results
Centrifugal force throws processed mixture against the jar walls, where gravity returns it to the blade zone for reprocessing. This cycle repeats until ingredients reach molecular dispersion, typically in 30-60 seconds. Critical visual cues include:
– A perfectly centered vortex (off-center indicates unbalanced load)
– Uniform color change (e.g., kale turning from speckled to solid green)
– Temperature rise of 4-7°C (excessive heat means over-blending)
Stop blending the moment texture turns silky—continued operation generates unnecessary heat that degrades nutrients. For thick mixtures like hummus, use the tamper through the fill cap to guide ingredients toward the vortex without stopping the motor.
Jar Shape Physics You Can’t Ignore

Your jar’s geometry directly impacts vortex efficiency. Tall tapered jars (standard on Vitamix) create stable, deep funnels ideal for leafy greens but cause slight cavitation with ice. Wide squat jars (Ninja-style) process large ice batches faster but require 20% more motor torque to maintain vortex integrity—explaining why cheap blenders stall during margarita prep. Most overlooked: square-cornered jars create 8% faster processing through secondary turbulence points where liquid rebounds off flat edges. Never fill beyond ⅔ capacity; overfilling disrupts the vortex and risks leaks from gasket pressure.
Ice Crushing Protocol for Perfect Results
Follow this sequence to avoid coupler damage:
1. Pulse 1 cup of ice at max speed for 5-second intervals
2. Wait 30 seconds between pulses to prevent motor overload
3. Stop when texture resembles wet snow (not powder)
4. Immediately rinse with warm water to prevent thermal shock
Blenders under 700W lack the torque for continuous ice crushing—attempting it triggers thermal cutoffs.
Safety Systems That Prevent Kitchen Disasters
Your blender’s jar detection switch (a Hall sensor or micro-lever) blocks operation unless the jar clicks into place—never force-start with misaligned components. During nut butter prep, the over-current trip will halt blending if viscosity exceeds 120% load, auto-resetting after 3 minutes of cooling. If you smell burning during soup blending, the 105°C thermal cutoff has likely activated; unplug immediately and check for worn motor brushes. High-end models add magnetic lid locks that prevent operation if the fill cap isn’t secured—a lifesaver when processing hot liquids.
Emergency Response for Common Failures
- Leaking jar mid-blend: Power off immediately, then reseat the gasket with food-safe lubricant
- Sudden vibration: Unplug and inspect for bent blades (often caused by frozen fruit chunks)
- Motor stall with ice: Reduce batch size by 50% and pulse instead of continuous blending
Pro Maintenance for 10-Year Longevity
Extend your blender’s life with these technician-recommended steps:
– Monthly: Soak the gasket in vinegar to prevent odor absorption; replace when it loses “snap”
– Every 6 months: Inspect blade edges with a magnifying glass—sharpen nicks using 600-grit diamond stone at 20°
– Annually: Swap the coupler if teeth appear rounded (costs $8 vs. $150 for motor replacement)
– After hot soup: Let the jar cool below 80°C before washing to avoid thermal cracking
Store the jar inverted with lid off to prevent moisture buildup. For brushless motors, skip brush replacements—they’re maintenance-free for 1,000+ hours.
Understanding how does the blender work transforms you from a button-pusher to a precision operator. Master the vortex physics by layering liquids first, respect torque limits during ice crushing, and maintain gaskets religiously. Remember: 70% of blender failures stem from ignoring jar shape compatibility or overloading motors beyond their wattage limits. Implement these insights, and you’ll extract maximum performance from every watt while avoiding costly repairs. Now that you know the engineering secrets behind silky smoothies and hot soups, your next blend won’t just work—it’ll perform. For immediate troubleshooting, bookmark the quick-reference chart: leaks mean gasket checks, burning smells demand brush inspections, and lumpy results always signal dull blades. Your countertop powerhouse deserves this expertise.


