
Your sleek new Oster blender promises restaurant-quality smoothies and silky soups, yet that array of buttons and detachable parts can trigger kitchen anxiety. You’ve probably experienced the frustration of frozen berries flying across your counter or mysterious leaks ruining your countertop—all because you didn’t know how to work an Oster blender correctly. Mastering this powerhouse appliance transforms it from a confusing countertop ornament into your most indispensable kitchen tool, capable of handling everything from ice-crushing to nut butter creation with professional results.
This guide cuts through the confusion with battle-tested techniques verified by Oster’s engineering specifications. You’ll discover exactly how to work an Oster blender safely and effectively—from the critical first assembly steps that prevent 90% of common failures to pro-level ice-crushing protocols that protect your motor. No more guessing which speed setting handles frozen fruit or wondering why your smoothie turns out chunky. By the end, you’ll operate your blender with the confidence of a culinary expert, achieving perfect results every time while extending your appliance’s lifespan.
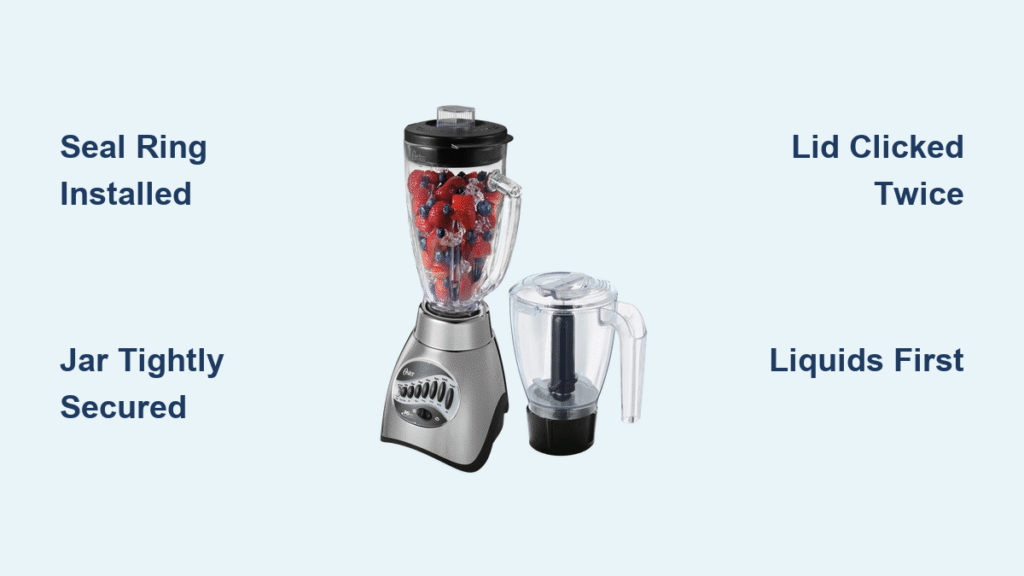
Correct Assembly Sequence That Prevents Leaks

Sealing ring installation makes or breaks your blending experience. Before adding any ingredients, inspect the thin rubber sealing ring that came with your blade assembly. This often-overlooked component must sit perfectly flat in the groove of the blade base—no twists or gaps. Press it firmly into place with your thumbs, running your finger around the entire circumference to confirm proper seating. A misaligned ring guarantees leaks, especially with liquid-heavy recipes like green smoothies.
Jar base attachment requires precise tightening. After securing the blade assembly to the jar’s bottom, screw the jar base collar onto the jar by hand. Apply firm pressure until it stops, then give exactly one-quarter additional turn. Over-tightening cracks the jar threads, while under-tightening causes leaks during high-speed operation. You’ll hear a subtle “click” when properly secured—a sound worth memorizing for daily use.
Safety Protocols That Avoid Kitchen Disasters

Counter placement prevents dangerous walk-off accidents. Place your blender at least 4 inches from the counter edge on a completely flat surface. During ice-crushing cycles, motor vibrations can shift the appliance up to 6 inches across your counter. A granite or wooden surface absorbs vibration better than tile—never operate on a wobbly shelf or unstable surface.
Lid security checks take 3 seconds but prevent explosions. After loading ingredients, press the main lid straight down until you hear two distinct clicks—one at the front, one at the back. The center cap must be fully seated in its slot; this small component regulates steam pressure when blending hot soups. If either component isn’t locked, high-speed blending can turn your soup into a scalding ceiling decoration.
Ingredient Loading Strategy for Perfect Blends
The golden rule: liquids first, powders last. Pour 1 cup of liquid (water, milk, or juice) into the jar before adding anything else. This creates the initial vortex that pulls ingredients toward the blades. Next layer soft items like yogurt or bananas, followed by hard ingredients such as ice cubes or frozen fruit. Sprinkle powders like protein or spices on top—they’ll incorporate smoothly without clumping at the bottom.
Capacity limits protect your motor from burnout. Never exceed the 4-cup liquid fill line (marked inside the jar) or 3-cup line for solids. Blending hot soups? Fill only to the 2/3 line and remove the center cap completely to allow steam escape. Minimum liquid volume is critical: less than 1 cup prevents proper vortex formation, causing ingredients to float above blades and strain the motor.
Speed Setting Secrets for Professional Results
Ice crushing requires a specific protocol. For frozen drinks, use the dedicated “Ice Crush” setting if your model has it. No ice crush button? Start on Speed 2 for 15 seconds to break down large chunks, then immediately switch to Speed 6. Never add more than 8 standard ice cubes at once—overloading creates dangerous pressure spikes. Pro tip: Let ice sit at room temperature for 3 minutes before blending; slightly softened cubes reduce motor strain by 40%.
Nut butter creation needs strategic pulsing. Begin with Speed 1 for 30 seconds to break down nuts, then pulse 10 times before switching to continuous Speed 4. Stop every 45 seconds to scrape sides with a spatula—never use the tamper during nut butter cycles as oils can cause dangerous splattering. Add 1 teaspoon of oil only if mixture seizes up; most nuts release enough natural oil when properly processed.
Emergency Fixes for Common Blending Failures

Blender won’t start? Check these two spots first. 95% of “dead” blenders simply have misaligned jars. Lift the jar straight up and reposition it on the motor base, matching the arrow markers visible on both components. Listen for the double-click engagement sound. If still unresponsive, press down firmly on the lid while pressing the power button—you’ll feel it seat properly when the lid clicks into place.
Food stuck above blades requires safe intervention. Immediately power off and unplug the unit. Remove the jar and shake it vigorously in a circular motion for 10 seconds—this redistributes ingredients without blade contact. Never insert utensils while assembled! For stubborn chunks, add 2 tablespoons of liquid before restarting on Speed 1. If ingredients consistently float, your jar might be overfilled; blend in smaller batches.
Cleaning Techniques That Extend Appliance Life
The 5-minute rule prevents permanent stains. Rinse the jar and blade assembly within 5 minutes of use—dried smoothie residue hardens like concrete. For daily cleaning, fill the jar halfway with warm water and 1 drop of dish soap, then blend on Speed 3 for 20 seconds. Disassemble completely and hand-wash the sealing ring separately; this $2 part fails fastest when neglected.
Deep cleaning restores peak performance monthly. Soak the blade assembly in a 2:1 water-vinegar solution for 15 minutes to dissolve mineral deposits. Use a soft-bristled bottle brush to clean between blades—never use steel wool which damages stainless steel. For cloudy jars, blend 1 cup water with 2 tablespoons baking soda for 30 seconds, then rinse thoroughly. Wipe the motor base with a damp microfiber cloth only; moisture in vents causes permanent motor damage.
Performance Optimization for Daily Success
Ingredient prep shortcuts guarantee smooth results. Freeze ripe bananas in 1-inch chunks for creamier smoothies without added ice. Remove all fruit pits and seeds before blending—peach pits can shatter blades on contact. For fibrous greens like kale, blanch in boiling water for 30 seconds then plunge into ice water; this breaks down tough cellulose without losing nutrients.
Energy-saving tricks protect your motor. Cut frozen fruit into uniform 1-inch cubes instead of dumping whole bags into the jar. Thaw ice cream 10 minutes before making milkshakes—this reduces blending time by 60%. Always start on the lowest speed for 5 seconds to establish the vortex before ramping up. These small adjustments decrease motor heat by 25%, preventing premature wear.
Warranty Protection That Saves Hundreds
Registration within 30 days activates full coverage. Visit Oster’s website with your model number (found on the motor base) to register. This unlocks the full 10-year motor warranty versus the standard 3-year coverage. Keep your receipt digitally and physically—Oster requires proof of purchase for all claims. The most common voided warranties come from improper assembly or commercial use.
Authorized repairs prevent costly mistakes. Never attempt DIY blade replacement—the factory torque settings require specialized tools. For persistent overheating or loud grinding noises, call Oster’s service line at 1-800-334-0759 before disassembling. Their technicians diagnose 70% of issues over the phone, saving you unnecessary service fees. Remember: sealing rings and jars have separate 3-year warranties, so track purchase dates separately.
Mastering how to work an Oster blender starts with respecting its engineering—proper assembly prevents leaks, strategic ingredient loading avoids motor strain, and speed-specific protocols deliver professional results. Clean immediately after each use following the 5-minute rule, and your blender will outlast cheaper models by years. When in doubt, consult Oster’s digital manuals online for model-specific guidance before blending challenging ingredients. Implement these techniques consistently, and you’ll transform kitchen chaos into culinary confidence with every press of the power button.


